1. Introdução
Thank you for choosing an Electrolux appliance. This user manual provides essential information for the safe and efficient operation, installation, and maintenance of your Electrolux ESF2400OW countertop dishwasher. Please read these instructions carefully before using your appliance and keep them for future reference.
2. Informações de segurança
For your safety and to ensure correct use, before installing and first using the appliance, read this user manual carefully, including its hints and warnings. To avoid unnecessary mistakes and accidents, it is important to ensure that all people using the appliance are thoroughly familiar with its operation and safety features.
- Este aparelho é destinado somente para uso doméstico.
- Não permita que crianças brinquem com o aparelho.
- Sempre desconecte o aparelho da fonte de alimentação antes da limpeza ou manutenção.
- Não opere a máquina de lavar louça se o cabo de alimentação ou o plugue estiverem danificados.
- Garanta o aterramento adequado para segurança elétrica.
- Objetos cortantes devem ser colocados com as pontas voltadas para baixo para evitar ferimentos.
3. Produto acabadoview
The Electrolux ESF2400OW is a compact countertop dishwasher designed for efficient cleaning of up to 6 place settings. It features multiple wash programs and indicators for ease of use.
3.1 Componentes internos

Figura 1: Interior view with dish racks and cutlery basket. This image shows the upper and lower racks, along with the removable cutlery basket, designed for optimal loading of various dishware.

Figura 2: Interior view with the lower rack. The lower rack is suitable for larger plates and bowls, ensuring thorough cleaning.

Figure 3: Empty interior view. This shows the clean, stainless steel interior of the dishwasher, highlighting its compact design.

Figure 4: Close-up of the filter and spray arm. The central spray arm and filter system are crucial for effective cleaning and require regular maintenance.
4. Instalação e configuração
4.1 Desembalagem
Remova cuidadosamente todos os materiais de embalagem. Inspecione a máquina de lavar louça para verificar se houve danos durante o transporte. Informe imediatamente o revendedor sobre qualquer dano.
4.2 Posicionamento
Place the dishwasher on a stable, level countertop near a water supply, drain, and electrical outlet. Ensure there is adequate space for the door to open fully.
4.3 Conexão de Água e Esgoto
Connect the water inlet hose to a cold water tap. Connect the drain hose to a suitable drain point, ensuring it is securely fastened to prevent leaks. Refer to the diagram below for hose connections.

Figura 5: Traseira view with connections. This image illustrates the proper connection points for the water inlet hose (left), drain hose (right), and power cable (bottom center).
4.4 Conexão elétrica
Ligue o aparelho a uma tomada elétrica aterrada. Certifique-se de que a voltagem esteja correta.tage a frequência correspondem às especificações na placa de classificação.
5. Instruções de operação
5.1 Painel de controle
The dishwasher features a user-friendly control panel with buttons for program selection and an integrated display for cycle information. The control type is push-button.
5.2 Carregando a máquina de lavar louça
Load dishes according to the rack design, ensuring water can reach all surfaces. Place larger items in the lower rack and smaller items, glasses, and cups in the upper rack. Use the cutlery basket for forks, knives, and spoons.
5.3 Adição de detergente e abrilhantador
Add the appropriate amount of dishwasher detergent to the dispenser. Check the rinse aid indicator; if low, refill the rinse aid dispenser to ensure optimal drying performance and to prevent water spots.
5.4 Adding Dishwasher Salt
If your water is hard, add dishwasher salt to the dedicated compartment. The salt level indicator will illuminate when a refill is needed. Adjust the water softening setting based on your local water hardness.
5.5 Selecionando um programa de lavagem
Choose from the 6 available wash programs based on the soil level of your dishes. The integrated display will show the remaining wash time.
- Number of wash programs: 6
- Number of temperature settings: 4
- Cycle time: 150 minutes (average)
5.6 Iniciando um ciclo
Close the dishwasher door firmly. Press the start button to begin the selected wash program. The remaining time display will count down until the cycle is complete.
6. Manutenção e Cuidados
6.1 Limpando os Filtros
Regularly clean the filter system located at the bottom of the dishwasher tub (refer to Figure 4). Remove food particles and rinse under running water. Reassemble correctly to prevent damage and ensure efficient operation.
6.2 Limpeza dos braços de pulverização
Check the spray arms for clogged nozzles. If necessary, remove the spray arms and clean the holes with a thin object like a toothpick. Ensure they rotate freely after reinstallation.
6.3 Limpeza Externa
Limpe as superfícies externas da lava-louças com um pano macio e seco.amp pano. Não use produtos de limpeza abrasivos ou solventes.
6.4 Descalcificação
If you notice limescale buildup, use a dishwasher-safe descaling product according to its instructions. Ensure the salt dispenser is always filled if you have hard water.
7. Solução De Problemas
Antes de entrar em contato com o serviço de assistência técnica, verifique os seguintes problemas comuns e suas soluções:
| Problema | Possível causa | Solução |
|---|---|---|
| A máquina de lavar louça não liga | Problema na fonte de alimentação, porta não fechada corretamente, programa não selecionado. | Check power connection, ensure door is latched, select a wash program. |
| Os pratos não estão limpos | Carregamento incorreto, braços aspersores entupidos, detergente insuficiente, filtros entupidos. | Reabasteça os pratos, limpe os braços aspersores e os filtros, adicione mais detergente. |
| Manchas de água nos pratos | Low rinse aid level, hard water. | Refill rinse aid dispenser, ensure salt dispenser is filled and water softening is set correctly. |
| Vazamentos na máquina de lavar louça | Improper hose connection, damaged door seal. | Check hose connections for tightness, inspect door seal for damage. |
8. Especificações
Detailed technical specifications for the Electrolux ESF2400OW countertop dishwasher:
- Número do modelo: ESF2400OW
- Dimensões do produto (L x P x A): 55 x 50 x 43.8 cm
- Peso: 20.6 kg
- Capacidade: 6 lugares
- Classe de eficiência energética: A+ (old rating) / F (new rating)
- Consumo anual de energia: 174 kWh
- Consumo de Energia por Ciclo: 0.61 kWh
- Consumo Anual de Água: 1820 litros
- Consumo de Água por Ciclo: 6.5 litros
- Sistema de secagem: Condensação
- Nível de ruído: 50 dB (old rating) / 52 dB (new rating)
- Número de programas de lavagem: 6
- Número de configurações de temperatura: 4
- Tempo de ciclo: 150 minutes (average) / 3:50 (new rating)
- Tipo de controle: Apertar botões
- Material: Stainless steel (interior)
- Vol de entrada ACtage: 230 V
- Carga conectada: 1180 W
- Atual: 10 UMA
8.1 Rótulo Energético
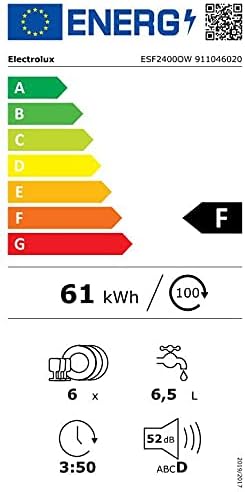
Figure 6: Energy Label for Electrolux ESF2400OW. This label provides key information on energy consumption, water usage, noise level, and capacity according to current EU standards.
8.2 Product Dimensions Diagram

Figure 7: Product Dimensions Diagram. This technical drawing provides precise measurements for installation planning.
9. Garantia e Suporte
Your Electrolux ESF2400OW dishwasher comes with a manufacturer's warranty. Please refer to the warranty card included with your purchase for specific terms and conditions. For technical support, spare parts, or service requests, please contact your local Electrolux customer service or visit the official Electrolux website.
When contacting support, please have your model number (ESF2400OW) and serial number ready.