Introdução
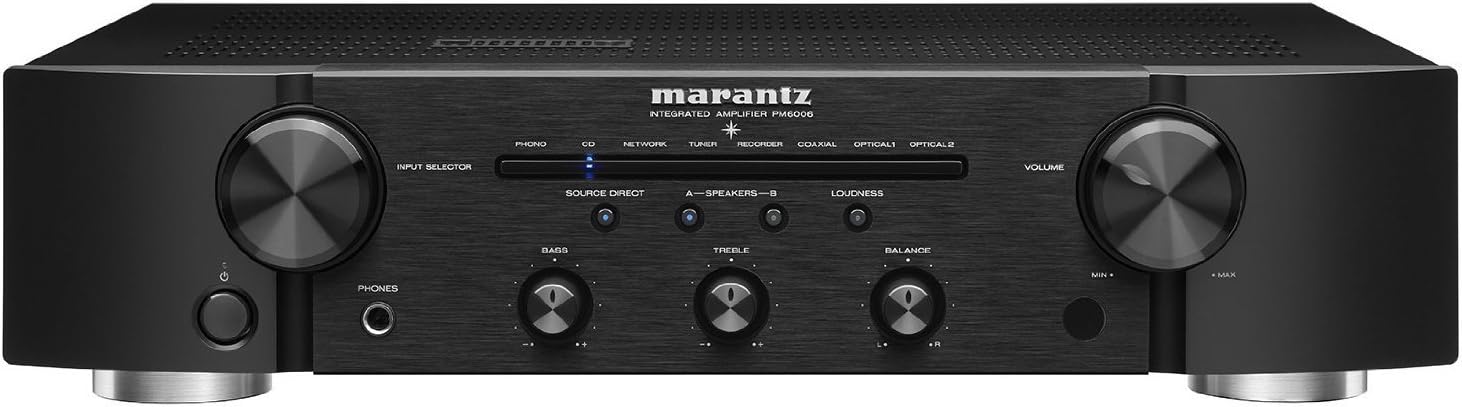
The Marantz PM6006 is an advanced integrated amplifier, serving as an upgraded successor to the acclaimed PM6005. This unit is designed to deliver superior sound quality from a wide range of audio sources, including high-resolution audio files. It features a high-current CS4398 DAC (24bit/192kHz), multiple digital inputs (2 optical, 1 coaxial), and a fully shielded digital section to prevent interference with analog signals. Key components include a lower impedance shielded Toroidal transformer, customized internal parts, and proprietary Marantz HDAM modules, all contributing to a powerful, dynamic, and detailed audio experience.
O que está na caixa
- Guia de início rápido
- CD-ROM (Owner's Manual)
- Instruções de segurança
- Garantia (para EUA/Canadá)
- Cabo de alimentação
- Remote control unit (RC003PMCD)
- Pilhas R03 / AAA
- Cabo de áudio
- Cabo conector remoto
Produto acimaview
Principais características
- Expanded Connection Possibilities: Upgraded for peak current at the ampmais vidatage, refining sound with greater detail.
- Flexible Operations: Features 3 digital inputs (1 coaxial, 2 optical), 5-line audio inputs including phono, and 45 watts per channel (45 x 2) suitable for medium-sized rooms.
- Wider Dynamic Range and Lower Audio Distortion: Enhanced audio clarity from various sources like CDs, turntables, and streaming audio. Includes high volume control, wide-bandwidth, and high-speed reproduction.
- Elegantly Crafted Precision Build Quality: Proprietary Marantz high-grade Hyper-Dynamic Amplifier Modules (HDAMs) provide powerful, dynamic, and detailed sound. A fully shielded extra metal housing prevents analog interferences.
- Efficient, Powerful, and Aesthetically Pleasing Upgrade: Built to handle peak currents at the ampmais vidatage with a massive energy reserve, encased in a cleaner design.
Guia visual


Vídeo do produto
Configurar
1. Desembalagem
Carefully remove the PM6006 from its packaging. Retain all packing materials for future transport or service.
2. Localização
Coloque o amplifier on a stable, level surface with adequate ventilation. Avoid direct sunlight, heat sources, and areas with high humidity or excessive vibration. Ensure sufficient space around the unit for proper airflow.
3. Conectando as caixas de som
The PM6006 features two pairs of gold-plated speaker connections (A and B) for bi-wiring or connecting two sets of speakers. Connect your speakers using high-quality speaker cables. Ensure correct polarity (+ to + and - to -) for each speaker and channel. For bi-wiring, remove the jumper bars on your speakers and connect separate cables for high and low frequencies to the corresponding terminals on the ampmais vivo.
4. Conectando fontes de áudio
Connect your audio sources to the appropriate input terminals on the rear panel:
- Entradas analógicas (RCA): Use for CD players, tuners, network players, recorders, and other analog devices. The PM6006 includes a dedicated PHONO input for turntables with MM (Moving Magnet) cartridges.
- Entradas digitais (óptica/coaxial): Connect digital audio sources such as TVs, Blu-ray players, or media streamers to the OPTICAL 1, OPTICAL 2, or COAXIAL inputs.
5. Conexão de energia
After all audio and speaker connections are made, connect the supplied power cord to the AC IN terminal on the rear panel and then to a wall outlet. Ensure the ampO interruptor de alimentação do amplificador deve estar na posição DESLIGADO antes de ser conectado à energia.
6. Ligação inicial
Press the power button on the front panel or the remote control to turn on the amplifier. The power indicator will illuminate.
Instruções de operação
1. Operação básica
- Ligar/desligar: Press the power button on the front panel or the remote control.
- Controle de volume: Rotate the large VOLUME knob on the front panel or use the VOLUME +/- buttons on the remote control to adjust the sound level.
2. Seleção de entrada
Use the INPUT SELECTOR knob on the front panel or the corresponding input buttons on the remote control (e.g., PHONO, CD, NETWORK, TUNER, RECORDER, COAXIAL, OPTICAL 1, OPTICAL 2) to choose your desired audio source.
3. Controles de tom
Adjust the BASS and TREBLE knobs on the front panel to fine-tune the low and high frequency response. The BALANCE knob allows you to adjust the left/right channel balance.
4. Source Direct Mode
Press the SOURCE DIRECT button to bypass the tone control circuits, providing the purest possible audio signal path for critical listening.
5. Uso de fones de ouvido
Connect headphones to the PHONES jack on the front panel. When headphones are connected, speaker output will be muted.
6. Digital Audio Playback
When playing digital audio sources connected to the optical or coaxial inputs, the PM6006's internal DAC will process the signal for high-quality sound reproduction.
7. Phono Input
For turntables with a Moving Magnet (MM) cartridge, connect to the PHONO input. Ensure the turntable's ground wire is connected to the GND terminal on the ampAmplificador para minimizar o ruído.
8. Controle remoto
The supplied remote control (RC003PMCD) allows for convenient operation of the amplifier from a distance. It also provides control over other compatible Marantz components.
Manutenção
1. Limpeza
To clean the unit, wipe the exterior surfaces with a soft, dry cloth. Do not use abrasive cleaners, waxes, or solvents as they may damage the finish. Ensure the unit is powered off and unplugged before cleaning.
2. Armazenamento
Se armazenar o amplifier for an extended period, disconnect it from the power outlet and all connected devices. Store it in a cool, dry place, ideally in its original packaging to protect it from dust and physical damage.
Solução de problemas
If you experience issues with your Marantz PM6006, please refer to the following common troubleshooting steps:
- Sem energia: Verifique se o cabo de alimentação está firmemente conectado a ambas as tomadas. amplifier and the wall outlet. Ensure the power button is pressed.
- Sem som: Verify that the correct input source is selected. Check all speaker connections for proper polarity and secure fit. Ensure the volume is not set to minimum or muted. If headphones are connected, disconnect them to enable speaker output.
- Som distorcido: Check speaker connections for loose wires or short circuits. Ensure the audio source is not overdriving the input. Try reducing the volume.
- Controle remoto não funciona: Check the batteries in the remote control and replace them if necessary. Ensure there are no obstructions between the remote and the ampsensor remoto do amplificador.
- Zumbido: For phono input, ensure the turntable's ground wire is properly connected to the amplifier's GND terminal. Check for interference from other electronic devices.
If the problem persists after trying these steps, consult the full owner's manual on the supplied CD-ROM or contact Marantz customer support.
Especificações
- Dimensões do produto: 17.3 x 14.14 x 4.14 polegadas
- Peso do item: 17.3 libras
- Fabricante: Marantz
- ASIN: B01FWM4A0G
- Número do modelo do item: PM6006
- Baterias: 2 AAA batteries required (for remote control)
- Data da primeira disponibilidade: 19 de maio de 2016
Garantia e Suporte
The Marantz PM6006 Integrated Amplifier comes with a manufacturer's warranty. Please refer to the warranty information provided in the box or on the supplied CD-ROM for specific terms and conditions applicable to your region (USA/CANADA). For technical support, service, or additional product information, please visit the official Marantz website or contact your authorized Marantz dealer.
Você também pode visitar o Loja Marantz na Amazon Para mais produtos e informações.


