1. Introdução
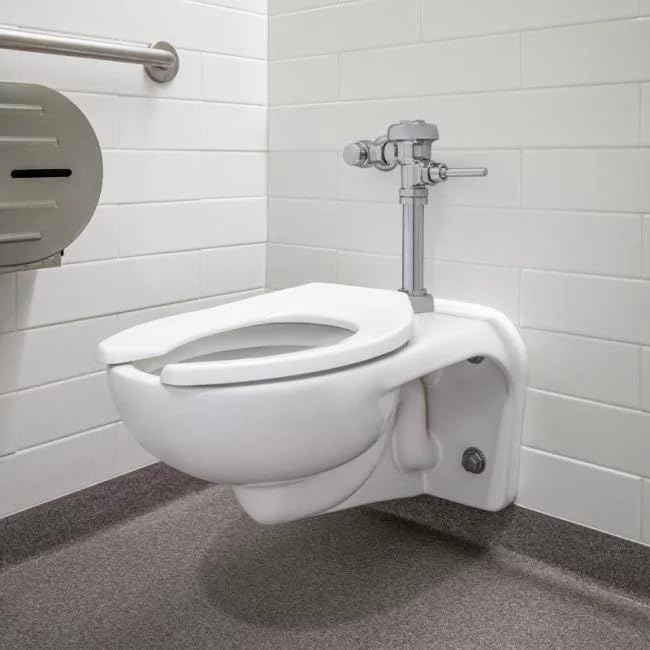
This manual provides detailed instructions for the installation, operation, maintenance, and troubleshooting of the Sloan Regal 186 Exposed Manual Urinal Flushometer. Designed for commercial applications, this flushometer offers reliable performance and water conservation with its 0.125 Gallons Per Flush (GPF) rate. It features a durable brass construction with a polished chrome finish, ensuring longevity and a professional appearance in high-traffic restrooms.
Key features include a non-hold-open handle to prevent excessive water use, a vacuum breaker flush connection for hygienic operation, and ADA compliance for accessibility.
2. Informações de segurança
Always ensure the main water supply is turned off before attempting any installation, maintenance, or repair. Wear appropriate personal protective equipment (PPE) such as safety glasses and gloves. If you are unsure about any step, consult a qualified plumber. This product is intended for commercial use and should be installed in accordance with local plumbing codes and regulations.
3. Componentes Sobreview
The Sloan Regal 186 Flushometer consists of several key components:
- Corpo principal: Houses the internal flushing mechanism.
- Non-Hold-Open Handle: Manual lever for initiating a flush cycle.
- Control Stop Plug: Allows for water flow adjustment and shut-off for maintenance.
- Vacuum Breaker Flush Connection: Prevents backflow into the water supply.
- Sweat Solder Adapter: For secure connection to the water supply.
- Cast Wall Flange: Provides stable mounting to the wall.
- 3/4" I.P.S. Screwdriver Bak-Chek Angle Stop: For precise water flow control and shut-off.


4. Instalação
Proper installation is crucial for optimal performance. Ensure all necessary tools and components are available before beginning.
4.1 Etapas de pré-instalação
- Turn off the main water supply to the urinal.
- Flush the urinal to relieve any remaining water pressure.
- Remove any existing flushometer or plumbing.
4.2 Mounting the Flushometer
- Position the flushometer on the urinal, aligning the spud connection.
- Secure the flushometer to the wall using the provided cast wall flange and set screw. Ensure it is level and stable.
- Connect the water supply line to the 3/4" I.P.S. screwdriver Bak-Chek angle stop. Use the sweat solder adapter for a secure, leak-free connection.
- Attach the vacuum breaker flush connection to the urinal's top spud.

5. Instruções de operação
The Sloan Regal 186 Flushometer is designed for simple and consistent operation.
- Once installation is complete and the water supply is restored, the flushometer is ready for use.
- To activate a flush, firmly push the non-hold-open handle. The handle will return to its original position automatically after initiating the flush cycle.
- The non-hold-open feature ensures that only the pre-set amount of water (0.125 GPF) is used per flush, promoting water conservation.
5.1 Demonstração Operacional
6. Manutenção
Regular maintenance ensures the longevity and efficient operation of your Sloan Regal 186 Flushometer.
6.1 Limpeza
Clean the exterior chrome finish regularly with a soft cloth and mild, non-abrasive cleaner to maintain its luster. Avoid harsh chemicals that can damage the finish.
6.2 Water Flow Adjustment
The control stop plug allows for adjustment of the water flow. If the flush is too weak or too strong, you can adjust this plug using a screwdriver. Turn clockwise to decrease flow, counter-clockwise to increase flow. Always make small adjustments and test the flush after each change.
6.3 Internal Component Check
Periodically inspect the internal components, such as the diaphragm, for wear or debris. If the valve becomes 'gummed up' with sand or other particles, it may cause continuous flushing or prevent proper operation. In such cases, the control stop plug can be used to shut off water, allowing for disassembly and cleaning of the internal parts. Refer to the manufacturer's detailed service manual for specific disassembly and reassembly instructions.
7. Solução De Problemas
Abaixo estão listados os problemas mais comuns e suas possíveis soluções:
| Problema | Possível causa | Solução |
|---|---|---|
| Sem descarga ou descarga fraca | Low water pressure; clogged inlet; diaphragm issue. | Check building water pressure. Clean or replace the inlet screen. Inspect and clean/replace diaphragm. |
| Lavagem contínua | Debris in the diaphragm assembly; worn diaphragm. | Turn off water at the control stop. Disassemble and clean the diaphragm. Replace if worn. |
| Leaking from handle | Worn packing or seals around the handle. | Replace the handle packing or seals. |
8. Especificações
| Recurso | Detalhe |
|---|---|
| Número do modelo | 3982604 |
| Volume de descarga | 0.125 GPF (Galões por Descarga) |
| Material | Latão |
| Terminar | Cromo polido |
| Tipo de alça | Manual, Non-Hold-Open, ADA Compliant |
| Tipo de conexão de entrada | Batata de cima |
| Tipo de conexão de saída | Fixação Top Spud |
| Dimensões do item (C x L x A) | 9.75 x 9.13 x 4.38 polegadas |
| Peso do item | 5 libras |
| Certificações | ADA, ANSI, ASSE |
| UPC | 671254396876 |
9. Garantia e Suporte
For warranty information, technical support, or to purchase replacement parts, please contact Sloan directly through their official website ou canais de atendimento ao cliente. Guarde o comprovante de compra para solicitações de garantia.