1. Introdução
The Melnor 73280 Digital 4-Zone Electronic Water Hose Timer provides flexible and efficient control over your outdoor watering needs. Designed for durability and ease of use, this timer allows you to customize watering schedules for up to four independent zones, ensuring optimal hydration for different areas of your garden or lawn.
Principais características:
- Programação flexível: Set up to 4 watering cycles per day, each with its own start time and duration, on specific days of the week.
- 4 Independent Zones: Control watering for up to four separate areas, each with unique scheduling.
- Grande display digital: A 25% larger rectangular screen provides clear information for easy setup and programming.
- Rega manual: Easily activate any zone for immediate watering without affecting programmed schedules.
- Função de atraso por chuva: Pause watering for up to 7 days to conserve water during rainy periods. The program resumes automatically after the delay.
- Low Battery Consumption: A new set of AA alkaline batteries (not included) can last up to 6 months. Watering programs are retained during battery changes.
Video 1: Melnor 73280 Product Overview. This video provides a brief visual introduction to the Melnor 73280 Digital 4-Zone Electronic Water Hose Timer, highlighting its main features and design.
2. Configuração
2.1. Instalação da bateria
- Localize o compartimento da bateria na parte traseira do temporizador.
- Deslize a bandeja da bateria para fora.
- Insert two (2) new AA alkaline batteries (not included), ensuring correct polarity (+/-).
- Slide the battery tray back into the timer until it clicks securely.
2.2. Attaching the Timer to Your Faucet
- Certifique-se de que a torneira externa esteja fechada.
- Thread the timer's brass inlet connector onto your faucet. Hand-tighten firmly to prevent leaks.
- Attach your garden hoses to the desired zone outlets (1-4) at the bottom of the timer.
- Slowly turn on your outdoor faucet. The timer is designed to withstand water pressure, but sudden surges should be avoided.
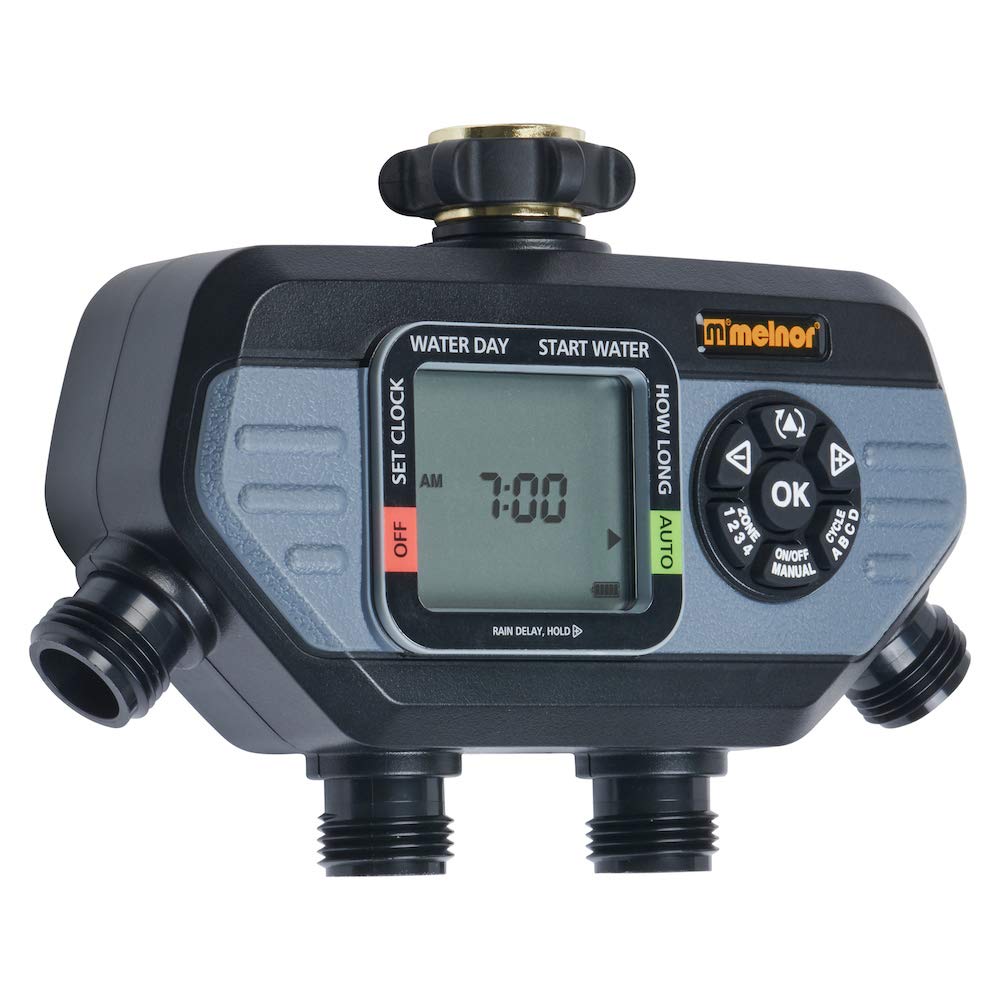
Image 1: The Melnor 73280 timer securely attached to an outdoor faucet, demonstrating the connection points for multiple hoses.
2.3. Initial Time and Day Setting
- Turn the dial to "SET CLOCK".
- Use the arrow buttons to adjust the current time (AM/PM). Press "OK" to confirm.
- Use the arrow buttons to select the current day of the week. Press "OK" to confirm.
- Turn the dial back to "AUTO" to save settings and return to automatic operation.
3. Operação
3.1. Programming Watering Cycles
- Turn the dial to "START TIME".
- Use the "ZONE" button to select the zone (1-4) you wish to program.
- Use the arrow buttons to set the desired start time for the first cycle. Press "OK" to confirm.
- Turn the dial to "HOW LONG". Use the arrow buttons to set the watering duration for the selected zone. Press "OK" to confirm.
- Turn the dial to "HOW OFTEN". Use the arrow buttons to set the frequency (e.g., every day, every other day, specific days). Press "OK" to confirm.
- Repeat steps for additional cycles (up to 4 per zone) or other zones as needed.
- Turn the dial back to "AUTO" to activate your programmed schedules.
3.2. Rega manual
To manually water a zone without affecting your programmed schedule:
- Ensure the dial is set to "AUTO".
- Press the "MANUAL" button.
- Use the "ZONE" button to select the desired zone (1-4).
- Use the arrow buttons to set the desired manual watering duration. Press "OK" to start watering.
- To stop manual watering, press "MANUAL" again or turn the dial to "OFF" and then back to "AUTO".
3.3. Função de Retardo por Chuva
Para interromper temporariamente a rega devido à chuva:
- Ensure the dial is set to "AUTO".
- Press and hold the "DELAY +" button for 3-5 seconds.
- Use the arrow buttons to select the desired delay duration (e.g., 24 hours, 48 hours, up to 7 days). Press "OK" to confirm.
- The timer will automatically resume its programmed schedule after the selected delay period.
- To cancel the rain delay early, press and hold "DELAY +" again until the delay is cleared.
4. Manutenção
4.1. Substituição da bateria
The timer will display a low battery indicator when replacement is needed. Programs are retained during battery changes.
- Slide out the battery tray from the back of the timer.
- Remove old batteries and insert two (2) new AA alkaline batteries, observing polarity.
- Reinsert the battery tray securely.
4.2. Limpeza da tela do filtro
Periodically check and clean the filter screen located in the brass inlet to prevent debris from affecting water flow and timer operation.
- Turn off the outdoor faucet and disconnect the timer.
- Carefully remove the filter screen from the brass inlet.
- Rinse the screen under running water to remove any accumulated debris.
- Reinsira a tela do filtro limpa e reconecte o temporizador à torneira.
5. Solução De Problemas
| Problema | Possível causa | Solução |
|---|---|---|
| Timer not watering / No water flow |
|
|
| Water flowing when off / Valve stuck open |
|
|
| Water leaking from faucet connection |
|
|
| Water leaking from zone outlets |
|
|
| O temporizador não responde |
|
|
Video 2: Melnor HydroLogic 2-Zone Digital Water Timer 73100. While this video features a 2-zone model, it demonstrates similar programming and operational principles that can be applied to the 4-zone timer.
6. Especificações
- Número do modelo: 73280
- Marca: melnor
- Cor: Preto/Cinza
- Material: Plástico
- Dimensões do produto: 5.7"P x 8.26"L x 2.67"A
- Peso do item: 1.06 libras
- Número de zonas: 4
- Fonte de energia: 2 pilhas alcalinas AA (não incluídas)
- Código UPC: 042206732804
7. Garantia e suporte
The Melnor 73280 Digital 4-Zone Electronic Water Hose Timer is backed by a Melnor 7-Year Limited Warranty. Melnor stands behind its products and values your experience. For any questions, feedback, or support needs, please refer to the contact information provided in your product packaging or visit the official Melnor website.
Informações importantes: Este produto pode expô-lo a produtos químicos, incluindo o estireno, que é conhecido pelo estado da Califórnia por causar câncer. Para obter mais informações, vá para www.P65Warnings.ca.gov. For outdoor use only.


