1. Introdução
This manual provides detailed instructions for the setup, operation, and maintenance of your myTouchSmart Indoor Plug-in Simple Set Digital Timer, Model 26892-T5. Please read this manual thoroughly before using the device to ensure proper function and safety.
The myTouchSmart Digital Timer is designed to automate indoor lighting and electronics, allowing you to schedule their operation for convenience and energy efficiency.
2. Produto acabadoview
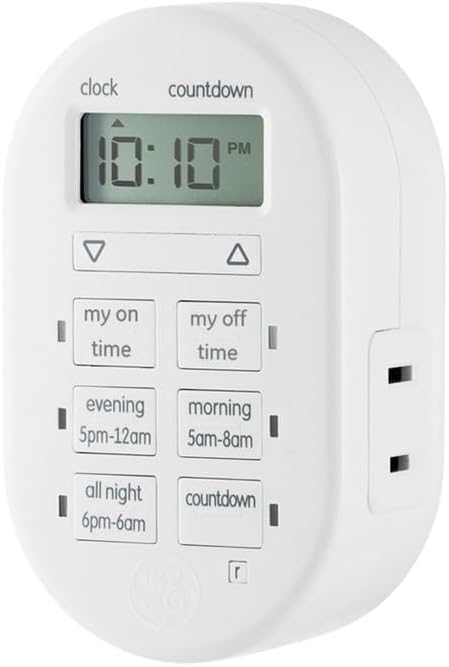
Figura 1: Frente view of the myTouchSmart Indoor Plug-in Simple Set Digital Timer. The device is white, oval-shaped, with a digital display at the top showing "10:10 PM". Below the display are two arrow buttons (up and down). Further down are six rectangular buttons arranged in two columns: "my on time", "my off time", "evening 5pm-12am", "morning 5am-8am", "all night 6pm-6am", and "countdown". A polarized outlet is visible on the right side.
The myTouchSmart Digital Timer features a compact design with a clear digital display and intuitive control buttons. It includes a single polarized outlet for connecting your device.
Componentes principais:
- Tela digital: Shows current time, program settings, and countdown status.
- Setas para cima/baixo: Utilizado para ajustar as configurações de hora e programação.
- "My On Time" Button: Sets a custom turn-on time.
- "My Off Time" Button: Sets a custom turn-off time.
- Botões predefinidos: "Evening (5pm-12am)", "Morning (5am-8am)", "All Night (6pm-6am)" for quick scheduling.
- "Countdown" Button: Activates a countdown timer.
- Polarized Outlet: For connecting the appliance or light to be controlled.
- Indicadores LED azuis: Show active programs.
3. Características
- Easy-to-set digital timer for indoor lighting and electronics.
- Flexible scheduling options including custom daily On/Off times.
- Three available daily presets: Evening (5pm-12am), Morning (5am-8am), or All Night (6pm-6am).
- Customizable countdown feature (up to 24 hours in 1-minute intervals).
- Blue LED indicators show active programs.
- Large LCD screen for effortless viewindo.
- One (1) polarized outlet.
- Compatible with LED, CFL, Incandescent, and Halogen bulbs, including dimmable LED and CFL bulbs.
- Backup battery saves timer settings during power outages or disconnections.
4. Configuração
4.1 Inicialização
- Unpack the timer from its packaging.
- Plug the timer into a standard 125V wall outlet. The display will illuminate.
- Allow the timer to charge its internal backup battery for approximately 15 minutes before programming. This ensures settings are retained during power interruptions.
4.2 Ajustando a hora atual
- Pressione e segure o RELÓGIO button (located above the display) until the time digits begin to flash.
- Use o UP (▲) e ABAIXO (▼) arrow buttons to adjust the hour. Pay attention to the AM/PM indicator.
- Pressione o RELÓGIO button again to move to the minutes setting.
- Use o UP (▲) e ABAIXO (▼) arrow buttons to adjust the minutes.
- Pressione o RELÓGIO button one more time to save the current time and exit the setting mode.
5. Instruções de operação
Connect the appliance or light you wish to control into the polarized outlet on the right side of the timer.
5.1 Setting Custom On/Off Times ("My On Time" / "My Off Time")
- Pressione o MY ON TIME button. The display will show "ON" and the time will flash.
- Use o UP (▲) e ABAIXO (▼) arrow buttons to set the desired turn-on hour, then press MY ON TIME again to set minutes.
- Once the desired ON time is set, press MY ON TIME to confirm. A blue LED indicator next to the button will light up, indicating the program is active.
- Repeat the process for the MY OFF TIME button to set the desired turn-off time. A blue LED indicator next to the button will light up.
- To deactivate a custom program, press the corresponding MY ON TIME or MY OFF TIME button until the blue LED indicator turns off.
5.2 Utilizando programas predefinidos
The timer offers three convenient preset programs:
- EVENING (5pm-12am): Turns on at 5:00 PM and off at 12:00 AM.
- MORNING (5am-8am): Turns on at 5:00 AM and off at 8:00 AM.
- ALL NIGHT (6pm-6am): Turns on at 6:00 PM and off at 6:00 AM.
To activate a preset program, simply press the corresponding button (NOITE, MANHÃ, ou ALL NIGHT). A blue LED indicator next to the button will light up, confirming the program is active. To deactivate, press the button again until the LED turns off.
5.3 Utilizando o temporizador de contagem regressiva
- Pressione o CONTAGEM REGRESSIVA button. The display will show "CD" and the time will flash.
- Use o UP (▲) e ABAIXO (▼) arrow buttons to set the desired countdown duration (up to 24 hours, in 1-minute intervals).
- Imprensa CONTAGEM REGRESSIVA again to start the countdown. The blue LED indicator will light up.
- The connected device will turn ON (if currently OFF) or OFF (if currently ON) after the countdown duration expires.
- Para cancelar a contagem regressiva, pressione o CONTAGEM REGRESSIVA button again until the blue LED indicator turns off.
Note: Only one program (custom or preset) can be active at a time. Activating a new program will deactivate any previously active program. The countdown timer operates independently but will override other programs for its duration.
6. Manutenção
6.1 Limpeza
To clean the timer, unplug it from the wall outlet. Use a soft, dry cloth to wipe the exterior. Do not use liquid cleaners or abrasive materials, as these may damage the device.
6.2 Reserva de bateria
The timer includes an internal backup battery to retain settings during power outages. This battery is not user-replaceable and is designed to last the lifetime of the product. Ensure the timer is plugged in for at least 15 minutes initially to charge this battery.
7. Solução De Problemas
| Problema | Possível causa | Solução |
|---|---|---|
| O visor do cronômetro está em branco. | A tomada não tem energia. | Check the wall outlet with another device. Ensure the timer is fully plugged in. |
| Connected device does not turn On/Off. | Program not active or incorrect settings. | Verify the blue LED indicator for the desired program is lit. Recheck your custom or preset time settings. Ensure the connected device is switched ON. |
| As configurações são perdidas após a queda de energiatage. | Backup battery not sufficiently charged. | Ensure the timer is plugged in for at least 15 minutes to charge the backup battery. If issues persist, the battery may be depleted (not user-replaceable). |
| Timer is not responding to button presses. | Falha temporária de software. | Unplug the timer from the wall outlet for 30 seconds, then plug it back in. This may reset the device. |
8. Especificações
- Número do modelo: 26892-T5
- Marca: meuTouchSmart
- Cor: Branco
- Classificações elétricas: 125V, 50/60 Hz, 15A 1875W General Purpose / Resistive, 10A 1250W Tungsten, ½ HP
- Dimensões do produto: 2.55 x 5.92 x 7.3 polegadas
- Peso do item: 4 onças
- Tipo de saída: 1 Tomada Polarizada
- Compatibilidade: LED, CFL, Incandescent, Halogen bulbs (including dimmable LED/CFL)
- Certificações: Listado pela UL
9. Garantia e Suporte
9.1 Garantia limitada
This myTouchSmart Digital Timer is backed by a garantia limitada de um ano. For details regarding warranty coverage and claims, please refer to the warranty card included with your product or visit the manufacturer's official website.
9.2 Suporte ao cliente
For technical assistance, troubleshooting not covered in this manual, or general inquiries, please contact myTouchSmart customer support. Contact information can typically be found on the product packaging or the official myTouchSmart website.
Please have your model number (26892-T5) and purchase date available when contacting support.


