1. Introdução
This manual provides essential instructions for the safe and efficient operation of your Automatic Mini Double Station Mug Heat Press Transfer Machine. Please read this manual thoroughly before use to ensure proper setup, operation, and maintenance.
This machine is designed for sublimation printing on various mug sizes, featuring a double station design for increased efficiency.
2. Instruções de segurança
- Utilize sempre a máquina sobre uma superfície estável e resistente ao calor.
- Keep hands clear of heating elements during operation to prevent burns.
- Garanta ventilação adequada na área de trabalho.
- Do not expose the machine to water or excessive moisture.
- Desligue o aparelho da tomada quando não estiver em uso ou antes de limpá-lo/realizá-lo com manutenção.
- Não tente modificar ou reparar a máquina por conta própria. Contate pessoal qualificado para assistência técnica.
- Mantenha crianças e animais de estimação afastados da máquina em funcionamento.
3. Conteúdo da embalagem
Verifique se todos os itens estão presentes na embalagem:
- 1x Double Mug Heat Press Machine
- 1x Manual do Usuário em Inglês (este documento)
- 2x 11oz Heating Pads (pre-installed or included separately)
Caso algum item esteja faltando ou danificado, entre em contato com o suporte ao cliente.
4. Configuração
- Desembalagem: Carefully remove the heat press machine from its packaging. Retain packaging for future storage or transport.
- Colocação: Place the machine on a flat, stable, and heat-resistant surface. Ensure there is adequate space around the machine for ventilation and safe operation.
- Conexão de energia: Ensure the machine's power switch is in the OFF position. Plug the machine into a standard 110V AC power outlet.
- Inspeção inicial: Before first use, inspect the heating pads and control panel for any visible damage.

Figura 1: Frente view of the Double Mug Heat Press Machine. This image shows the overall design with two mug stations and the central control panel.
5. Instruções de operação
5.1 Painel de controle sobreview

Figure 2: Close-up of the LCD control panel. The panel features an LCD display for temperature and time, along with buttons for timing, temperature adjustment, and mode selection for left and right stations.
The machine features an LCD control panel for setting temperature and time. It allows for independent control of each mug station.
5.2 Etapas básicas de operação
- Ligar: Ligue o interruptor principal de energia. O visor LCD acenderá.
- Temperatura definida: Use the temperature adjustment buttons (often indicated by '+' and '-' or specific temperature setting buttons) to set the desired transfer temperature. The recommended transfer temperature is 180°C (356°F).
- Definir hora: Use the timing adjustment buttons to set the desired transfer time. The recommended transfer time is 90 seconds.
- Pré-aqueça: Allow the machine to preheat until it reaches the set temperature. The display will show the current temperature.
- Prepare a caneca: Wrap your sublimation print around the mug, securing it with heat-resistant tape. Ensure the print is flat against the mug surface.
- Insert Mug: Carefully place the prepared mug into the heating pad of one or both stations. Ensure the mug is centered and the heating pad fully encompasses the printed area.
- Aplicar pressão: Feche a clamp handle to apply even pressure to the mug. The machine is designed to accommodate various mug sizes (6OZ, 9OZ, 11OZ, 12OZ, 17OZ) with appropriate heating pads.
- Iniciar transferência: Press the start button (often labeled 'Timing' or 'Start') for the respective station. The timer will begin counting down.
- Remove Mug: Once the timer reaches zero, carefully open the clamp handle and remove the hot mug using heat-resistant gloves.
- Esfriar: Place the mug on a heat-resistant surface to cool. Once cool, carefully remove the sublimation paper.

Figure 3: A mug correctly positioned within the heating element of the heat press machine, ready for the sublimation process.
5.3 Workflow Diagram
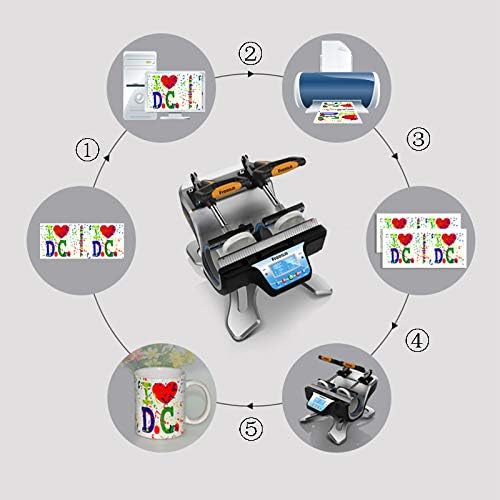
Figure 4: A visual representation of the sublimation printing process, from designing and printing the image to pressing it onto the mug and the final result.
5.4 Replacing Heating Pads
The heating pads are replaceable to accommodate different mug sizes. The machine includes two 11oz heating pads. For other sizes, contact customer support.

Figura 5: Uma análise detalhada view of the heating element, showing its construction and how it secures the mug for heat transfer.
- Desligue e desconecte: Ensure the machine is turned off and unplugged from the power source. Allow the heating pads to cool completely.
- Solte os fixadores: Locate the fasteners securing the heating pad to the machine frame. Loosen or remove them as required.
- Disconnect Pad: Carefully disconnect the electrical connector for the heating pad.
- Remova a almofada antiga: Slide out the old heating pad.
- Instalar novo pad: Insert the new heating pad, ensuring it is correctly aligned.
- Conecte-se e proteja-se: Reconnect the electrical connector and secure the heating pad with the fasteners.
- Teste: Plug in the machine and perform a test run to ensure the new heating pad functions correctly.
6. Manutenção
- Limpeza: After each use, ensure the machine is cool and unplugged. Wipe down the exterior surfaces with a soft, dry cloth. Do not use abrasive cleaners or solvents.
- Heating Pad Care: Inspect heating pads regularly for wear or damage. Replace if necessary to ensure consistent heat transfer.
- Armazenar: Armazene a máquina em um ambiente seco e livre de poeira quando não estiver em uso.
7. Solução De Problemas
| Problema | Possível causa | Solução |
|---|---|---|
| A máquina não liga. | Não está conectado à tomada; interruptor desligado; tomada com defeito. | Verifique a conexão do cabo de alimentação; certifique-se de que o interruptor de energia esteja LIGADO; teste a tomada com outro aparelho. |
| Temperature not reaching set value. | Configuração de temperatura incorreta; elemento de aquecimento defeituoso. | Verify temperature setting; allow more time for preheating; contact support if issue persists. |
| Uneven transfer results. | Uneven pressure; worn heating pad; incorrect mug placement. | Ensure mug is centered and clamp is fully engaged; inspect heating pad for wear; ensure print is flat on mug. |
| O temporizador não está funcionando. | Incorrect operation; control panel issue. | Review operating instructions for timer activation; contact support. |
8. Especificações
| Modelo | Automatic Mini Double Station Mug Heat Press Transfer Machine |
| Compatible Mug Sizes | 6OZ, 9OZ, 11OZ, 12OZ, 17OZ |
| Volumetage | 110V |
| Poder | 280W + 280W (Total 560W) |
| Transfer Temperature | 180°C (356°F) |
| Tempo de transferência | 90 Seconds (Adjustable) |
| Modelo de controle | Controle de LCD |
| Peso | 14.6 libras (7.2 kg) |
| Dimensões gerais | 14.5" x 12" x 13.38" (37 x 30.6 x 34 cm) |
| Tipo de plugue | Plugue dos EUA |
9. Garantia e Suporte
No specific warranty information is provided with this product. For technical support, replacement parts (such as different sized heating pads), or any operational questions, please refer to the seller or manufacturer's contact information provided at the point of purchase.


