1. Introdução
This manual provides essential information for the installation, operation, and maintenance of your Helix 706622 Column Shift. Designed for high-quality steering performance, this compact column features reinforced tubing, 3-position tilt, and integrated controls for a seamless driving experience. Please read this manual thoroughly before beginning installation or operation to ensure proper function and safety.
2. Produto acabadoview
2.1 Principais Características
- Shift Style: Column Shift
- Shift Pattern: 4 Speed Auto
- Acabamento da coluna: Preto
- Função de inclinação: Yes, 3-position tilt
- Keyed: No (Designed for push-button start and RFID systems)
- Reinforced column tubing for durability.
- Billet steering column dress-up kit.
- Integrated steering wheel horn button and hazard button.
- Machined splined steering wheel input.
- Engineered based on the GM tilt column design for reliable performance.
- Compatible with "One Touch Push Button Start" and RFID Hands-Free Security systems (sold separately).
2.2 Conteúdo da embalagem
The Helix 706622 Column Shift package includes the main column assembly and all necessary components for installation.
- Helix 706622 Column Shift Assembly (Black, Tilt)
- Associated wiring harness
- Suporte de montagem no chão
- Steering wheel adapter/hub (if included in "Kit And Componets")
- RFID module and key fobs (if included in "Kit And Componets")
- Push button start switch (if included in "Kit And Componets")
- Hardware de instalação
2.3 Diagrama do produto
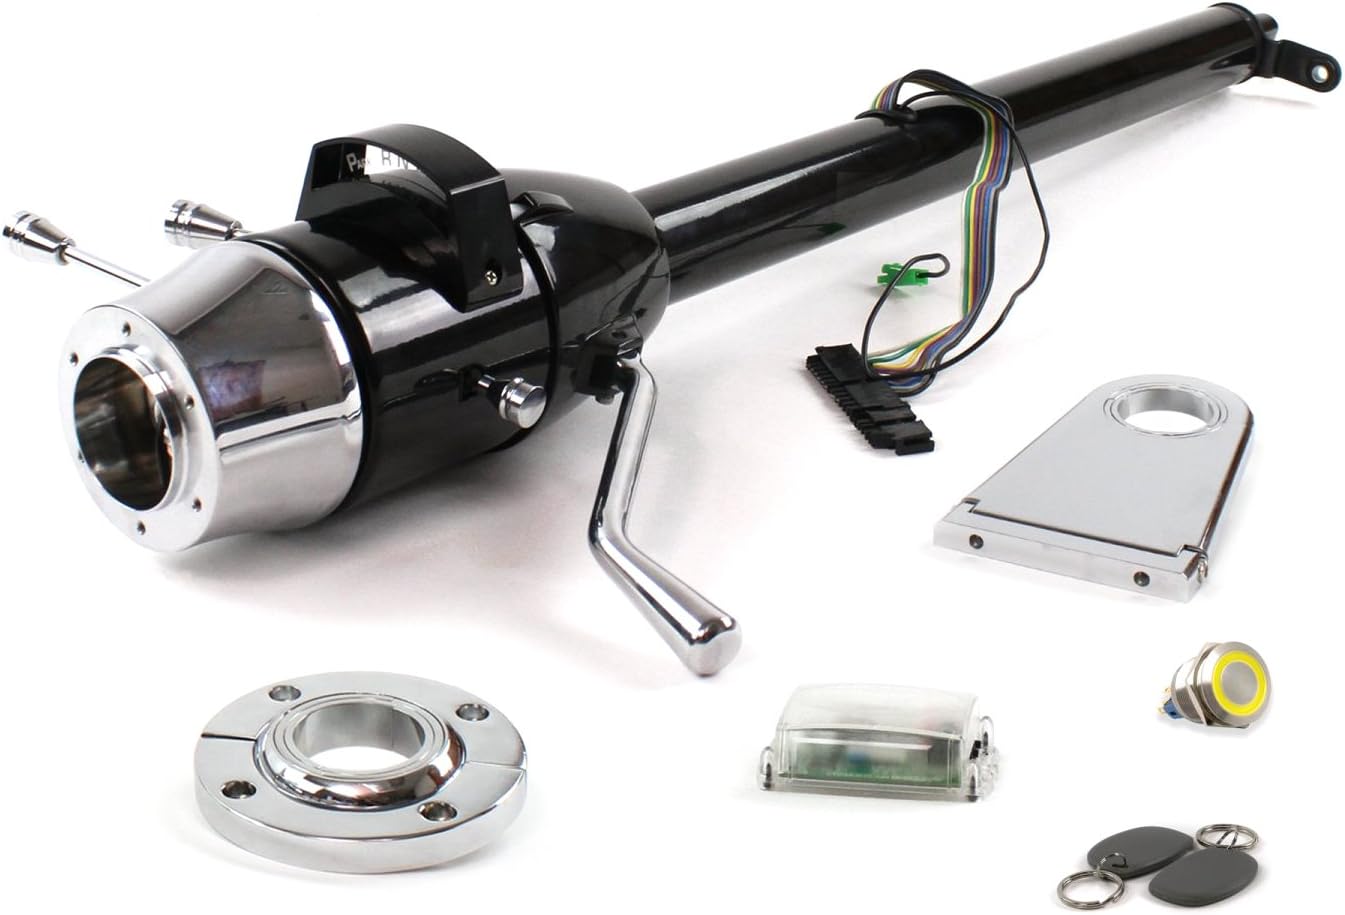
Figura 1: Sobreview of the Helix 706622 Column Shift and included components. This image displays the main black tilt steering column, a chrome floor mount bracket, a clear RFID module, a yellow-ringed push-button start switch, and two black RFID key fobs.
3. Configuração e instalação
Installation of the Helix 706622 Column Shift requires mechanical aptitude and familiarity with automotive electrical systems. It is highly recommended that installation be performed by a qualified professional. Always disconnect the vehicle's battery before beginning any electrical work.
3.1 Lista de verificação de pré-instalação
- Verifique se todos os componentes listados na Seção 2.2 estão presentes e sem danos.
- Certifique-se de que a bateria do veículo esteja desconectada.
- Gather necessary tools (e.g., wrenches, screwdrivers, wire strippers, multimeter).
- Review vehicle-specific wiring diagrams if integrating with existing systems.
3.2 Mounting the Column
- Carefully remove the existing steering column, if applicable, following vehicle manufacturer guidelines.
- Position the Helix column in the desired location, ensuring proper clearance for tilt and shift mechanisms.
- Secure the column using the provided floor mount bracket and hardware. Ensure the column is firmly mounted and aligned.
- Connect the steering shaft to the column's input spline.
3.3 conexões elétricas
- Connect the column's wiring harness to the vehicle's electrical system. This includes connections for turn signals, horn, hazard lights, and ignition (if applicable). Refer to the detailed wiring diagram provided with the product for specific wire functions and colors.
- If using the "One Touch Push Button Start" system, connect the push button switch according to its specific instructions.
- If integrating the RFID Hands-Free Security system, follow the RFID module's installation guide for wiring and programming the key fobs.
- Certifique-se de que todas as conexões estejam seguras e devidamente isoladas para evitar curtos-circuitos.
3.4 Verificações pós-instalação
- Reconecte a bateria do veículo.
- Test all electrical functions: turn signals, horn, hazard lights, and brake lights.
- Verify the column shift mechanism operates smoothly through all gears.
- Test the tilt function to ensure it locks securely in all three positions.
- If installed, test the push-button start and RFID system for proper vehicle ignition and security.
- Check for any abnormal noises or movements during operation.
4. Operação
4.1 Column Shift Operation
The column shift lever allows you to select the desired gear for your 4-speed automatic transmission. To shift, pull the lever towards you and move it up or down to engage the desired gear (e.g., Park, Reverse, Neutral, Drive, Low gears). Ensure the vehicle is stationary and the brake pedal is depressed when shifting into or out of Park or Reverse.
4.2 Função de Inclinação
The tilt mechanism allows you to adjust the steering wheel angle for optimal driving comfort and easier entry/exit. To adjust, locate the tilt lever (typically on the left side of the column, below the turn signal lever). Pull the lever towards you to unlock the column, adjust the steering wheel to one of the three desired positions, and then release the lever to lock it in place.
4.3 Integrated Controls
- Sinais de direção: Operate the turn signal lever (left side of column) up for right turn, down for left turn.
- Buzina: Press the horn button located on the steering wheel.
- Luzes de emergência: Activate the hazard warning lights by pressing the dedicated hazard button on the column.
4.4 Push Button Start and RFID (If Installed)
If your column is integrated with a "One Touch Push Button Start" and RFID Hands-Free Security system, refer to the specific instructions provided with those components for detailed operation. Generally, the RFID system will detect the presence of a valid key fob, allowing the push button to initiate engine start/stop without a traditional key.
5. Manutenção
The Helix 706622 Column Shift is designed for long-term durability with minimal maintenance. Regular inspection is recommended to ensure optimal performance and safety.
- Limpeza: Clean the column's exterior with a soft, damp pano. Evite produtos de limpeza abrasivos ou solventes que possam danificar o acabamento.
- Inspeção: Periodically check all mounting bolts and fasteners for tightness. Ensure the column is securely attached and there is no excessive play.
- Lubrificação: The internal mechanisms are pre-lubricated. Avoid applying external lubricants unless specifically instructed by Helix support, as this could attract dirt and impair function.
- Fiação: Inspect wiring harnesses for any signs of wear, fraying, or loose connections. Repair or replace damaged wiring immediately.
6. Solução De Problemas
This section provides solutions to common issues you might encounter. For problems not listed here, or if solutions do not resolve the issue, contact Helix customer support.
| Problema | Possível causa | Solução |
|---|---|---|
| As luzes de direção ou a buzina não funcionam. | Loose electrical connection; blown fuse; faulty switch. | Check wiring harness connections. Inspect vehicle's fuse box for blown fuses. Test the respective switch for continuity. |
| Column shift lever is stiff or not engaging gears. | Improper installation; linkage obstruction; internal mechanism issue. | Verify correct installation and alignment of the column and shift linkage. Check for any obstructions. If issue persists, professional inspection is recommended. |
| Tilt function is not locking securely. | Tilt mechanism wear; debris in mechanism. | Ensure the tilt lever is fully released. Inspect for any foreign objects obstructing the locking mechanism. If wear is evident, professional repair may be required. |
| Push button start or RFID not functioning. | Improper wiring; unprogrammed key fob; faulty module. | Refer to the specific manual for the push button start/RFID system. Verify all connections. Ensure key fobs are correctly programmed and have working batteries. |
7. Especificações
| Atributo | Detalhe |
|---|---|
| Marca | Hélice |
| Número do modelo | 706622 |
| Shift Style | Column Shift |
| Shift Pattern | 4 Speed Auto |
| Column Finish | Preto |
| Função de inclinação | Yes (3-position) |
| Com chave | No (Designed for Push Button Start/RFID) |
| Peso do item | 17 libras |
| Dimensões do produto | 42 x 7 x 7 polegadas |
| Número da peça do fabricante | 706622 |
| ASIN | B075VRQSKF |
| Primeira data disponível | 21 de setembro de 2017 |
8. Garantia e Suporte
8.1 Informações de garantia
Helix products are manufactured to high-quality standards. For specific warranty terms and conditions, please refer to the warranty card included with your product or visit the official Helix Suspension website. Guarde o comprovante de compra para solicitações de garantia.
8.2 Suporte ao cliente
If you have any questions regarding the installation, operation, or maintenance of your Helix 706622 Column Shift, please contact Helix customer support. Contact information can typically be found on the product packaging or the official Helix Suspension website.
Ao entrar em contato com o suporte, tenha em mãos o número do modelo do seu produto (706622) e os detalhes da compra.


