1. Introdução
Thank you for choosing the Henry HVR 160-11 Bagged Cylinder Vacuum. This manual provides essential information for the safe and efficient operation, maintenance, and troubleshooting of your new vacuum cleaner. Please read these instructions carefully before use and retain them for future reference.

Figura 1: Frente view of the Henry HVR 160-11 Bagged Cylinder Vacuum. This image shows the iconic red and black design with the friendly 'Henry' face, the main suction inlet, and the carrying handle.
2. Instruções de segurança
Sempre siga as precauções básicas de segurança ao usar aparelhos elétricos para reduzir o risco de incêndio, choque elétrico ou ferimentos.
- Certifique-se de que a fonte de alimentação voltage matches the rating shown on the vacuum cleaner's label.
- Não utilize o aspirador de pó em superfícies molhadas ou para aspirar líquidos.
- Não recolha materiais inflamáveis ou combustíveis, cinzas quentes ou objetos cortantes.
- Mantenha cabelos, roupas largas, dedos e todas as partes do corpo longe de aberturas e peças móveis.
- Desconecte da tomada elétrica quando não estiver em uso e antes da manutenção.
- Não utilize com cabo ou ficha danificados. Se o cabo estiver danificado, deve ser substituído pelo fabricante, pelo seu agente de assistência técnica ou por pessoal qualificado para evitar riscos.
- Este aparelho não se destina ao uso por pessoas (incluindo crianças) com capacidades físicas, sensoriais ou mentais reduzidas, ou com falta de experiência e conhecimento, a menos que tenham recebido supervisão ou instruções sobre o uso do aparelho de uma pessoa responsável pela sua segurança.
- Nota importante para usuários dos EUA: This product is designed for UK electrical standards (230V). Use with a suitable voltage converter and adapter is required for safe and effective operation in regions with 120V power supplies, such as the United States. Failure to do so may result in poor performance, damage to the unit, or electrical hazard.
3. Configuração e montagem
3.1. O que está na caixa
Desembale cuidadosamente todos os componentes e verifique-os com a lista abaixo:
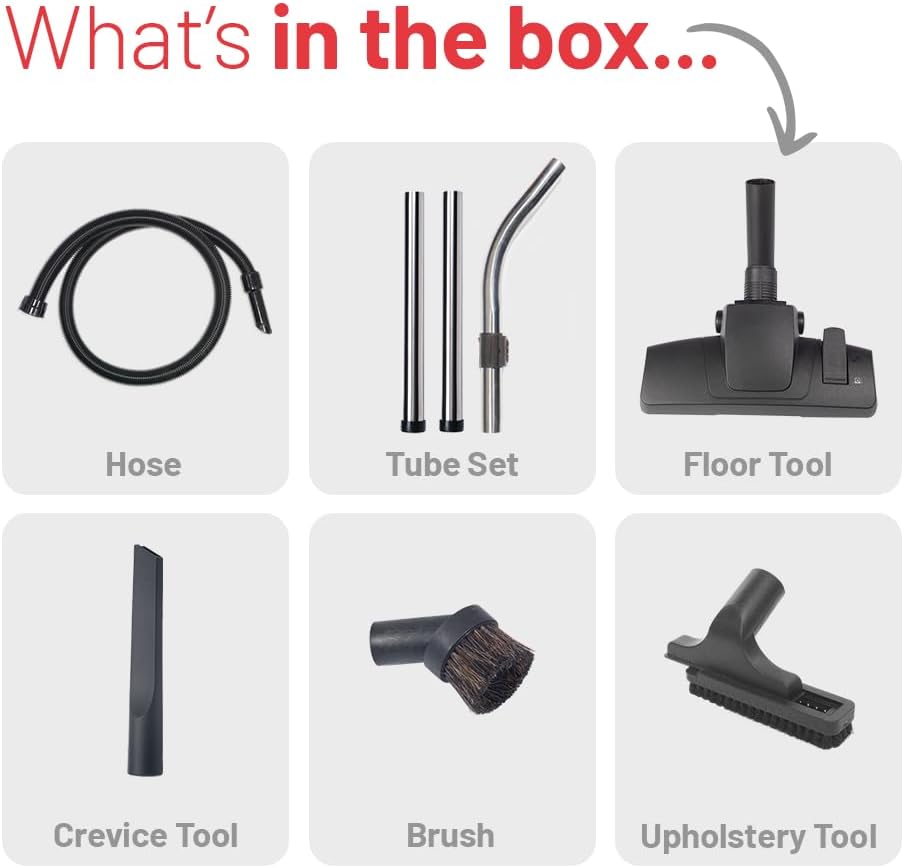
Figura 2: All components included in the Henry HVR 160-11 packaging. This image displays the hose, tube set, floor tool, crevice tool, brush, and upholstery tool.
- Mangueira Flexível
- Tube Set (usually 2 or 3 metal tubes)
- Ferramenta de chão
- Ferramenta para fendas
- Escova para tirar pó
- Ferramenta para estofamento
- Filtro (pré-instalado)
- Dust Bag (one pre-installed, usually one spare)
3.2. Etapas de montagem
- Conecte a mangueira: Insert the larger end of the flexible hose into the suction inlet on the front of the vacuum cleaner until it clicks securely into place.
- Assemble the Tube Set: Connect the metal tubes together by twisting them firmly. Attach one end of the assembled tube set to the handle end of the flexible hose.
- Attach the Floor Tool: Connect the desired floor tool to the open end of the tube set. Ensure it is securely fitted.
- On-board Tool Storage: The vacuum features convenient on-board storage for accessories. Attach the crevice tool, dusting brush, and upholstery tool to the designated clips on the back of the vacuum for easy access.

Figura 3: Illustration of the on-board tool storage feature. This image shows how the various cleaning tools can be neatly stored on the vacuum cleaner itself.
4. Instruções de operação
4.1. Ligar / desligar
Plug the power cord into a suitable electrical outlet. To turn the vacuum cleaner on, press the red power switch located on the top of the unit. Press it again to turn the unit off.
4.2. Using the Floor Tool
The main floor tool is designed for both carpets and hard floors. It features a brush bar that can be engaged or disengaged depending on the surface.
- Para tapetes, ensure the brush bar is engaged (bristles extended) to agitate and lift dirt from the fibers.
- Para hard floors, disengage the brush bar (bristles retracted) to prevent scratching and to allow for optimal suction on smooth surfaces.

Figura 4: The floor tool demonstrating the switch mechanism for different floor types. The top panel shows the tool configured for carpet, and the bottom panel shows it configured for hard floors.
4.3. Usando acessórios
The Henry HVR 160-11 comes with several accessories for versatile cleaning:
- Ferramenta para fendas: Ideal para alcançar espaços estreitos, cantos e ao longo das bordas.
- Escova de Pó: Soft bristles for delicate surfaces, shelves, and intricate items.
- Ferramenta de estofamento: Designed for cleaning fabric surfaces like sofas, chairs, and curtains.
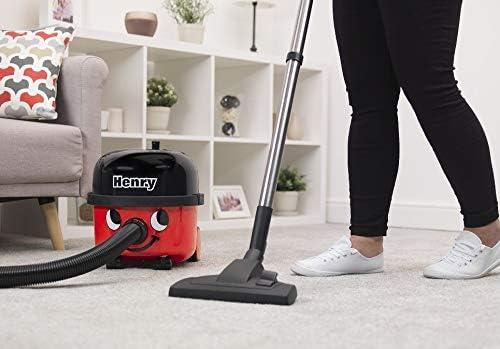
Figura 5: A collage showing the various tools in action. This image illustrates the dusting brush cleaning skirting boards, the upholstery tool cleaning a mattress, the crevice tool reaching between sofa cushions, and the main floor tool on carpet.
5. Manutenção
Regular maintenance ensures optimal performance and extends the life of your Henry vacuum cleaner.
5.1. Substituindo o saco de pó
The Henry HVR 160-11 uses high-efficiency dust bags. Replace the bag when the suction power noticeably decreases or when the 'full' indicator (if present) suggests it's time.
- Desligue o aspirador de pó da tomada elétrica.
- Unclip and remove the top head unit of the vacuum.
- Carefully lift out the full dust bag. The Henry bags feature an innovative self-seal tab to lock dust inside, ensuring a dust-free emptying process.
- Descarte o saco cheio de forma responsável.
- Insert a new Henry dust bag, ensuring the cardboard collar is correctly seated in the bag holder.
- Replace the top head unit and secure the clips.

Figura 6: A hand demonstrating the self-seal feature of the Henry dust bag during emptying. This image highlights the clean and dust-free process of removing a full bag from the vacuum and placing it into a waste bin.
5.2. Limpando o Filtro
The vacuum is equipped with a foam filter. Periodically check the filter for excessive dust build-up. To clean:
- Desligue o aspirador.
- Remove the top head unit and the dust bag.
- Carefully remove the foam filter.
- Gently tap the filter to dislodge loose dust. For a more thorough clean, the foam filter can be rinsed under cold water.
- Ensure the filter is completely dry before reinserting it into the vacuum cleaner. Operating the vacuum with a wet filter can cause damage.
5.3. Cleaning Hoses and Accessories
Inspect the hose and accessories regularly for blockages or damage. Clear any obstructions using a blunt object. Do not use sharp objects that could puncture the hose.
6. Solução De Problemas
If you encounter issues with your Henry HVR 160-11, refer to the table below for common problems and solutions.
| Problema | Possível causa | Solução |
|---|---|---|
| O vácuo não liga | Sem alimentação; Cabo/plugue danificado; Interruptor com defeito | Check power outlet; Inspect cord/plug for damage (do not use if damaged); Contact support if switch is faulty. |
| Sucção baixa ou nenhuma | Full dust bag; Clogged hose/filter/accessories; Incorrectly fitted bag/filter; Motor issue; Incorrect voltage (for US users) | Replace dust bag; Clear blockages; Re-seat bag/filter correctly; Ensure correct voltage converter is used (if applicable); Contact support for motor issues. |
| Ruído incomum | Blockage in hose/brush head; Motor issue | Check and clear blockages; Contact support if noise persists. |
| Superaquecimento | Blocked airflow (bag/filter/hose); Prolonged use | Check and clear blockages; Allow unit to cool down before resuming use. |
7. Especificações
Key technical specifications for the Henry HVR 160-11 Bagged Cylinder Vacuum:
| Recurso | Especificação |
|---|---|
| Nome do modelo | Henry 160 |
| Número do modelo | HVR 160-11 |
| Fonte de energia | Elétrico com fio |
| O quetage | 620 watts |
| Capacidade | 6 litros |
| Comprimento da mangueira | 2.2 metros |
| Tipo de filtro | Espuma |
| Tecnologia de coleta a vácuo | Ensacado |
| Nível de ruído | 72 decibéis |
| Dimensões do produto | 13.39 x 13.58 x 12.6 polegadas |
| Peso do item | 16.54 libras |
| Cor | Vermelho, Preto |
8. Garantia e Suporte
For warranty information and customer support, please refer to the documentation provided with your purchase or visit the official Henry webGuarde seu comprovante de compra para eventuais solicitações de garantia.
If you require technical assistance or have questions not covered in this manual, please contact Henry customer service.


