1. Introdução
This manual provides detailed instructions for the safe and effective use of the SMART SENSOR AS8805 Digital Sulfur Dioxide Gas Monitor. This device is designed for high-sensitivity detection of sulfur dioxide (SO2) gas, featuring sound and light alarms, and a rechargeable Li-battery for portable operation. Please read this manual thoroughly before operating the device and retain it for future reference.
2. Informações de segurança
Siga sempre as seguintes precauções de segurança para evitar ferimentos ou danos ao dispositivo:
- Não tente modificar ou desmontar o dispositivo.
- Certifique-se de que o dispositivo seja usado dentro das faixas de temperatura e umidade de operação especificadas.
- Mantenha o dispositivo longe de campos eletromagnéticos fortes.
- Verifique regularmente o dispositivo quanto a sinais de danos ou mau funcionamento.
- Perform zero calibration in a clean air environment, free from SO2 or other interfering gases.
- Recharge the battery promptly when the low power indicator is active to maintain optimal performance and safety.
- This device is designed for detecting SO2 gas. Do not use it for other gas types without proper calibration and verification.
3. Produto acabadoview
The SMART SENSOR AS8805 is a compact and portable sulfur dioxide gas detector. Familiarize yourself with its components:

Figura 3.1: Frente View of the AS8805 Detector. This image shows the front of the device, highlighting the digital LCD display, power on/off key, up key (addition), down key (subtraction), and enter key. The alarm light is visible at the top left, and the sulfur dioxide gas sensor is at the top right.
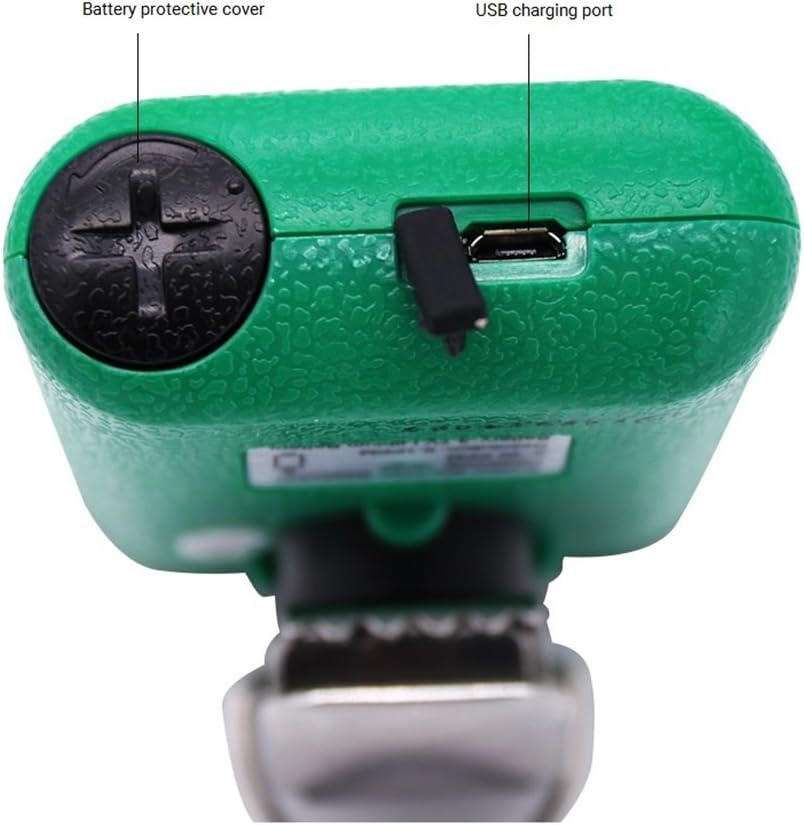
Figura 3.2: parte superior View of the AS8805 Detector. This image displays the top section of the device, indicating the battery protective cover and the USB charging port.

Figura 3.3: Lateral View of the AS8805 Detector. This image illustrates the side of the device, pointing out the gas sensor inside and the alarm light.
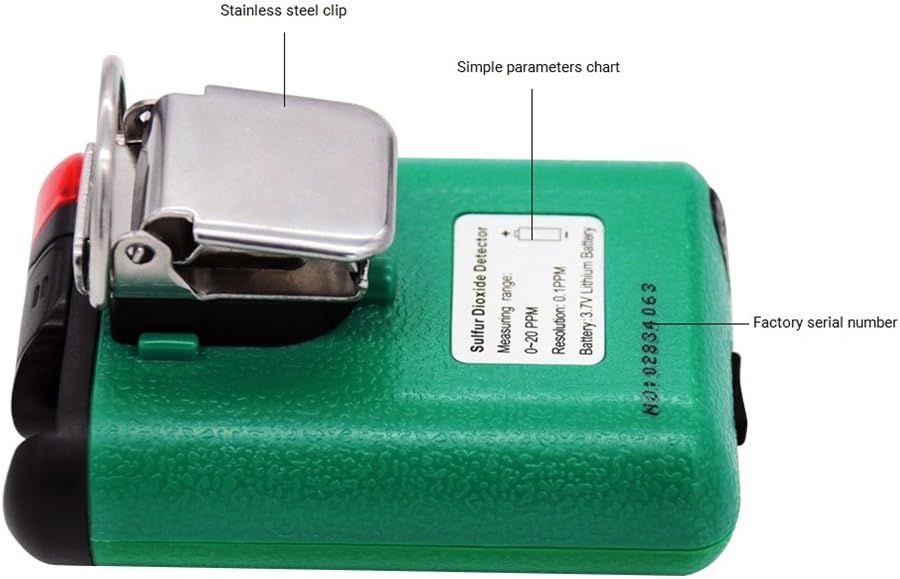
Figura 3.4: Voltar View of the AS8805 Detector. This image shows the back of the device, featuring the stainless steel clip, a simple parameters chart, and the factory serial number.
3.1 Componentes principais
- Sulfur Dioxide Gas Sensor: Detects SO2 concentration in the air.
- Luz de alarme: Provides visual indication during an alarm event.
- Visor LCD digital: Shows real-time gas concentration, battery status, and other operational information.
- Tecla liga/desliga: Utilizado para ligar ou desligar o dispositivo.
- Up Key (Addition): Used for navigating menus or increasinValores de g.
- Down Key (Subtraction): Used for navigating menus or decreasinValores de g.
- Tecla Enter: Utilizado para confirmar seleções ou acessar menus.
- Battery Protective Cover: Secures the internal battery.
- Porta de carregamento USB: For recharging the device's internal Li-battery.
- Stainless Steel Clip: Allows for convenient carrying and attachment.
4. Configuração
4.1 Desembalagem e Conteúdo da Embalagem
Carefully unpack the device and verify that all standard accessories are present:

Figure 4.1: Standard Package Contents. This image shows the items included in the standard package: the AS8805 gas monitor, power charger and cable, user manual, explosive-proof certificate, certificate of calibration, and warranty card.
- 1x Sulfur Dioxide Gas Monitor (AS8805)
- 1x Manual do Usuário
- 1x Explosive-proof Certificate
- 1x Cartão de Garantia
- 1x Power Charger
- 1x Cabo de alimentação
4.2 Carregando a bateria
The device is powered by a 3.7V Li-battery. Before first use, or when the low power indicator appears, charge the device:
- Connect the provided power cable to the USB charging port on the top of the device (refer to Figure 3.2).
- Connect the other end of the cable to the power charger, and then plug the charger into a suitable power outlet.
- The battery icon on the LCD display will indicate charging status.
- A full charge typically allows for approximately 60 hours of continuous operation without alarms.
4.3 Inicialização
Para ligar o dispositivo:
- Pressione e segure o Tecla liga/desliga até que o visor se ilumine.
- The device will perform a self-test and warm-up sequence. During this time, the display may show various readings before settling.
5. Operação
5.1 Ligar/Desligar
- Ligar: Pressione e segure o Tecla liga/desliga for a few seconds until the display turns on.
- Desligar: Pressione e segure o Tecla liga/desliga for a few seconds until the display turns off.
5.2 Informações de Exibição
The digital LCD display shows the following information:
- Real-time SO2 Concentration: Displayed in parts per million (ppm).
- Indicador de status da bateria: Mostra o nível atual de carga da bateria.
- Indicadores de alarme: Visual cues for high or low alarm conditions.
5.3 Alarm Functions and Settings
The device features adjustable high and low alarm values with three alarm methods: sound, light, and vibration. The alarm sound can reach up to 80dB.
- Default High Alarm: 10.0 ppm
- Default Low Alarm: 5.0 ppm
To adjust alarm values:
- With the device powered on, press the Chave alta or Tecla para baixo to enter the password interface.
- Enter the password (e.g., "123" as shown in the calibration video, though specific password should be confirmed in the full user manual). Use the Up e Down Keys to change digits and the Tecla Enter to move to the next digit or confirm.
- After entering the correct password, navigate through the menu using the Up e Down Keys to find the alarm setting options.
- Adjust the high and low alarm thresholds as required using the Up e Down Keys, and confirm each setting with the Tecla Enter.
5.4 Calibração Zero
Zero calibration ensures accurate readings by setting the baseline in a clean air environment. This procedure should be performed regularly or if you suspect inaccurate readings.
- Ensure the device is in a clean environment, free from any SO2 gas.
- Ligue o dispositivo.
- Access the calibration menu by pressing the Chave alta or Tecla para baixo to enter the password interface.
- Enter the password (e.g., "123").
- After successful password entry, navigate to the calibration option (often labeled "CAL" or "ZERO CAL").
- Confirm the zero calibration selection with the Tecla Enter. The device will then perform the zero calibration, displaying a changing number as it stabilizes.
- Wait for the device to stabilize and confirm the calibration. The display may show "F" or return to 0.0 ppm, indicating successful calibration.
5.5 Auto/Hand Power Off Function
The device includes an auto power-off feature to conserve battery life. This can be set manually.
- Desligamento automático: If enabled, the device will automatically turn off after 10 minutes of no operation.
- Refer to the full user manual for specific instructions on how to enable or disable the auto power-off function.
6. Manutenção
6.1 Cuidados com a bateria
- Recharge the 3.7V Li-battery when the low power indicator is displayed.
- Para prolongar a vida útil da bateria, evite descarregá-la completamente com frequência.
- Utilize apenas o carregador e o cabo fornecidos.
6.2 Vida útil do sensor
The electrochemical sensor has an estimated life of 2 years. After this period, the sensor's accuracy may degrade, and replacement or professional calibration may be required.
6.3 Limpeza
- Limpe a parte externa do dispositivo com um pano macio e seco.amp pano.
- Não utilize produtos de limpeza abrasivos ou solventes.
- Ensure no liquid enters the sensor opening or charging port.
7. Solução De Problemas
| Problema | Possível causa | Solução |
|---|---|---|
| O dispositivo não liga. | Bateria fraca ou descarregada. | Carregue o dispositivo usando o carregador e o cabo fornecidos. |
| Leituras imprecisas. | Sensor requires zero calibration; sensor lifespan exceeded. | Perform zero calibration in clean air. If issues persist, consider sensor replacement or professional service. |
| O alarme soa continuamente. | High SO2 concentration detected; alarm settings too low. | Evacuate the area and ventilate. Check and adjust alarm thresholds if necessary. |
| A tela está em branco ou congelada. | Software error or battery issue. | Try restarting the device. If problem persists, contact support. |
8. Especificações
| Recurso | Detalhe |
|---|---|
| Número do modelo do produto | AS8805 |
| Gas Measurement Type | Dióxido de enxofre (SO2) |
| Faixa de medição | 0 ~ 20 ppm |
| Testing Resolution | 0.1 ppm |
| Princípio de medição | Eletroquímica |
| Vida útil do sensor | 2 anos |
| Alarme baixo/alto | Supported, adjustable values |
| Métodos de Alarme | Som, luz, vibração |
| Alarme Nível sonoro | Até 80 dB |
| Temperatura de operação | -10 ~ 50 ℃ (14 ~ 122 ℉) |
| Umidade operacional | 15 ~ 95% RH (Standard) |
| Tipo de Bateria | 3.7V Li-battery (754060p) |
| Tempo de funcionamento da bateria | Approx. 60 hours (no alarm) |
| Desligamento automático | Yes (after 10 minutes of no operation, if enabled) |
| Peso líquido do produto | 200g (7.1 onças) |
| Tamanho do produto | 120 * 65 * 38 milímetros |
| UPC | 785197913523 |
9. Garantia e Suporte
The SMART SENSOR AS8805 Digital Sulfur Dioxide Gas Monitor comes with a warranty as detailed in the included Warranty Card. Please refer to the card for specific terms and conditions.
For technical support, service, or inquiries regarding your device, please contact your retailer or the manufacturer directly. Keep your purchase receipt and warranty card handy when seeking support.


