1. Introdução
This manual provides comprehensive instructions for the installation, operation, and maintenance of your BlueBird A1390 Automatic Irrigation Tap Programmer. This device is designed to automate your garden watering schedule, ensuring efficient and consistent irrigation. Please read this manual thoroughly before using the product to ensure correct operation and to prevent damage.
2. Informações de segurança
- Do not immerse the unit in water. The unit is designed to be weather-resistant, but not submersible.
- Use only 1.5V AA alkaline batteries. Do not mix old and new batteries, or different types of batteries.
- Remova as pilhas se o aparelho não for usado por um longo período para evitar vazamentos.
- Mantenha fora do alcance de crianças.
- Não tente desmontar ou reparar a unidade por conta própria. Contate pessoal qualificado para assistência técnica.
- Certifique-se de que todas as conexões estejam seguras para evitar vazamentos.
3. Conteúdo da embalagem
Por favor, verifique se a embalagem contém os seguintes itens:
- 1x BlueBird A1390 Automatic Irrigation Tap Programmer
- 1x Manual do Usuário (este documento)
Note: 2 AA 1.5V batteries are required for operation and are not included in the package.
4. Produto acabadoview
The BlueBird A1390 features two main rotary dials for setting irrigation frequency and duration, along with a battery indicator and an ON/OFF switch.
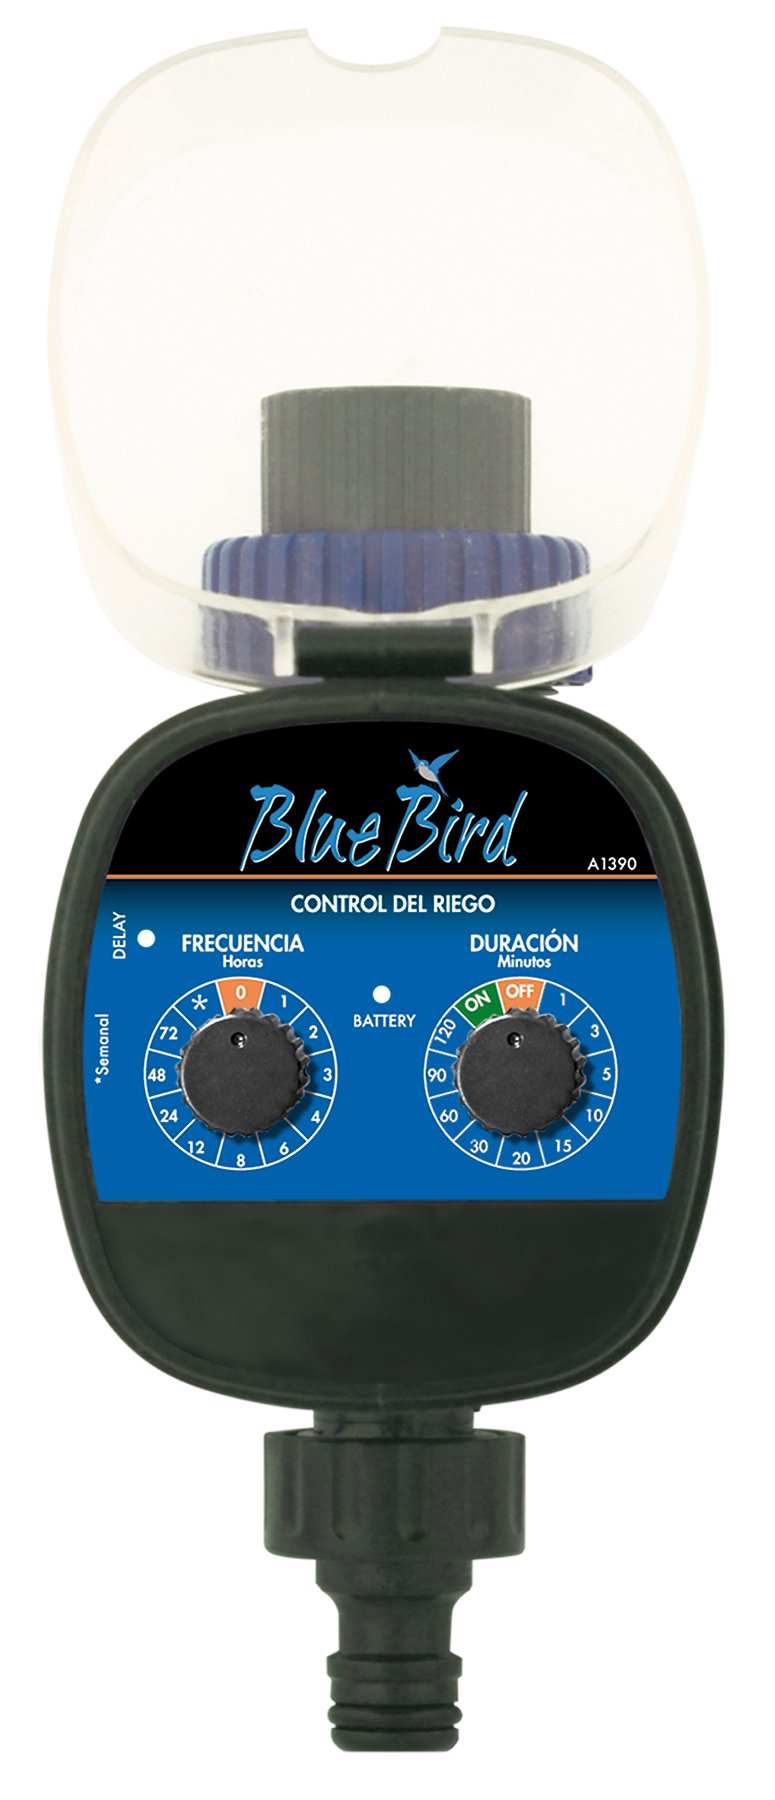
Figura 1: Frente view of the BlueBird A1390 Irrigation Programmer. The left dial controls irrigation frequency, and the right dial controls irrigation duration. A battery indicator light is located between the dials.
Componentes:
- Frequency Dial (Frecuencia): Sets how often the irrigation occurs. Options include 0 (off), 1, 2, 3, 4, 6, 8, 12, 24, 48, 72 hours, and a '*' setting for manual or weekly operation.
- Duration Dial (Duración): Sets how long each irrigation cycle lasts. Options include 0 (off), 1, 3, 5, 10, 15, 20, 30, 60, 90, 120 minutes.
- Chave ON / OFF: Located on the Duration Dial, allows for manual override or turning the unit off.
- Indicador de bateria: A light that indicates battery status.
- Compartimento da bateria: Located at the rear of the unit (not visible in Figure 1).
- Entrada/Saída de Água: Standard tap and hose connections.
5. Configuração
5.1 Instalação da bateria
- Localize a tampa do compartimento da bateria na parte traseira da unidade.
- Remove the cover by twisting or sliding it open.
- Insert two (2) new 1.5V AA alkaline batteries, ensuring correct polarity (+/-).
- Replace the battery compartment cover securely to maintain water resistance.
5.2 Conectando à torneira
- Ensure your outdoor tap is turned off.
- Screw the BlueBird A1390 programmer onto your tap. Hand-tighten only to prevent damage.
- Connect your garden hose or irrigation system to the outlet of the programmer. Ensure a tight connection to prevent leaks.
- Slowly turn on your outdoor tap. Check for any leaks at the connections.
6. Instruções de operação
The BlueBird A1390 is designed for simple, intuitive programming using its two rotary dials.
6.1 Setting Irrigation Frequency
- Gire o Discador de freqüência (left dial) to your desired irrigation interval.
- As configurações disponíveis são:
- 0: No irrigation (off).
- 1, 2, 3, 4, 6, 8, 12, 24, 48, 72: Irrigation every X hours.
- *: This setting typically indicates a manual mode or a weekly cycle, depending on the specific model's internal logic. Refer to the example below for common usage.
6.2 Setting Irrigation Duration
- Gire o Duration Dial (right dial) to your desired watering time per cycle.
- As configurações disponíveis são:
- OFF: No irrigation.
- EM: Continuous irrigation (use with caution).
- 1, 3, 5, 10, 15, 20, 30, 60, 90, 120: Irrigation for X minutes.
6.3 Example Programação
To water every 6 hours for 10 minutes:
- Defina o Discador de freqüência para 6 (horas).
- Defina o Duration Dial para 10 (minutos).
The programmer will automatically begin the cycle based on these settings. The first cycle will typically start shortly after programming, or after a short delay.
6.4 Manual ON/OFF
To manually turn on the water, rotate the Duration Dial to the ON position. To stop manual watering, rotate the dial back to DESLIGADO or a timed setting.
7. Manutenção
7.1 Substituição da bateria
When the battery indicator light dims or the unit stops functioning, it's time to replace the batteries. Follow the steps in Section 5.1 for battery installation.
7.2 Limpeza
Clean the exterior of the programmer with a damp cloth. Do not use abrasive cleaners or solvents. Ensure no water enters the battery compartment or internal electronics.
7.3 Armazenamento de Inverno
Before the first frost, disconnect the programmer from the tap and hose. Remove the batteries. Store the unit indoors in a dry, frost-free location to prevent damage from freezing water.
8. Solução De Problemas
| Problema | Possível causa | Solução |
|---|---|---|
| Unit does not turn on/display. | Baterias descarregadas ou instaladas incorretamente. | Substitua as pilhas, certificando-se da polaridade correta. |
| A água não flui. | Tap is off; programmer set to '0' or 'OFF'; low water pressure; clogged filter. | Ensure tap is fully open. Check frequency/duration settings. Verify water pressure. Clean any filters. |
| Unit leaks at connections. | Loose connections; missing or damaged washer. | Tighten connections. Check and replace washers if necessary. |
| Irrigation schedule is incorrect. | Incorrect frequency or duration settings. | Re-check and adjust the Frequency and Duration Dials according to your desired schedule. |
9. Especificações
- Modelo: A1390
- Marca: Pássaro azul
- Fabricante: Altadex
- Fonte de energia: 2 pilhas alcalinas AA de 1.5 V (não incluídas)
- Frequência de irrigação: 0, 1, 2, 3, 4, 6, 8, 12, 24, 48, 72 hours, or '*' (manual/weekly)
- Duração da irrigação: OFF, ON, 1, 3, 5, 10, 15, 20, 30, 60, 90, 120 minutes
- Dimensões do produto: Aproximadamente 19.4 x 10.6 x 10 cm
- Peso do produto: Aproximadamente 280 g
- GTIN (UPC): 8426375113909
10. Garantia e Suporte
This product is covered by a standard manufacturer's warranty. For specific warranty details, please refer to the documentation provided at the time of purchase or contact your retailer. For technical support or inquiries, please contact the seller or manufacturer directly.


