1. Instruções importantes de segurança
To reduce the risk of fire, electric shock, or injury, always follow these basic safety precautions when using your Arctic-Pro Portable Digital Ice Maker Machine:
- Leia todas as instruções antes de usar.
- Não toque em superfícies quentes. Use alças ou botões.
- To protect against electrical hazards, do not immerse cord, plug, or any part of the appliance in water or other liquids.
- É necessária supervisão rigorosa quando qualquer aparelho for usado por crianças ou perto delas.
- Desligue da tomada quando não estiver em uso e antes de limpar. Deixe esfriar antes de colocar ou retirar peças e antes de limpar o aparelho.
- Não utilize nenhum aparelho com cabo ou plugue danificado, ou após o aparelho apresentar mau funcionamento ou ter sido danificado de alguma forma. Entre em contato com o serviço de atendimento ao cliente para verificação, reparo ou ajuste.
- O uso de acessórios não recomendados pelo fabricante do aparelho pode causar riscos.
- Não utilize ao ar livre.
- Não deixe o cabo pendurado na borda da mesa ou do balcão, nem toque em superfícies quentes.
- Não coloque sobre ou perto de um queimador a gás ou elétrico quente, nem em um forno aquecido.
- Sempre conecte primeiro o plugue ao aparelho e, em seguida, ligue o cabo na tomada. Para desconectar, gire qualquer controle para a posição "desligado" e, em seguida, retire o plugue da tomada.
- Não use o aparelho para outro uso doméstico que não o pretendido.
- Este aparelho é somente para uso doméstico.
- Não use produtos químicos corrosivos ou vapores neste aparelho.
- This ice maker must be grounded.
- Não perfure a tubulação de refrigerante.
2. Produto acabadoview
The Arctic-Pro Portable Digital Ice Maker Machine is designed to produce ice quickly and efficiently. It features a compact design suitable for various settings.
2.1 Componentes
- Unidade de fabricação de gelo
- Cesta de gelo removível
- Colher de gelo
- Power Cord (3-prong plug)
2.2 Características
- Tela digital: An easy-to-read LCD control panel for selecting ice size, setting timers, and controlling cleaning functions.
- Claro View Window Lid: Allows observation of the ice making process.
- Fill Sensor: Detects water level to ensure proper operation.
- Sensores inteligentes: Prevents the ice basket from overfilling.
- Two Ice Cube Sizes: Choose between small (0.75 x 0.75 inches) and large (1 x 0.75 inches) ice cubes.
- Produção rápida de gelo: Produces first batch of ice in 6-8 minutes.
- Capacidade diária: Capable of producing up to 26 pounds of ice per day.
- Enhanced Cooling System: Features a fan for efficient heat dissipation.

Figure 1: Key features and components of the ice maker.
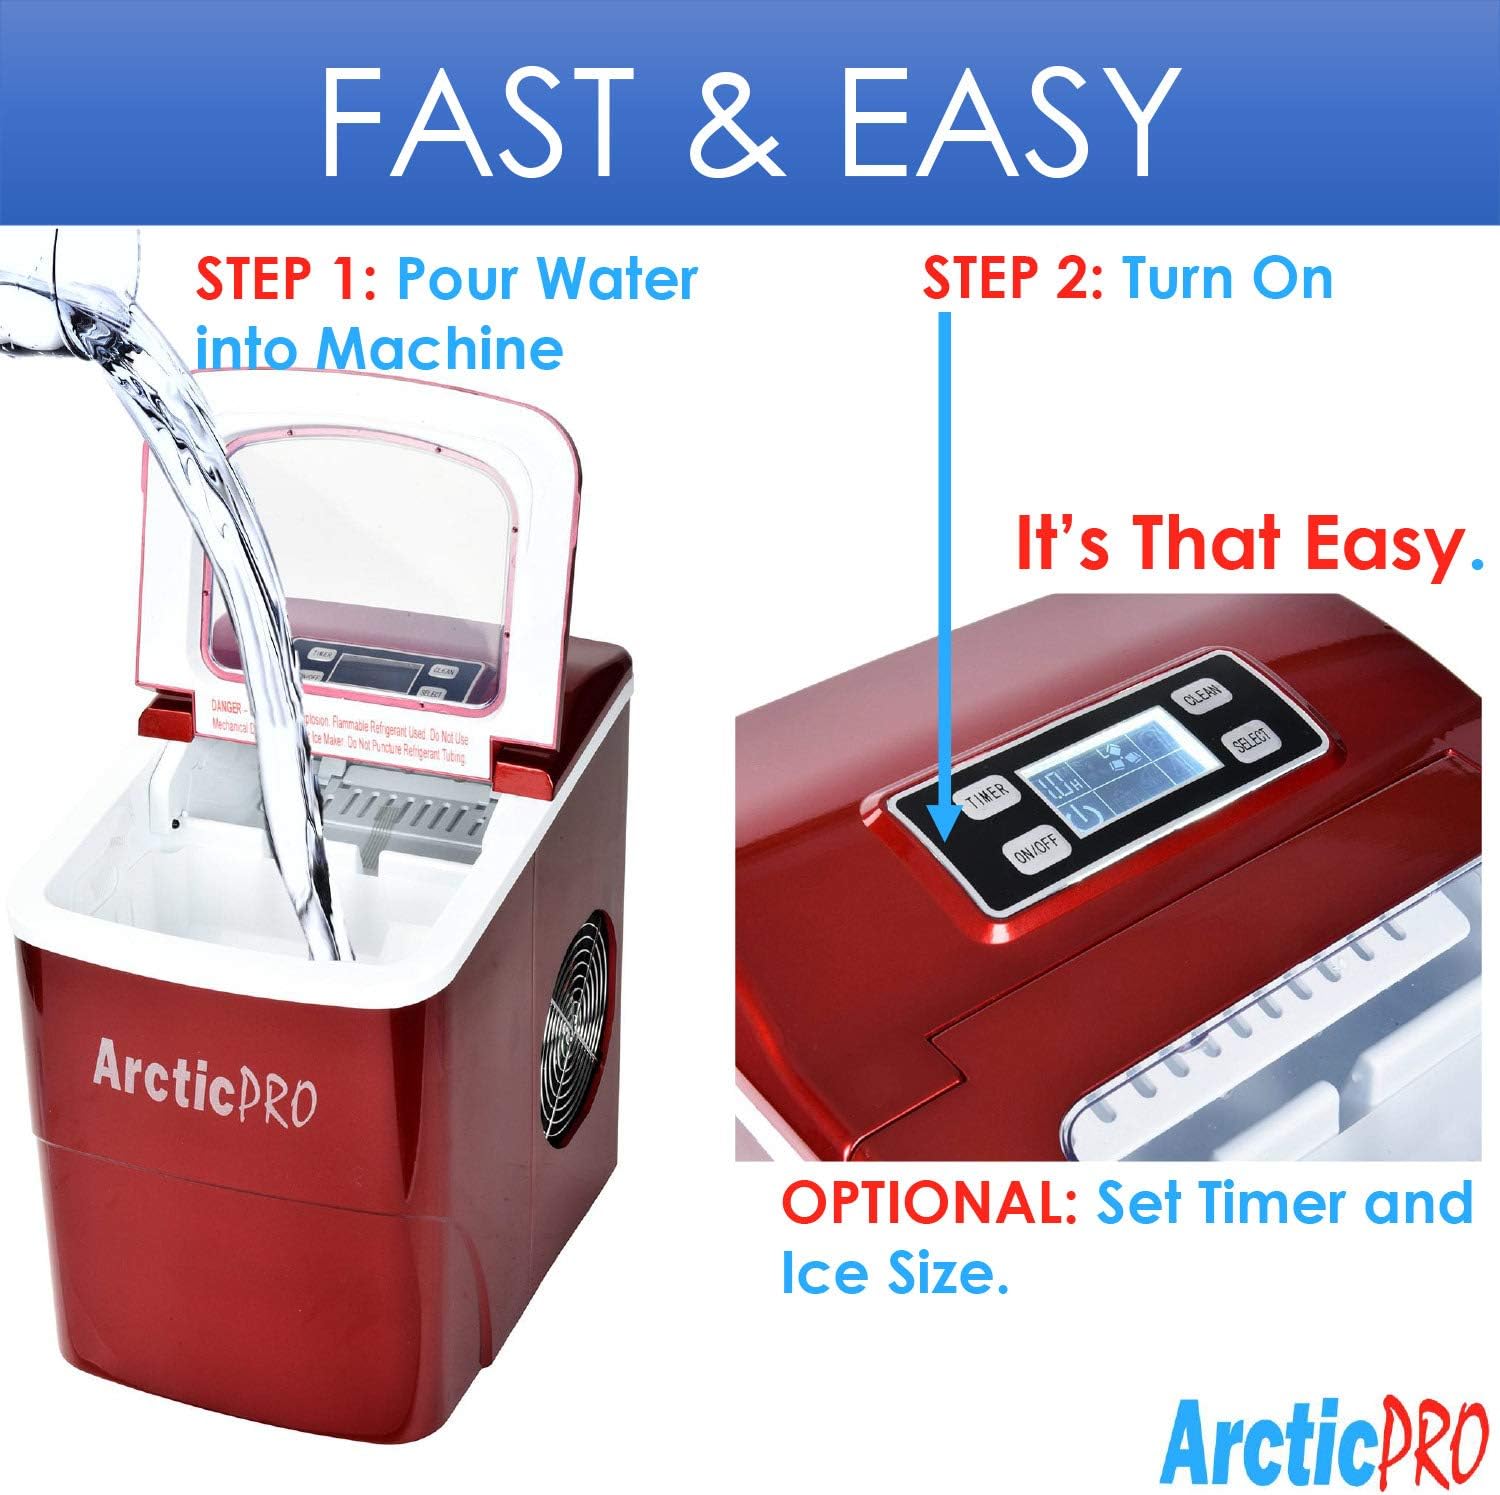
Figure 2: Ice production capabilities.
3. Instruções de configuração
3.1 Desembalagem
- Remova todos os materiais de embalagem da unidade.
- Inspect the ice maker for any damage. If damaged, do not operate and contact customer service.
- Remove the ice basket and ice scoop from inside the unit.
3.2 Limpeza Inicial
Before first use, clean the interior of the ice maker:
- Wash the ice basket and ice scoop with warm water and mild detergent. Rinse thoroughly.
- Limpe o interior do ice maker com um pano macio dampened with warm water and a small amount of vinegar or mild detergent. Rinse with clean water and drain.
- Certifique-se de que todas as peças estejam secas antes de remontar.
3.3 Posicionamento
- Coloque a máquina de gelo em uma superfície estável e nivelada, longe da luz solar direta e de fontes de calor.
- Ensure there is adequate ventilation around the unit, especially at the back and sides where the cooling fan is located.
- Deixe pelo menos 4 polegadas de espaço ao redor da unidade para circulação de ar adequada.
3.4 Conexão de Energia
- Plug the 3-prong power cord into a grounded electrical outlet (115V, 60Hz).
- Allow the unit to rest for at least one hour before adding water and operating, especially if it was tilted during transport.
4. Instruções de operação
Operating your Arctic-Pro ice maker is a simple two-step process:

Figure 3: Simple operating steps.
4.1 Adicionando Água
- Abra a tampa da máquina de gelo.
- Pour potable water into the water reservoir. Do not exceed the 'MAX FILL LINE' indicated inside the reservoir.
- Feche a tampa.

Video 1: Demonstrates adding water to the ice maker. Note: This video is a customer-generated preview and may not represent official instructions.
4.2 Produção inicial de gelo
- Pressione o LIGADO/DESLIGADO button on the digital control panel to turn on the unit.
- Use o SELECIONAR button to choose your desired ice cube size: Small (S) or Large (L). The selected size will be indicated on the digital screen.
- The ice maker will begin its cycle. The first batch of ice cubes will typically be ready in 6-8 minutes.
4.3 Indicadores
- GELO CHEIO: An indicator light or message on the digital screen will illuminate when the ice basket is full. The unit will automatically pause ice production. Remove ice from the basket to resume production.
- ADICIONE ÁGUA: An indicator light or message will illuminate when the water reservoir is low. Add water to the reservoir to resume ice production.
4.4 Timer Function (Optional)
The digital screen allows you to set a timer for operation. Refer to the specific instructions in your product packaging for detailed timer setup.
5. Manutenção e Limpeza
Regular cleaning and maintenance ensure optimal performance and longevity of your ice maker.
5.1 Limpeza Diária
- After each use, unplug the unit.
- Remove the ice basket and empty any remaining ice.
- Esvazie qualquer água restante do reservatório usando o bujão de drenagem localizado na parte inferior da unidade.
- Wipe the interior with a soft cloth.
5.2 Limpeza Semanal
- Perform the daily cleaning steps.
- Prepare a solution of warm water and a small amount of white vinegar or a food-grade ice maker cleaner.
- Pour the solution into the water reservoir and allow it to sit for 10-15 minutes.
- Esvazie completamente a solução.
- Rinse the reservoir thoroughly with clean water multiple times to remove any residue.
- Limpe o exterior com um pano macio e seco.amp pano.
5.3 Armazenamento
If storing the ice maker for an extended period:
- Ensure the unit is thoroughly cleaned and completely dry.
- Leave the lid slightly ajar to prevent mold and mildew growth.
- Armazene em local fresco e seco.
6. Solução De Problemas
Review Confira os problemas comuns a seguir e suas soluções antes de entrar em contato com o atendimento ao cliente.
| Problema | Possível causa | Solução |
|---|---|---|
| A máquina de gelo não liga | Sem fonte de alimentação | Check if the power cord is securely plugged into a grounded outlet. Test the outlet with another appliance. |
| Sem produção de gelo | Lack of water in reservoir | Add water to the reservoir up to the MAX FILL LINE. |
| Temperatura ambiente muito alta | Ensure the ice maker is in a cool environment and not exposed to direct sunlight or heat sources. | |
| Air circulation blocked | Ensure adequate space around the unit for ventilation. Clean any dust from the fan vents. | |
| Os cubos de gelo são muito pequenos ou estão turvos. | Temperatura da água muito alta | Use colder water when filling the reservoir. |
| Acúmulo de minerais | Perform a thorough cleaning and descaling as per maintenance instructions. Use filtered water. | |
| "ICE FULL" indicator is on, but basket is not full | Ice blocking sensor | Rearrange ice in the basket or remove some ice to clear the sensor path. |
| Ruído incomum durante a operação | Sons normais de operação | Some gurgling or fan noise is normal. If the noise is excessive or unusual, contact customer service. |
7. Especificações
| Recurso | Especificação |
|---|---|
| Nome do modelo | Máquina de fazer gelo portátil |
| Número do modelo | 21738 |
| Dimensões (D x L x A) | 11.5" x 8.75" x 12.5" |
| Capacidade de produção diária de gelo | Até 26 libras |
| First Ice Production Time | 6-8 minutos |
| Tamanhos de cubos de gelo | Small (0.75"x0.75"), Large (1"x0.75") |
| O quetage | 100 watts |
| Volumetage | 115 Volts |
| Nível de ruído | 45 decibéis |
| Material | Plástico |
| Componentes incluídos | Ice Maker, Ice Basket, Small Ice Scoop |

Figura 4: Dimensões do produto.
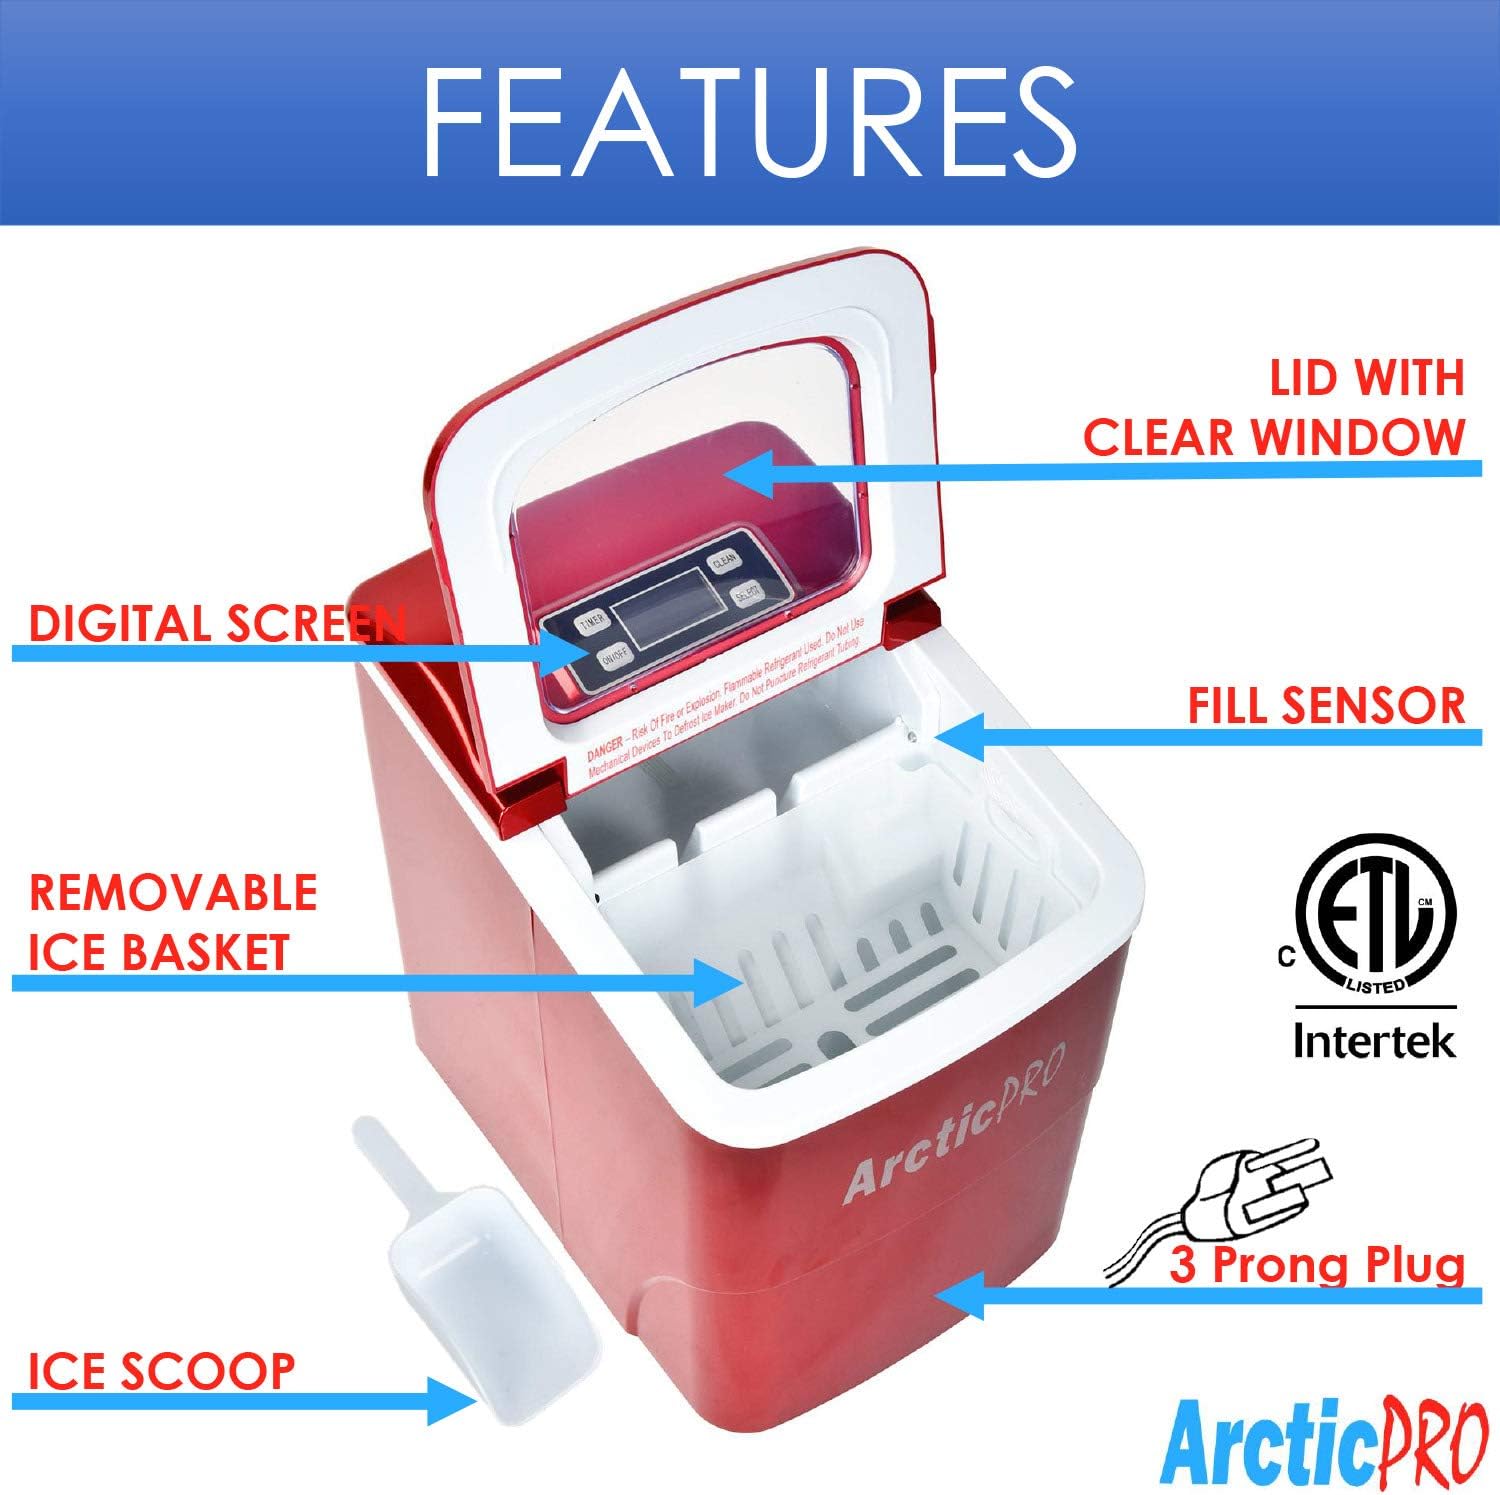
Figure 5: Ice cube size comparison.
8. Garantia e Suporte ao Cliente
Arctic-Pro products are manufactured to high-quality standards. For warranty information, product registration, or technical assistance, please refer to the warranty card included with your purchase or visit the official Arctic-Pro website.
If you encounter any issues not covered in this manual, please contact Arctic-Pro customer support for further assistance.


