1. Introdução
1.1 Produto Acimaview
The Commax DR-8AM is an 8-button audio intercom lobby panel designed for use in 8-apartment buildings. This unit facilitates communication between visitors at the building entrance and residents within their apartments. It is engineered for flush mounting and is compatible with Commax interphone series room units, such as the DP-SS (sold separately).

Imagem: Frente view of the Commax DR-8AM 8-Button Audio Intercom Lobby Panel.
1.2 Conteúdo da embalagem
Por favor, verifique se todos os itens estão presentes na embalagem:
- DR-8AM 8-button lobby panel x1
- Conector de 4 pinos x1
- Conector de 8 pinos x1
- Manual de instruções x1
2. Informações de segurança
- Fonte de energia: The DR-8AM requires a DC12V, 1Amp power supply (e.g., Commax RF-1A or RF-12015S, sold separately). Using an incorrect power supply can damage the unit and void the warranty.
- Instalação: Installation should be performed by a qualified professional to ensure proper wiring and safe operation.
- Proteção da água: Esta unidade é não é à prova d'água. It must be installed in a location protected from direct exposure to water, rain, or excessive humidity. Failure to do so will result in damage and void the warranty.
- Compatibilidade: Ensure compatibility with Commax interphone series room units (e.g., DP-SS) before installation.
- Ventilação: Não obstrua as aberturas de ventilação. Garanta uma circulação de ar adequada ao redor do aparelho.
3. Configuração e instalação
3.1 Mounting the Lobby Panel
The DR-8AM is designed for flush mounting. Follow these steps for installation:
- Prepare the wall opening according to the flushed box dimensions (refer to Specifications).
- Secure the flushed box into the wall opening.
- Connect the necessary wiring to the DR-8AM unit (refer to Wiring Diagram).
- Insert the DR-8AM unit into the flushed box and secure it using the provided screws (4 x 20Ni).
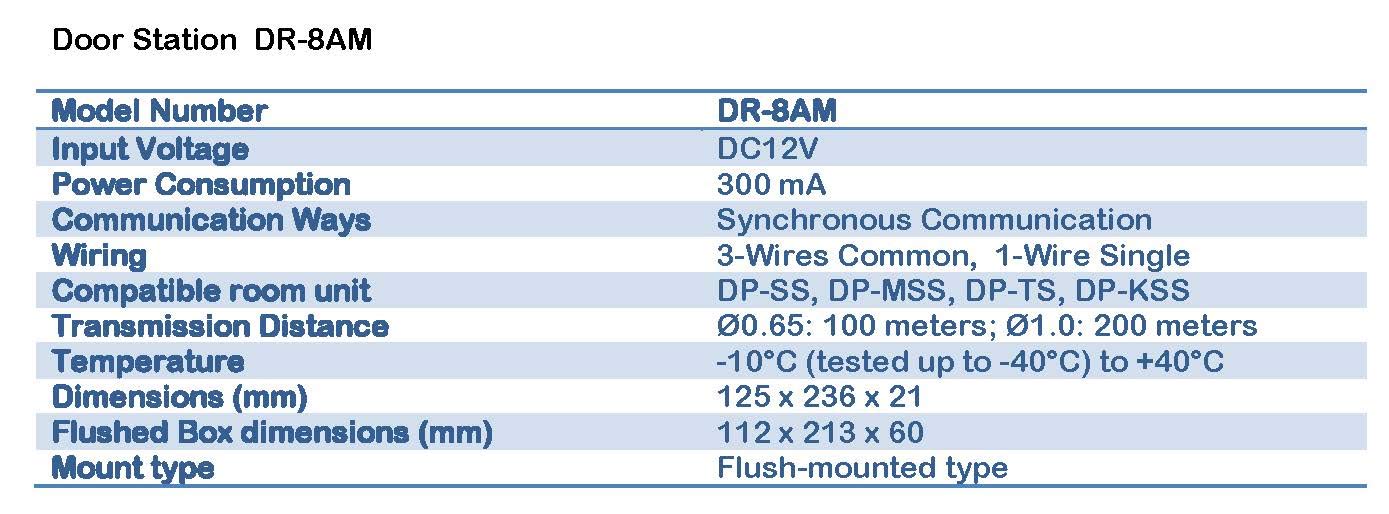
Image: Installation diagram illustrating the flush mounting of the DR-8AM lobby panel into a wall box.
3.2 Diagrama de fiação
The DR-8AM uses a 3-wires common, 1-wire single wiring method. Ensure all connections are secure and correctly polarized. The system requires a DC12V power supply (RF-1A is recommended) and connects to individual room units (DP-SS) and an electric door strike.

Image: Detailed wiring diagram for the Commax DR-8AM, showing connections to room units, power supply, and electric door strike.
Pontos-chave da fiação:
- Connect the DC12V power supply (RF-1A) to the designated terminals on the DR-8AM.
- Connect each room unit (DP-SS) to its corresponding terminals on the DR-8AM.
- Connect the electric door strike to the appropriate terminals, ensuring it has its own power supply if required.
- Observe a polaridade de todas as conexões.
4. Instruções de operação
The Commax DR-8AM lobby panel provides simple audio communication for visitors.
- Visitor Call: A visitor presses the button corresponding to the desired apartment number on the DR-8AM lobby panel.
- Resident Response: The resident in the apartment hears the call on their compatible room unit (e.g., DP-SS). The resident can then pick up their interphone handset to speak with the visitor.
- Abertura da porta: If an electric door strike is connected, the resident can typically press a button on their room unit to release the door for the visitor.
Note: The DR-8AM lobby panel itself does not produce a ringing sound. The call notification occurs only at the resident's room unit.
5. Manutenção
5.1 Limpeza
- To clean the exterior of the unit, use a soft, dry cloth.
- Do not use abrasive cleaners, solvents, or liquid sprays, as these can damage the finish or internal components.
5.2 Proteção
- As the unit is not waterproof, ensure its installed location remains protected from rain, splashes, and high humidity.
- Regularly inspect the unit for any signs of damage or loose connections.
6. Solução De Problemas
If you encounter issues with your DR-8AM lobby panel, refer to the following common problems and solutions:
- Sem energia:
- Check if the DC12V power supply is correctly connected and functioning.
- Verifique se a tomada está funcionando.
- No Communication with Room Unit:
- Verify all wiring connections between the DR-8AM and the room unit (DP-SS) are secure and correct according to the wiring diagram.
- Ensure the room unit is powered on and functioning correctly.
- Verifique se há danos na fiação.
- Door Strike Not Activating:
- Confirm the electric door strike is correctly wired to the DR-8AM and has its own power supply if required.
- Teste a fechadura da porta separadamente, se possível.
- Botões não respondem:
- Inspect buttons for physical damage or obstruction.
- Ensure the internal connections for the buttons are secure.
If the problem persists after attempting these troubleshooting steps, please contact Commax customer support or a qualified technician.
7. Especificações
Detailed technical specifications for the Commax DR-8AM 8-Button Audio Intercom Lobby Panel:

Image: Table detailing the technical specifications of the DR-8AM.
| Recurso | Especificação |
|---|---|
| Número do modelo | DR-8AM |
| Vol de entradatage | CC 12 V |
| Consumo de energia | 300 mA |
| Formas de comunicação | Comunicação Síncrona |
| Fiação | 3-Wires Common, 1-Wire Single |
| Unidade de quarto compatível | DP-SS, DP-MSS, DP-TS, DP-KSS |
| Distância de transmissão | Ø0.65: 100 meters; Ø1.0: 200 meters |
| Temperatura de operação | -10°C (tested up to -40°C) to +40°C |
| Dimensões (L x A x P) | 125 x 236 x 21 mm |
| Flushed Box Dimensions (W x H x D) | 112 x 213 x 60 mm |
| Tipo de montagem | Tipo de montagem embutida |
| Material | Alumínio |
| Proteção da Água | Requires protection against water (not waterproof) |
8. Garantia e Suporte
For warranty information, technical support, or service inquiries regarding your Commax DR-8AM lobby panel, please contact your authorized Commax dealer or the manufacturer directly. Keep your purchase receipt as proof of purchase for any warranty claims.


