Introdução
This manual provides instructions for the safe and efficient operation of your Suteck Automatic Digital Yogurt Maker. Please read thoroughly before first use to ensure proper function and longevity of the appliance.
Instruções de segurança
- Leia todas as instruções cuidadosamente antes de usar o aparelho.
- Do not immerse the main unit of the yogurt maker in water or any other liquid.
- Mantenha o aparelho fora do alcance de crianças e animais de estimação.
- Use the yogurt maker only on a stable, flat, and heat-resistant surface.
- Sempre desconecte o aparelho da tomada quando não estiver em uso e antes de limpá-lo.
- Do not operate the appliance if the power cord or plug is damaged. Contact customer service for repair.
- This appliance is designed for household use only. Do not use it for commercial purposes.
- Assegure-se de que a ventilação ao redor da unidade esteja adequada durante o funcionamento.
Componentes do produto
The Suteck Yogurt Maker includes the following parts:
- Yogurt Maker Main Unit (Stainless Steel Design)
- Tampa Transparente
- 8 Glass Jars (6 oz each)
- Manual do usuário (este documento)

Image: The Suteck Yogurt Maker main unit with its transparent lid, containing eight glass jars filled with various yogurts and fruit toppings. A bowl of yogurt with strawberries and a separate glass of yogurt with berries are also shown.
Configurar
- Desembale todos os componentes e remova quaisquer materiais de embalagem.
- Wash the glass jars and the transparent lid with warm, soapy water. Rinse thoroughly and dry completely.
- Limpe o exterior da unidade principal com um panoamp pano. Não mergulhe a unidade principal em água.
- Place the yogurt maker on a clean, dry, and stable surface, away from direct heat sources or drafts.

Image: A visual representation of the Suteck Yogurt Maker and its individual components, including the stainless steel base, clear lid, and eight glass jars.
Operating Instructions: Making Yogurt
- Prepare the Yogurt Mixture: Add yogurt starter or a small amount of plain yogurt (containing live active cultures) to milk. Mix thoroughly until well combined. The specific ratio and type of milk may vary based on your desired yogurt consistency and starter culture instructions.
- Fill the Jars: Pour the prepared milk mixture evenly into the 8 clean glass jars. Do not overfill; leave a small space at the top.
- Place Jars in Maker: Carefully place the filled glass jars (without their lids) into the yogurt maker's base. Ensure they are seated properly. Cover the yogurt maker with its transparent lid.
- Definir temperatura e tempo:
- Plug in the appliance. The display will show "---".
- Pressione o Função button. The "Temp" light will flash green, and the "Time" light will be solid green. A default temperature (e.g., 108°F) will appear on the display.
- Use o + e - buttons to adjust the desired fermentation temperature. The temperature range is 68°F to 131°F (20°C to 55°C).
- Pressione o Iniciar / Cancelar button to confirm the temperature setting. The "Temp" light will become solid green, and the "Time" light will flash green.
- Use o + e - buttons to set the desired fermentation time. The time range is 1 to 48 hours.
- Pressione o Iniciar / Cancelar button again to confirm the time and initiate the fermentation process.
- The "Temp" and "Time" indicator lights will turn red, signifying that the yogurt maker is actively operating. The display will show the countdown timer.
- Conclusão: Once the set fermentation time has elapsed, the yogurt maker will emit an audible beep, and the display will show "0". The "Temp" and "Time" indicator lights will turn green.
- Cool and Enjoy: Carefully remove the jars from the yogurt maker. Place the lids on the jars and refrigerate for at least 4 hours before serving. This cooling period helps to thicken the yogurt and halts the fermentation process.

Image: Step 1 of yogurt making, showing a pitcher of milk and a spoon adding yogurt starter powder, with empty glass jars nearby.

Image: Step 2 of yogurt making, illustrating milk being poured from a pitcher into the glass jars.

Image: A step-by-step visual guide demonstrating how to set the temperature and time on the yogurt maker's digital control panel.

Image: Step 4 of yogurt making, showing a person enjoying a jar of homemade yogurt with fruit.
Dicas para melhores resultados:
- For thicker yogurt, consider using whole milk or adding a small amount of powdered milk to your mixture.
- Ensure your starter culture is fresh and active for optimal fermentation.
- Some users find that adding warm water to the basin around the jars can assist with more even heat distribution, although the unit is designed for uniform heating.
Manutenção e Limpeza
- Desconecte: Always unplug the yogurt maker from the power outlet before cleaning any part of the appliance.
- Clean Jars and Lid: The glass jars and transparent lid are dishwasher safe. Alternatively, they can be washed by hand with warm, soapy water. Rinse thoroughly and dry completely before storage or next use.
- Limpeza da unidade principal: Limpe o exterior da unidade principal com um pano macio e seco.amp cloth. Do not use abrasive cleaners, harsh chemicals, or scouring pads, as these can damage the finish. Never immerse the main unit in water or any other liquid.
- Armazenar: Ensure all parts are clean and completely dry before storing the appliance. Store in a cool, dry place, away from direct sunlight.

Image: Two panels illustrating cleaning methods: glass jars placed in a dishwasher rack, and a hand washing a glass jar under running water.
Solução de problemas
| Problema | Possível causa | Solução |
|---|---|---|
| Yogurt is too thin/liquid. | Insufficient fermentation time, low fermentation temperature, inactive starter culture, or low-fat milk. | Increase fermentation time, ensure correct temperature setting, use fresh and active starter, or try whole milk/add powdered milk for future batches. |
| O iogurte está muito azedo. | Fermented for too long or at too high a temperature. | Reduce fermentation time or lower the temperature for subsequent batches. |
| O aparelho não liga. | Not plugged in correctly, power outage, or faulty power outlet. | Check power connection, ensure the appliance is fully plugged in, and test the power outlet with another device. |
| Temperature/Time setting is difficult or auto-starts. | The control panel requires quick input within a short timeframe (approx. 5 seconds) to prevent auto-start with default settings. | After pressing "Function", quickly adjust the temperature with the +/- buttons and press "Start/Cancel". Then, quickly adjust the time with the +/- buttons and press "Start/Cancel" again to confirm. Practice the sequence to become familiar with the timing. |
Especificações
- Marca: Suteck
- Modelo: SNJ-159B
- Capacidade: 8 x 6 oz (48 oz total) glass jars
- Faixa de temperatura: 68°F - 131°F (20°C - 55°C)
- Intervalo do temporizador: 1 a 48 horas
- Poder: 25 W
- Material: Aço Inoxidável, Vidro
- Dimensões do produto: Approximately 14.5" (Length) x 7.5" (Height) x 5.7" (Width)
- Peso do item: 4.4 libras
- Características especiais: Automatic Shut-Off, Digital Display, Constant Temperature Control
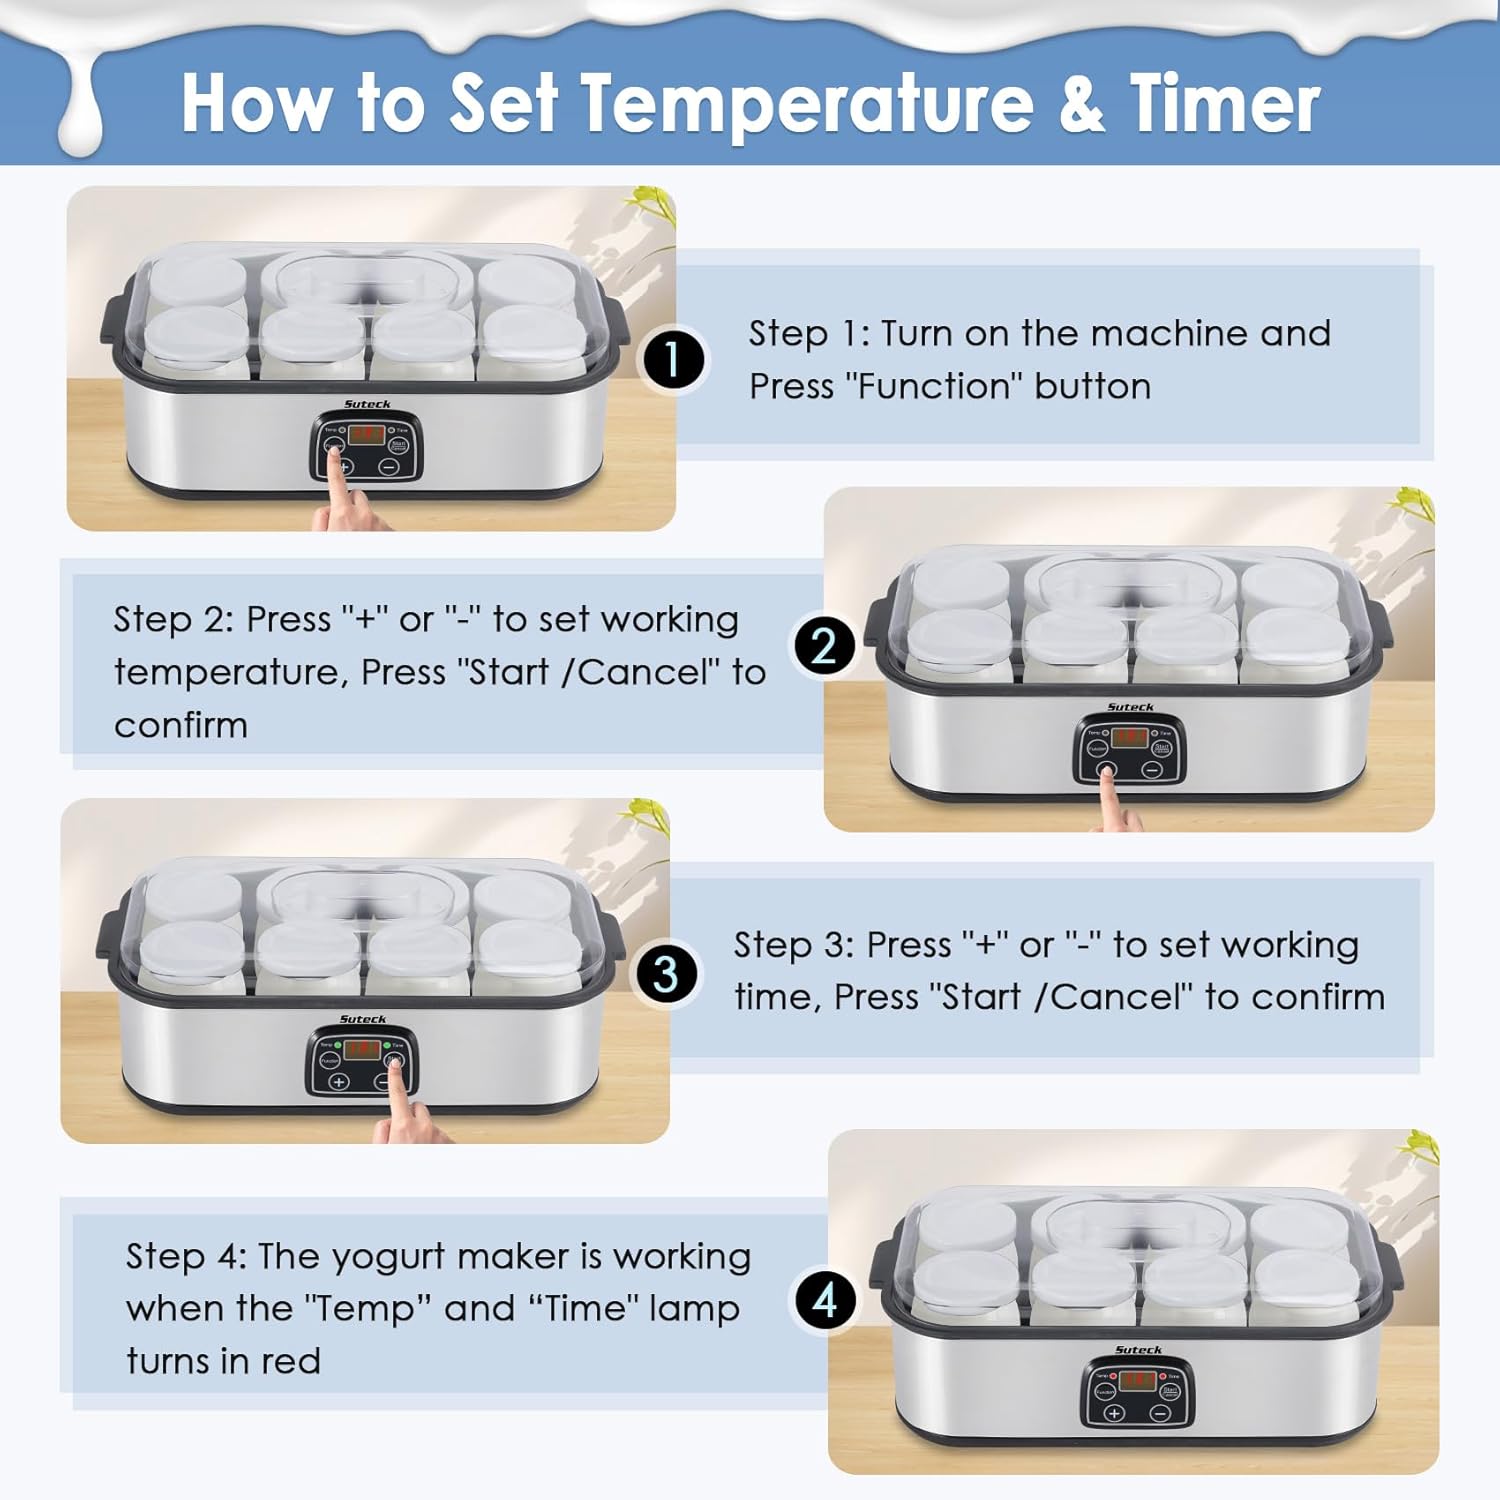
Image: The Suteck Yogurt Maker with key specifications highlighted, including its approximate dimensions (14.5 inches length, 7.5 inches height) and capacity (8 x 6 oz glass jars).
Garantia e Suporte
For warranty information or technical support regarding your Suteck Yogurt Maker, please refer to the original purchase documentation or contact Suteck customer service directly. Specific warranty terms and conditions may vary.
For additional assistance and product information, you may visit the Suteck Store on Amazon.


