1. Introdução
This manual provides comprehensive instructions for the installation, operation, and maintenance of the Chacon DI-O 54515 Universal Dimmer White. This device allows you to wirelessly control your lighting, integrating seamlessly with existing light switches and the DiO 1.0 ecosystem.
The DI-O 54515 micro-module is designed to be installed behind your existing light switch, enabling wireless ON-OFF control of your lights. It supports control via the physical switch, a remote control, or automatically through compatible motion or opening sensors. When connected to a LiteBox or DiO Home+ hub, it offers smartphone app control, timers, and scenario programming, including voice control via Amazon Echo or Google Home.
2. Informações de segurança
Leia atentamente todas as instruções de segurança antes da instalação e utilização. O não cumprimento destas instruções pode resultar em choque elétrico, incêndio ou outros riscos.
- A instalação deve ser realizada por um eletricista qualificado ou de acordo com as normas elétricas locais.
- Desligue sempre a energia no disjuntor antes de instalar ou realizar manutenção no aparelho.
- Do not exceed the maximum load ratings specified in the technical specifications.
- Este dispositivo foi projetado apenas para uso interno.
- Mantenha o dispositivo longe de água, umidade e temperaturas extremas.
- Certifique-se de que todas as conexões estejam seguras e devidamente isoladas.
3. Conteúdo da embalagem
A embalagem deve conter os seguintes itens:
- Chacon DI-O 54515 Universal Dimmer White Module
- Manual de Instruções (este documento)

Image 1: The Chacon DI-O 54515 Universal Dimmer White module, showing its compact design and wiring terminals.
4. Recursos do Produto
- Controle sem fio: Enables wireless ON-OFF control of lights when installed behind an existing switch.
- Opções de controle múltiplo: Compatible with existing physical switches, DiO 1.0 remote controls, wireless switches, motion sensors, and opening sensors.
- Integração de casa inteligente: Connects to LiteBox or DiO Home+ for smartphone app control, timers, and scenario programming.
- Controle de voz: Supports voice commands via Amazon Echo or Google Home when integrated with DiO Home+.
- Fácil instalação: Designed for simple connection behind an existing light switch, requiring no neutral wire.
- Design compacto: Dimensions (L x W x H): 41 x 42 x 13 mm, allowing it to fit into standard electrical boxes.
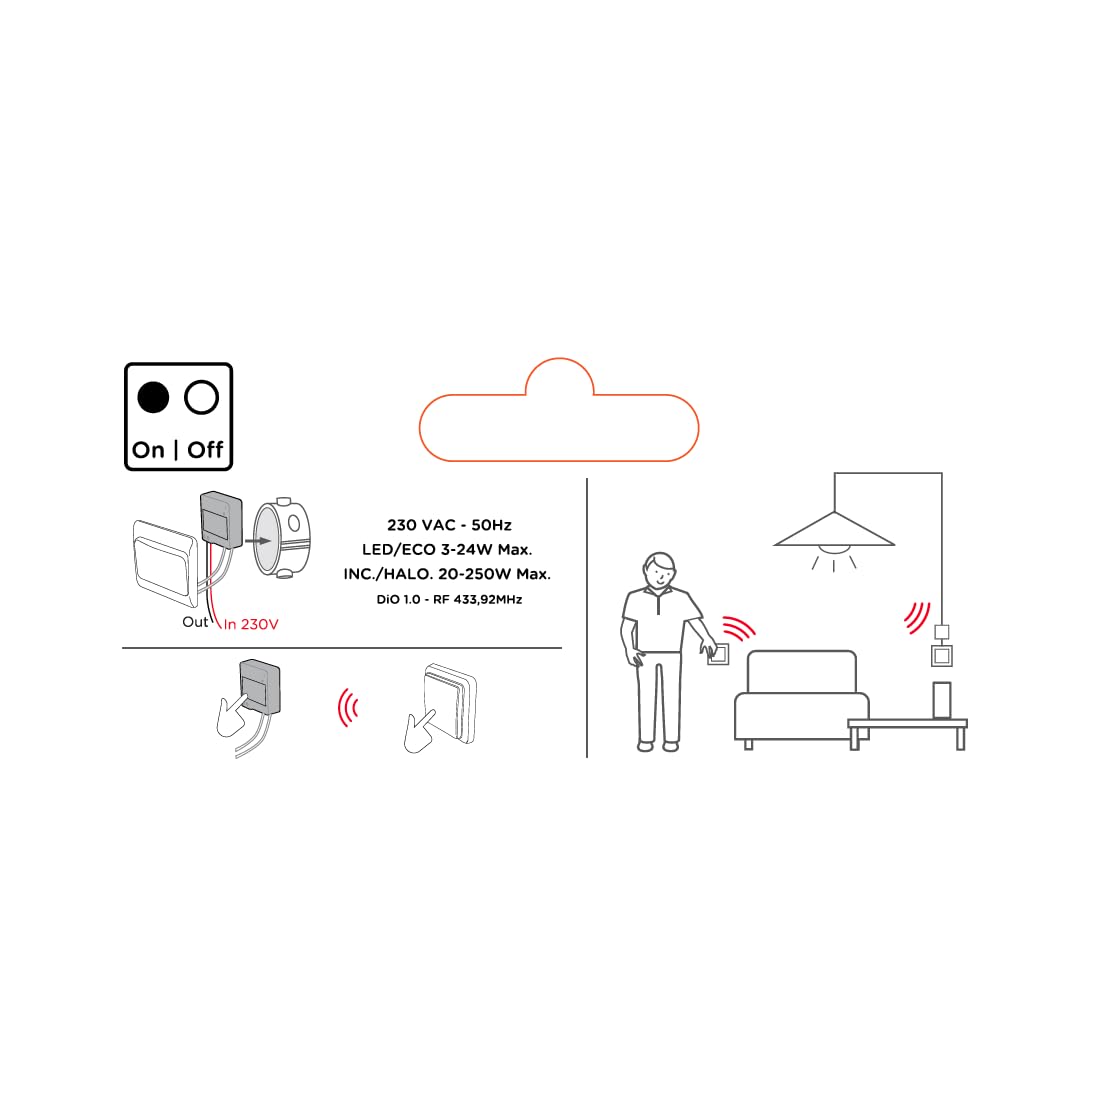
Image 2: An illustrative diagram detailing the wireless control capabilities and key electrical specifications of the module.
5. Configuração e instalação
The installation of the Chacon DI-O 54515 module is designed to be straightforward. However, if you are unsure, consult a qualified electrician.
5.1 Instruções de Fiação
- Desconecte a energia: Before starting any electrical work, ensure the power supply to the circuit is turned off at the main circuit breaker.
- Access Switch Box: Carefully remove your existing light switch from the wall box.
- Módulo de conexão:
- Connect the Live (L) wire from your electrical supply to the 'L' terminal on the DiO module.
- Connect the wire going to your light fixture to the output terminal (often marked with a wave symbol or 'OUT') on the DiO module.
- Connect the two wires from your existing light switch to the designated switch input terminals on the DiO module. This module does not require a neutral wire for operation.
- Position Module: Carefully place the DiO module into the wall box behind your existing light switch. Ensure wires are not pinched.
- Reinstalar o Switch: Reattach your existing light switch to the wall box.
- Restaurar energia: Ligue novamente a energia no disjuntor.

Image 3: A visual representation of the DiO module being installed within a standard electrical wall box, positioned behind an existing light switch.

Imagem 4: Uma descrição detalhada view of the Chacon DI-O 54515 module, highlighting its wiring terminals for proper connection.
5.2 Pairing with DiO 1.0 Controls
To enable wireless control, you need to pair the module with a compatible DiO 1.0 remote control, wireless switch, or sensor.
- Entrar no modo de emparelhamento: Refer to the specific instructions for your DiO 1.0 control device to put it into pairing mode. Typically, this involves pressing a pairing button on the module or performing a specific sequence with the existing switch.
- Ativar controle: Once the module is in pairing mode, activate your DiO 1.0 control (e.g., press the 'ON' button on a remote or wireless switch).
- Confirmação: The light connected to the module should flash or turn on/off to confirm successful pairing.
- Repeat for Multiple Controls: You can pair multiple DiO 1.0 controls to the same module if desired.
6. Instruções de operação
Once installed and paired, the Chacon DI-O 54515 module offers several ways to control your lighting:
- Existing Light Switch: You can continue to use your traditional wall switch to turn the lights on and off.
- DiO 1.0 Remote Control/Wireless Switch: Use any paired DiO 1.0 remote control or wireless switch to toggle the lights.
- DiO 1.0 Sensors: If paired with a DiO motion or opening sensor, the lights can be triggered automatically based on detected activity.
- Smartphone App (via DiO Home+ / LiteBox):
- Connect your DiO module to a DiO Home+ or LiteBox hub (sold separately).
- Download the free DiO smartphone app.
- Follow the app's instructions to add and configure your module.
- From the app, you can turn lights on/off, set timers, and create custom scenarios.
- Voice Control (via DiO Home+ and Smart Speaker):
- Ensure your DiO Home+ hub is integrated with Amazon Echo or Google Home.
- Use voice commands such as "Alexa, turn on the living room light" or "Hey Google, turn off the kitchen light."
7. Manutenção
The Chacon DI-O 54515 module requires minimal maintenance. Follow these guidelines to ensure optimal performance:
- Limpeza: If necessary, gently wipe the module with a dry, soft cloth. Do not use liquid cleaners or solvents.
- Inspeção: Periodically check the wiring connections to ensure they remain secure. Always disconnect power before inspection.
- Atualizações de firmware: If using with a DiO Home+ or LiteBox, ensure your hub's firmware and the smartphone app are kept up to date for the best performance and security.
8. Solução De Problemas
| Problema | Possível causa | Solução |
|---|---|---|
| A luz não liga/desliga. | No power to the module, incorrect wiring, module not paired, faulty bulb. | Check circuit breaker. Verify wiring according to Section 5.1. Re-pair the module with the control device (Section 5.2). Test with a known working bulb. |
| O controle sem fio não está funcionando. | Module not paired, control device out of range, battery low in remote/sensor. | Ensure module is correctly paired (Section 5.2). Move control device closer to the module. Replace batteries in remote/sensor. |
| Module indicator light flashing red. | Detecção de sobrecarga ou curto-circuito. | Immediately disconnect power. Check the connected load does not exceed specifications. Inspect wiring for any short circuits. Consult a qualified electrician if the problem persists. |
| O controle de voz não responde. | DiO Home+ hub not connected, incorrect voice command, smart speaker issue. | Ensure DiO Home+ is online and linked to your smart speaker account. Verify the correct device name is used in commands. Check smart speaker's internet connection. |
9. Especificações
| Recurso | Detalhe |
|---|---|
| Número do modelo | 54515 |
| Marca | Dio |
| Modo de operação | LIGADO DESLIGADO |
| Classificação atual | 10 Amps |
| Tipo de interruptor | Interruptor Dimmer |
| Tipo de montagem | Montagem na parede |
| Tipo de atuador | Controle remoto |
| Avaliação de proteção internacional | IP44 |
| Tipo de controlador | Amazon Alexa |
| Método de controle | Remoto |
| Cor | Branco |
| Dimensões (C x L x A) | 41 x 42 x 13 mm |
| Garantia | 2 anos |
Note on Dimming Functionality: While the product title includes "Dimmer" and "Switch Type" is listed as "Dimmer Switch", the official specifications list "Operation mode: ON-OFF". Some user reviews also indicate that newer versions of this module function as a simple ON/OFF switch rather than a dimmer. Please verify the specific functionality of your module upon receipt.
10. Garantia e Suporte
This Chacon DI-O 54515 Universal Dimmer White module comes with a Garantia de 2 ano a partir da data da compra, cobrindo defeitos de fabricação.
For technical support, troubleshooting assistance, or warranty claims, please contact your retailer or visit the official Dio website for contact information. Please have your proof of purchase and model number (54515) ready when contacting support.


