1. Introdução
The Bewinner Fixed Wireless Terminal (FWT) is designed to provide voice services using a GSM mobile phone SIM card, eliminating the need for traditional ground wire lines. This device allows you to use standard telephone landline operations with the flexibility of a mobile network. It supports international and domestic, local, fixed/mobile voice services and is suitable for various applications including telephone landlines, alarm systems, and recording boxes.
This manual provides detailed instructions for the proper installation, operation, and maintenance of your Bewinner FWT.
2. Informações de segurança
- Leia todas as instruções cuidadosamente antes de usar o dispositivo.
- Não exponha o dispositivo à água, umidade ou temperaturas extremas.
- Use only the provided power adapter. Using an incorrect adapter may damage the device and void the warranty.
- Mantenha o dispositivo longe da luz solar direta e de fontes de calor.
- Não tente abrir ou reparar o dispositivo por conta própria. Encaminhe todos os serviços de manutenção a pessoal qualificado.
- Garanta ventilação adequada ao redor do dispositivo para evitar superaquecimento.
3. Conteúdo da embalagem
Por favor, verifique se a embalagem contém os seguintes itens:
- Bewinner Fixed Wireless Terminal Main Unit
- Adaptador de energia (DC 12V)
- Antena GSM
- Telephone Line Cables (RJ11)

Imagem 3.1: Contents of the Bewinner Fixed Wireless Terminal package, including the main unit, power adapter, antenna, and telephone cables.
4. Produto acabadoview
4.1 Indicadores do Painel Frontal
The front panel of the Bewinner FWT features several LED indicators that display the device's status:
- PODER: Indica que o dispositivo está ligado.
- INUSE: Indicates the telephone line is in use.
- FALANDO: Indicates an active call.
- MÓDULO: Indicates the GSM module status.
- SIM: Indicates the SIM card status.
- Indicadores de intensidade do sinal: Multiple LEDs to show the strength of the GSM signal.

Imagem 4.1: Frente view of the Bewinner FWT, highlighting the LED indicators for power, usage, call status, module, SIM, and signal strength.
4.2 Portas do painel traseiro
O painel traseiro oferece todas as portas de conexão necessárias:
- CC 12V: Porta de entrada de energia.
- LIGADO/DESLIGADO: Interruptor de alimentação.
- PHONE1 / PHONE2: RJ11 ports for connecting standard telephones or alarm systems.
- USB: Micro USB port (for potential data/configuration, typically not user-accessible for basic operation).
- RST: Botão de reinicialização.
- FORMIGA: SMA connector for the external GSM antenna.
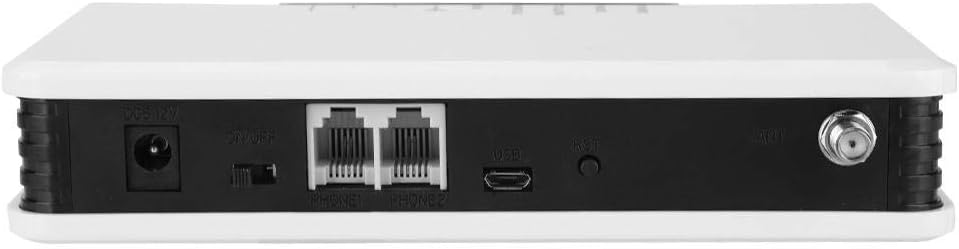
Imagem 4.2: Traseira view of the Bewinner FWT, showing the DC power input, ON/OFF switch, PHONE1/PHONE2 ports, USB port, Reset button, and antenna connector.
5. Instruções de configuração
Follow these steps to set up your Bewinner Fixed Wireless Terminal:
5.1 Instalação do cartão SIM
- Ensure the device is powered off using the ON/OFF switch on the rear panel.
- Locate the SIM card slot on the bottom of the device. It is usually covered by a small flap or a swing-up mechanism.
- Carefully insert your activated GSM SIM card into the slot. Ensure the SIM card is correctly oriented according to the diagram near the slot. The SIM card slot typically swings up to allow insertion.
- Close the SIM card slot securely.

Imagem 5.1: Fundo view of the Bewinner FWT, indicating the location of the SIM card slot. Ensure the SIM card is activated by your mobile carrier before insertion.
5.2 conexão de antena
- Locate the ANT connector on the rear panel of the device.
- Screw the provided GSM antenna onto the ANT connector clockwise until it is finger-tight.
- Position the antenna vertically for optimal signal reception.
5.3 Conexão de Energia
- Connect the power adapter to the DC 12V input port on the rear panel.
- Conecte o adaptador de alimentação a uma tomada elétrica padrão.
5.4 Connecting a Telephone
- Using a standard RJ11 telephone cable, connect your telephone or alarm system to either the PHONE1 or PHONE2 port on the rear panel of the FWT.
5.5 Ligando
- Ligue o interruptor ON/OFF no painel traseiro e coloque-o na posição 'ON'.
- Observe the LED indicators on the front panel. The POWER LED should illuminate. The SIM and MODULE LEDs should also light up, and the signal strength indicators should show the network signal. This process may take a few moments as the device registers with the GSM network.

Imagem 5.2: The Bewinner FWT in an operational setting, demonstrating its use for making calls via a connected telephone.
6. Instruções de operação
6.1 Fazendo uma chamada
- Pick up the handset of the connected telephone. You should hear a dial tone.
- Disque o número de telefone desejado.
- The TALKING LED will illuminate during an active call.
6.2 Recebendo uma Chamada
- When an incoming call is received, the connected telephone will ring.
- Levante o auscultador para atender a chamada.
6.3 Significado dos indicadores LED
| Indicador | Status | Descrição |
|---|---|---|
| PODER | On | O dispositivo está ligado. |
| EM USO | On | Telephone line is active (off-hook). |
| FALANDO | On | An active call is in progress. |
| MÓDULO | Ligado / Piscando | Indicates GSM module status (e.g., searching for network, registered). |
| SIM | Ligado / Piscando | Indicates SIM card status (e.g., detected, error). |
| Intensidade do sinal | Varying LEDs | Indicates the strength of the GSM network signal. More LEDs lit means stronger signal. |
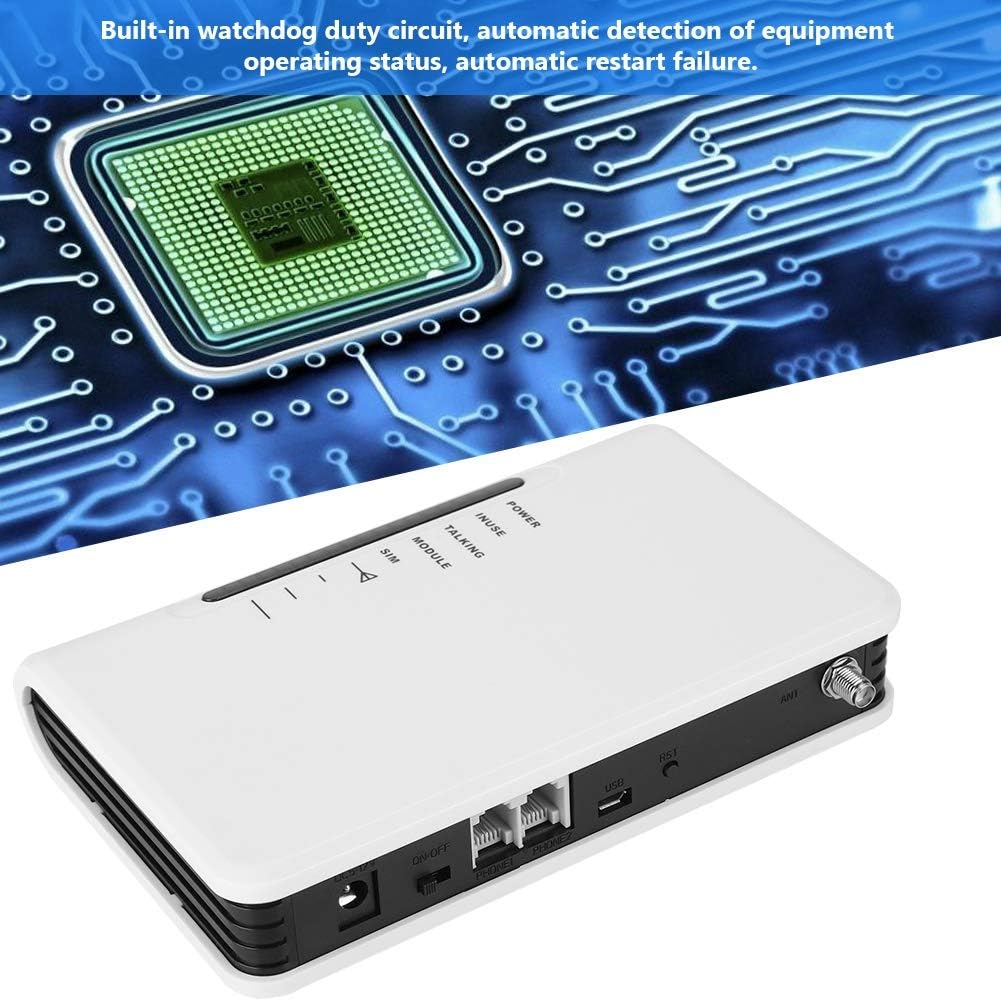
Imagem 6.1: The Bewinner FWT displaying various LED statuses, including signal, standby, and working status.
7. Manutenção
- Limpeza: Use um pano macio e seco para limpar a parte externa do dispositivo. Não use produtos de limpeza líquidos ou aerossóis.
- Armazenar: Se for guardar o aparelho por um período prolongado, desligue-o da tomada e guarde-o em local fresco e seco.
- Watchdog Circuit: The device includes a built-in watchdog duty circuit for automatic detection of operating status and automatic restart in case of failure, minimizing the need for manual intervention.
8. Solução De Problemas
| Problema | Possível causa | Solução |
|---|---|---|
| Sem energia | Power adapter not connected; Power switch off; Faulty adapter/outlet. | Ensure power adapter is securely connected and plugged into a working outlet. Turn the ON/OFF switch to 'ON'. |
| Sem tom de discagem | SIM card not inserted or activated; Poor GSM signal; Telephone not connected properly. | Check SIM card insertion and activation status. Ensure antenna is connected and positioned for best signal. Verify telephone cable connection to PHONE1/PHONE2 port. |
| Poor Call Quality / Cannot Hear | Weak GSM signal; Network congestion; Device compatibility issues with specific network bands. | Relocate the FWT to an area with better signal strength (check signal LEDs). Ensure your SIM card's network provider supports the device's GSM bands (850/900/1800/1900Mhz). Note that some networks (e.g., in the US) may no longer support 2G devices. |
| Não consigo fazer/receber chamadas. | SIM card not activated; SIM card balance low; Network issues; Device not registered on network. | Verify SIM card activation and account balance with your mobile carrier. Check signal strength. Restart the device. |
| Device restarts automatically | Normal operation of watchdog circuit; Temporary system error. | This may be the built-in watchdog circuit functioning. If restarts are frequent and disruptive, contact support. |
9. Especificações
| Recurso | Detalhe |
|---|---|
| Marca | Vencedor |
| Número do modelo | Bewinner42sg1ohuke-01 |
| GSM Frequency Bands | Quad-Band GSM 850/900/1800/1900Mhz |
| Fonte de energia | DC |
| Volumetage | 12 Volts, 5 Volts (Input/Output) |
| O quetage | 2 watts |
| Dimensões do produto | 10L x 10W x 10H millimetres (approx. 1 x 1 x 1 cm) |
| Peso do item | 399 g |
| Dispositivos compatíveis | PC (for potential configuration, not typical user operation), Standard Telephones, Alarm Systems |
| Nível de ruído | 104 decibéis |
| UPC | 753874206541 |

Imagem 9.1: Bottom label of the Bewinner FWT, displaying the model number, serial number, and checkboxes for supported network technologies (GSM, CDMA, WCDMA, 4G).
Observação: Specifications are subject to change without notice. The "Noise level" specification of 104 Decibels may be a general specification for a component within the device or a misinterpretation; the device itself is not expected to produce such high noise during normal operation.
10. Garantia e Suporte
Para informações sobre garantia e suporte técnico, consulte a documentação fornecida com sua compra ou entre em contato com o revendedor. Guarde o comprovante de compra para eventuais solicitações de garantia.