1. Introdução
Obrigado pela compra.asing the THOMSON 48L Mini Oven, Model WT024. This appliance is designed for versatile cooking, baking, grilling, and rotisserie functions. To ensure safe and efficient operation, please read this instruction manual thoroughly before first use and keep it for future reference.
2. Instruções importantes de segurança
Ao usar aparelhos elétricos, precauções básicas de segurança devem sempre ser seguidas para reduzir o risco de incêndio, choque elétrico e ferimentos às pessoas, incluindo o seguinte:
- Leia todas as instruções antes de usar o aparelho.
- Não toque em superfícies quentes. Use alças ou botões.
- Para evitar choques elétricos, não mergulhe o cabo, os plugues ou o aparelho em água ou qualquer outro líquido.
- É necessária supervisão rigorosa quando qualquer aparelho for usado por crianças ou perto delas.
- Desligue da tomada quando não estiver em uso e antes de limpar. Deixe esfriar antes de colocar ou retirar peças.
- Não opere nenhum aparelho com o cabo ou plugue danificado ou após o aparelho apresentar mau funcionamento ou ter sido danificado de qualquer forma.
- O uso de acessórios não recomendados pelo fabricante do aparelho pode causar riscos.
- Não utilize ao ar livre.
- Não deixe o cabo pendurado na borda da mesa ou do balcão, nem toque em superfícies quentes.
- Não coloque sobre ou perto de um queimador a gás ou elétrico quente, nem em um forno aquecido.
- Deve-se ter extremo cuidado ao mover um aparelho que contenha óleo quente ou outros líquidos quentes.
- Sempre conecte primeiro o plugue ao aparelho e, em seguida, ligue o cabo na tomada. Para desconectar, gire qualquer controle para a posição "desligado" e, em seguida, retire o plugue da tomada.
- Não utilize o aparelho para outro fim que não o pretendido.
- Alimentos grandes ou utensílios de metal não devem ser inseridos na torradeira, pois podem causar incêndio ou risco de choque elétrico.
- Pode ocorrer um incêndio se o forno estiver coberto ou em contato com material inflamável, incluindo cortinas, persianas, paredes e similares, enquanto estiver em funcionamento.
- Não coloque nenhum dos seguintes materiais no forno: papel, papelão, plástico e similares.
- Não guarde nenhum material, além dos acessórios recomendados pelo fabricante, neste forno quando não estiver em uso.
- Não cubra a bandeja de migalhas ou qualquer parte do forno com papel-alumínio. Isso causará superaquecimento do forno.
3. Produto acabadoview
Familiarize yourself with the components of your THOMSON 48L Mini Oven.

Figura 1: Frente view of the THOMSON 48L Mini Oven, showcasing its compact design and 48-liter capacity.
3.1. Componentes principais
- Carcaça do forno: Corpo principal do aparelho.
- Porta de vidro: Double-glazed for heat retention and visibility.
- Lidar: Para abrir e fechar a porta do forno.
- Painel de controle: Located on the right side, featuring three rotary knobs.
- Elementos de aquecimento: Upper and lower heating elements for various cooking modes.
- Luz interior: (If applicable, not explicitly mentioned but common)
3.2. Painel de controle

Figura 2: Detalhado view of the control panel, showing the temperature, mode, and timer knobs.
- Botão de controle de temperatura: Ajusta a temperatura de 100°C a 230°C.
- Botão seletor de modo: Selects cooking functions (e.g., top heat, bottom heat, convection, rotisserie).
- Botão do cronômetro: Sets cooking time up to 120 minutes with automatic shut-off and bell signal.
3.3. Acessórios incluídos
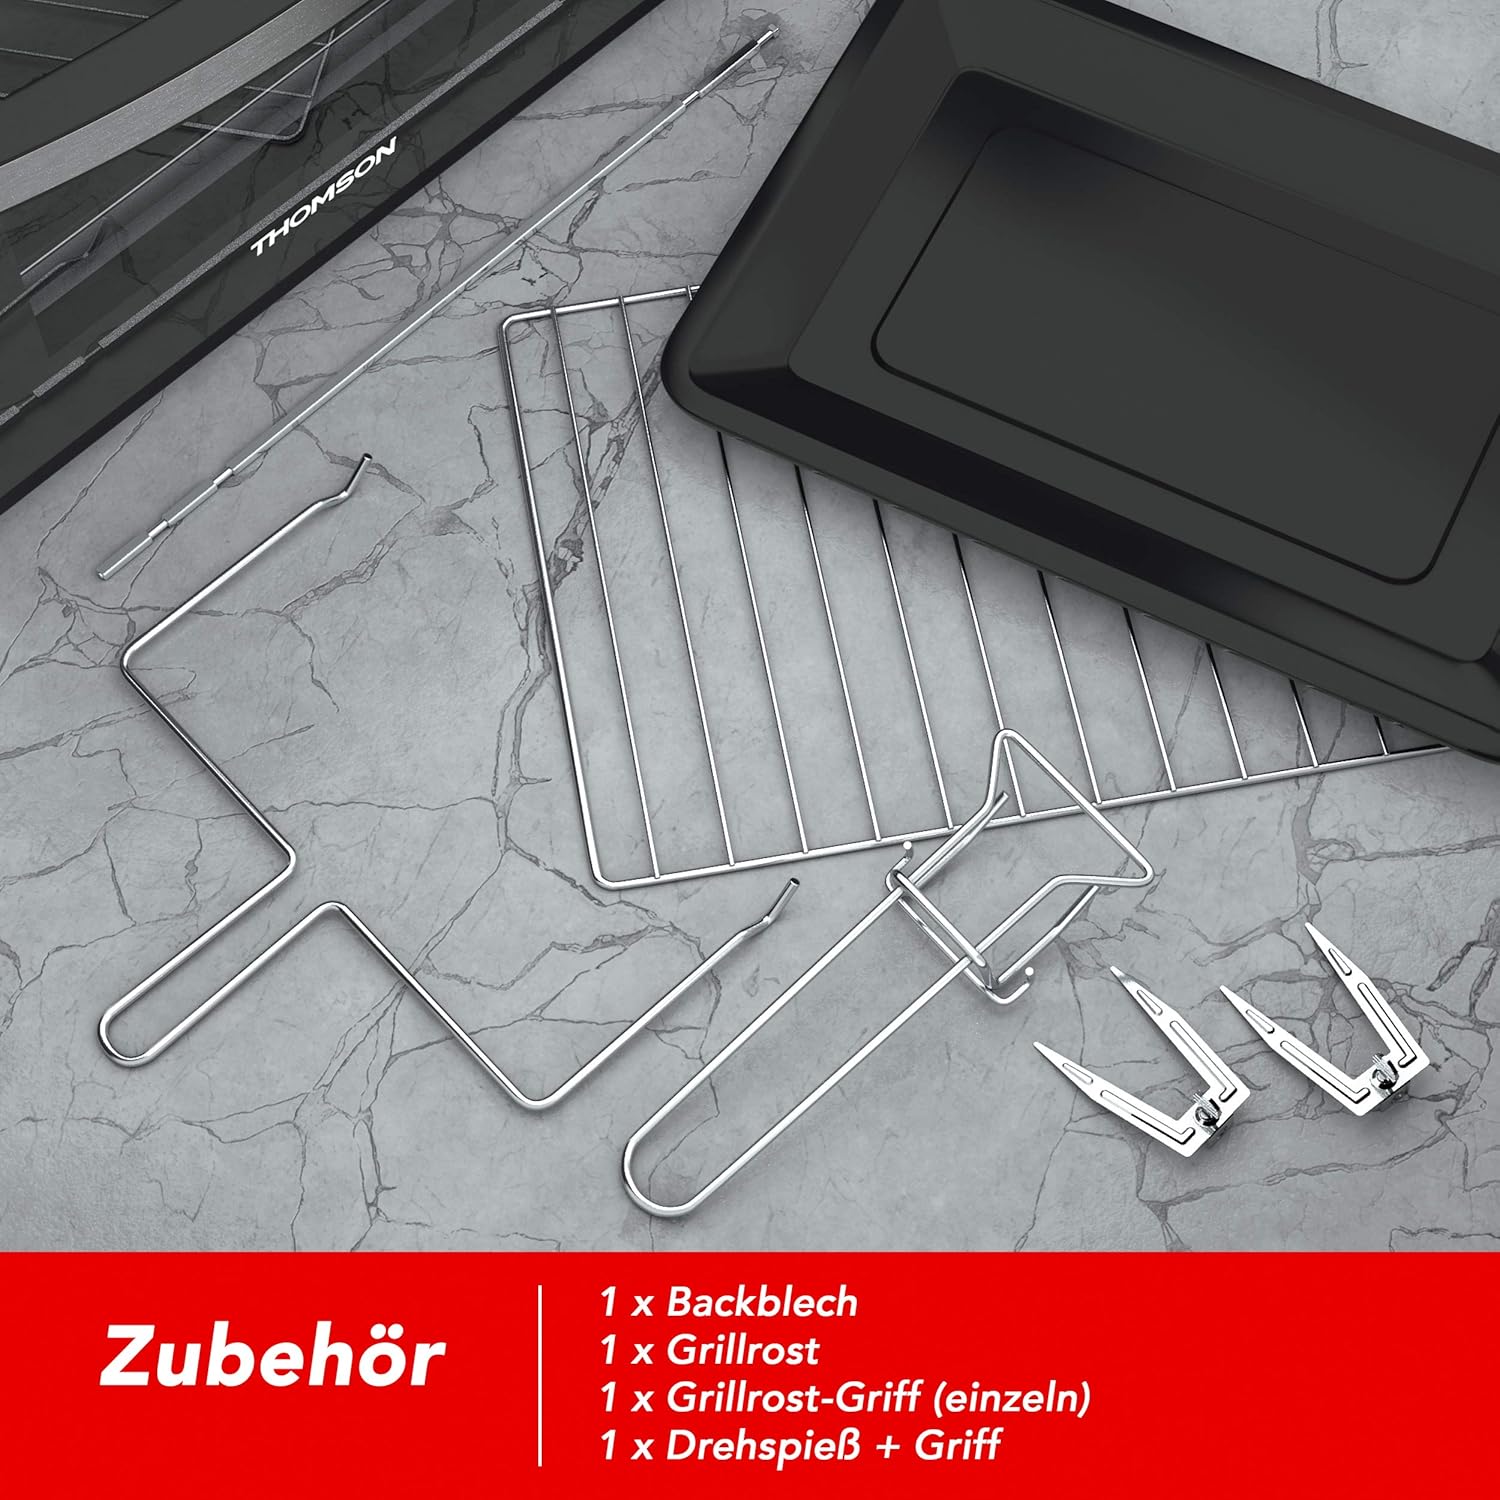
Figura 3: All included accessories: baking tray, grill rack, grill rack handle, and rotisserie spit with handle.
- Assadeira: Para assar e recolher gotas.
- Prateleira para Churrasqueiras: For grilling and placing dishes.
- Grill Rack Handle: For safely inserting and removing the grill rack and baking tray.
- Rotisserie Spit with Handle: For roasting poultry or larger meat cuts.
4. Configuração e primeiro uso
4.1. Desembalagem
- Remove all packaging materials and promotional labels from the oven.
- Verifique se todos os acessórios estão presentes e não danificados.
- Mantenha os materiais de embalagem fora do alcance das crianças.
4.2. Localização

Figura 4: The mini oven positioned on a kitchen counter, demonstrating appropriate placement with surrounding clearance.
- Coloque o forno sobre uma superfície estável, plana e resistente ao calor.
- Ensure adequate ventilation around the oven (at least 10 cm clearance on all sides).
- Do not place the oven near flammable materials (curtains, walls, etc.).
- Do not place the oven directly under a wall cabinet.
4.3. Limpeza Inicial
- Antes da primeira utilização, limpe o interior e o exterior do forno com um pano.amp pano.
- Wash all accessories (baking tray, grill rack, rotisserie spit) in warm, soapy water, rinse thoroughly, and dry completely.
4.4. First Operation (Burn-in)
It is recommended to run the oven empty for approximately 15 minutes before first use to burn off any manufacturing residues and odors.
- Ensure the oven is empty and the door is closed.
- Conecte o cabo de alimentação a uma tomada elétrica aterrada.
- Ajuste o botão de controle de temperatura para 230°C.
- Set the Mode Selector Knob to "Top and Bottom Heat with Convection" (usually indicated by fan icon with top and bottom lines).
- Ajuste o botão do temporizador para 15 minutos.
- É normal que haja um leve odor ou fumaça durante a operação inicial. Certifique-se de que a área esteja bem ventilada.
- Once the timer rings, the oven will switch off automatically. Allow the oven to cool completely before use.
5. Instruções de operação
This section details how to use the various functions of your mini oven.

Figura 5: Examples of dishes that can be prepared in the THOMSON Mini Oven, including baked goods, pizza, roasted chicken, and fries.
5.1. Operação geral
- Place food on the baking tray or grill rack. Ensure proper clearance from heating elements.
- Feche bem a porta do forno.
- Defina a temperatura desejada usando o Botão de controle de temperatura (100°C - 230°C).
- Select the appropriate cooking mode using the Botão seletor de modo.
- Defina o tempo de cozimento usando o Botão do cronômetro (up to 120 minutes). The oven will start heating.
- When the set time expires, the oven will automatically switch off, and a bell will sound.
- Carefully remove cooked food using oven mitts and the grill rack handle.
5.2. Modos de cozimento
- Calor máximo: Ideal for browning the top of dishes.
- Calor inferior: Ideal para bases de bolos ou cozimento lento.
- Top and Bottom Heat: Standard baking for most dishes.
- Top Heat with Convection: For faster cooking and even browning.
- Bottom Heat with Convection: For dishes requiring heat primarily from below with air circulation.
- Top and Bottom Heat with Convection: For uniform cooking and baking, especially for larger items or multiple trays.
- Função Grill: Uses the top heating element for grilling.
- Função Rotisserie: Activates the rotisserie motor for even roasting.
5.3. Usando o espeto giratório
- Prepare the food (e.g., chicken) and secure it onto the rotisserie spit using the forks.
- Insira a ponta afiada do espeto no encaixe do acionador do espeto giratório, localizado no lado direito do interior do forno.
- Rest the square end of the spit onto the support on the left side.
- Place the baking tray at the bottom to catch drips.
- Set the Mode Selector Knob to the rotisserie function (usually combined with grill or convection).
- Defina a temperatura e o tempo desejados.
- Once cooking is complete, use the rotisserie handle to carefully remove the hot spit from the oven.
6. Manutenção e Limpeza
Regular cleaning and maintenance will prolong the life of your oven.
6.1. Limpeza Geral
- Desligue sempre o forno da tomada e deixe-o arrefecer completamente antes de o limpar.
- Não mergulhe o corpo do forno, o cabo de alimentação ou a ficha em água ou qualquer outro líquido.
- Limpe o exterior com adamp pano e detergente suave. Seque bem.
- Limpe o interior com anúncioamp cloth and mild, non-abrasive cleaner. For stubborn stains, a paste of baking soda and water can be used.
- Limpe a porta de vidro com um limpador de vidros ou outro produto de limpeza.amp pano.
- Do not use abrasive cleaners, steel wool, or metal scouring pads, as they can scratch surfaces.
6.2. Acessórios de limpeza
- The baking tray, grill rack, and rotisserie spit can be washed in warm, soapy water. Rinse and dry thoroughly.
- For baked-on food, soak accessories in hot soapy water before cleaning.
7. Solução De Problemas
Se você tiver problemas com seu forno, consulte os problemas comuns e suas soluções a seguir:
| Problema | Possível causa | Solução |
|---|---|---|
| O forno não liga. | Não está conectado; energia outage; temporizador não configurado. | Ensure the oven is securely plugged into a working outlet. Check circuit breaker. Set the timer to the desired cooking duration. |
| A comida não está cozinhando uniformemente. | Incorrect mode selection; oven overloaded; food placed too close to heating elements. | Select the appropriate cooking mode (e.g., convection for even heat). Do not overload the oven. Ensure proper spacing around food. |
| Excesso de fumaça durante o funcionamento. | Food residue or grease buildup; initial burn-in odor. | Clean the oven interior and accessories thoroughly. Ensure the first burn-in cycle is complete. Reduce fat content in food if possible. |
| O espeto giratório não está girando. | Spit not correctly inserted; rotisserie mode not selected; food too heavy. | Ensure the spit is properly seated in both the drive socket and support. Select the rotisserie cooking mode. Do not exceed the maximum weight capacity for the rotisserie. |
Se o problema persistir após tentar essas soluções, entre em contato com o suporte ao cliente.
8. Especificações
| Recurso | Detalhe |
|---|---|
| Marca | THOMSON |
| Número do modelo | WT024 |
| Capacidade | 48 litros |
| Poder | 2000 Watts |
| Faixa de temperatura | 100°C - 230°C |
| Temporizador | Até 120 minutos com desligamento automático |
| Funções | Convection, Grill, Rotisserie, Top/Bottom Heat |
| Material | Alumínio, Vidro |
| Dimensões (C x L x A) | 57.5 x 46.2 x 34.5 cm |
| Peso | 11.5 kg |
| Cor | Preto |
9. Garantia e Suporte ao Cliente
This product comes with a standard manufacturer's warranty. Please refer to the warranty card included with your purchase for specific terms and conditions.
For technical assistance, spare parts, or any questions regarding your THOMSON 48L Mini Oven, please contact your local retailer or the THOMSON customer support service. Keep your proof of purchase for warranty claims.


