1. Introdução
This manual provides detailed instructions for the safe and effective use of the ANENG V01B Digital Multimeter. This device is a battery-powered, true-RMS, auto-ranging digital multimeter featuring a 4000-count LCD display with backlight and flashlight functions. It is designed for measuring various electrical parameters in automotive and general electrical applications.
2. Informações de segurança
Read all safety warnings and instructions carefully before using this multimeter. Failure to follow these instructions may result in electric shock, fire, or damage to the instrument.
- Não insira voltage at the Current Mode, Resistance Mode, Diode Mode, Continuity Mode, or Temperature Mode.
- Não insira voltage exceeding 36V DC or 25V AC when you are in the setting of measuring current.
- Sempre verifique se os cabos de teste estão conectados corretamente e se a chave seletora de função está ajustada para a faixa correta antes de realizar qualquer medição.
- Desligue a alimentação do circuito e descarregue todos os dispositivos de alta tensão.tagVerifique os capacitores antes de medir resistência, continuidade, diodos ou capacitância.
- Tenha cuidado ao trabalhar com voltagacima de 30V AC RMS, 42V pico ou 60V DC. Essas tensõestagrepresentam um risco de choque.
- Substitua as pilhas quando o indicador de bateria fraca acender para garantir leituras precisas.
- Não utilize o medidor se ele parecer danificado ou se a caixa estiver aberta.
3. Produto acabadoview
The ANENG V01B is a compact and versatile digital multimeter.
3.1. Dimensões do produto

The multimeter measures approximately 119.5mm (4.70in) in length, 61.7mm (2.43in) in width, and 31.9mm (1.25in) in thickness. Note: Manual measurement may have an error of 10-20 mm.
3.2. Recursos do painel traseiro

The back of the multimeter features a battery slot for easy access and a retractable bracket for convenient positioning. It also includes a high-brightness flashlight to assist in measurements in low-light conditions.

The back of the product also houses the NCV (Non-Contact Voltage) sensing point and the LED lighting for the flashlight function.
4. Configuração
4.1. Instalação da bateria
The ANENG V01B multimeter requires batteries for operation.
- Locate the battery slot cover on the back of the multimeter.
- Use uma chave de fenda para remover o parafuso que prende a tampa da bateria.
- Remova a tampa da bateria com cuidado.
- Insert the required batteries (typically AAA, refer to the battery compartment for specific type and polarity) ensuring correct polarity.
- Recoloque a tampa da bateria e prenda-a com o parafuso.
5. Instruções de operação
5.1. Panel Function Introduction

The front panel of the ANENG V01B multimeter features a rotary switch for function selection, an LCD display, and various input jacks.
- Mostrar: 4000 counts LCD for reading measurements.
- On-off detection/Buzzer: For continuity testing.
- Function conversion button (SEL): Used to switch between different functions within a single rotary switch position (e.g., AC/DC voltage, diodo/continuidade).
- AD/DC millivolt voltage (hertz): Measures small AC/DC voltages and frequency.
- OFF: Turns the multimeter off.
- AD/DC voltage (hertz): Measures standard AC/DC voltages and frequency.
- Ligar/desligar: Interruptor de alimentação principal.
- "10A" Input: Input jack for high current measurements (up to 10A).
- "COM" Input: Common (negative) input jack for all measurements.
- "VΩHz" Input: Input jack for voltage, medições de resistência, frequência, capacitância, diodo e continuidade.
- AD/DC current (mA): Measures small AC/DC currents (milliampéres).
- AD/DC current (amperes): Measures standard AC/DC currents (ampéres).
- NCV non-contact power alarm: Detecta vol ACtage sem contato direto.
- Data retention/Backlight (HOLD/*): Holds the current reading on the display and activates/deactivates the backlight.
- Resistance detection: Measures electrical resistance.
5.2. Measuring Current Safely
Aviso de segurança importante: Incorrect current measurement can damage the instrument.
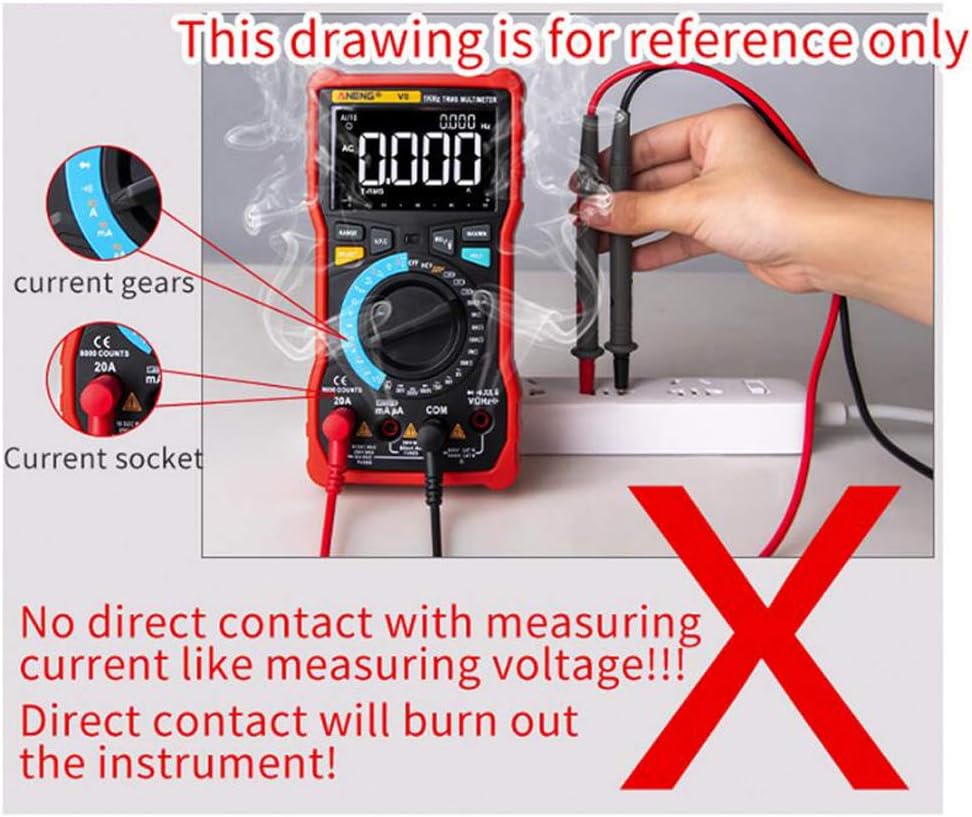
Do not directly contact a live circuit to measure current like measuring voltage. Direct contact will burn out the instrument. This drawing is for reference only to illustrate an incorrect method.
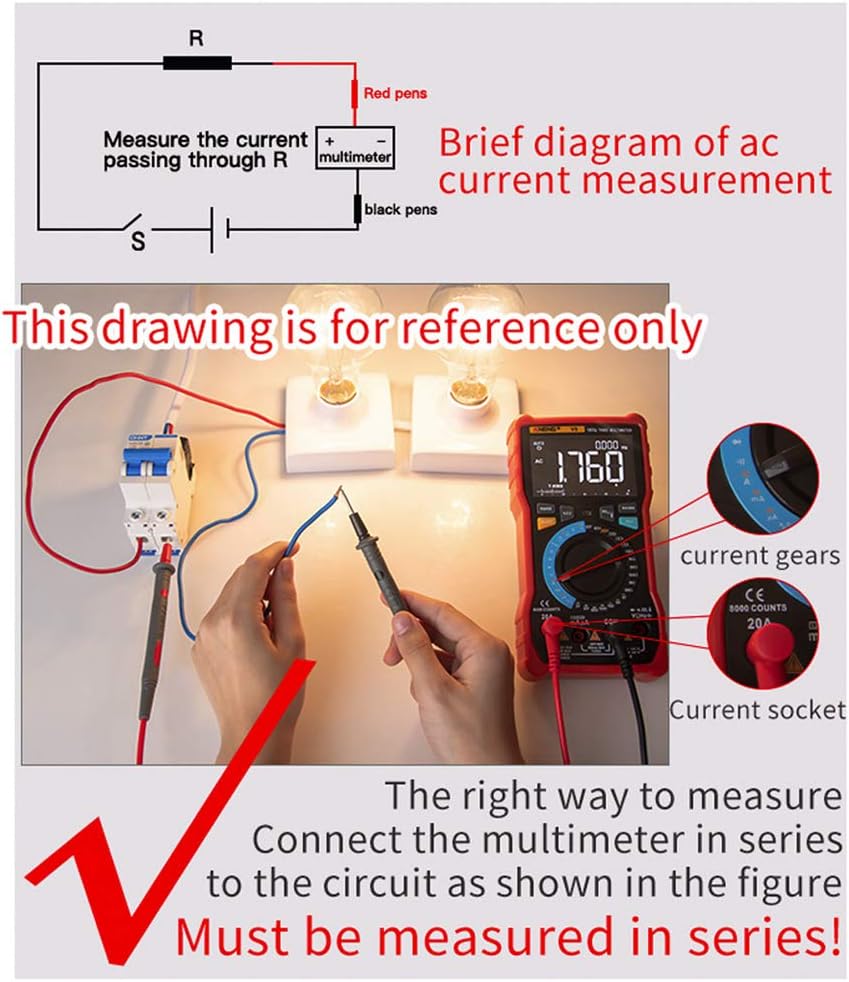
To measure current correctly, the multimeter must be connected in série with the circuit. This means the circuit must be broken, and the multimeter inserted into the break so that the current flows through the multimeter.
Steps for Current Measurement:
- Desligue a energia do circuito.
- Break the circuit where you want to measure current.
- Connect the red test lead to the appropriate current input jack (e.g., "10A" or "mA") on the multimeter.
- Conecte o fio de teste preto ao conector de entrada "COM".
- Connect the test leads in series with the circuit, ensuring the current flows through the multimeter.
- Select the appropriate current range on the rotary switch.
- Restore power to the circuit and read the measurement.
- After measurement, turn off power, disconnect the multimeter, and restore the circuit.
6. Manutenção
6.1. Cuidados Gerais
Mantenha o multímetro seco. Se molhar, seque-o imediatamente.
Use and store the multimeter in normal temperature environments. Extreme temperatures can shorten the life of electronic devices.
Handle the multimeter gently and carefully. Dropping it can damage circuit boards and cases.
Keep the multimeter away from dust and dirt, which can cause corrosion of electronic components.
Limpe o multímetro com o adesivo.amp pano ocasionalmente para mantê-lo com aparência de novo. Não use produtos químicos fortes, solventes de limpeza ou detergentes fortes.
6.2. Substituição da bateria
When the low battery indicator appears on the display, replace the batteries promptly to ensure accurate readings and proper operation. Refer to the "Battery Installation" section for instructions.
7. Solução De Problemas
7.1. Millivolt Value Jump
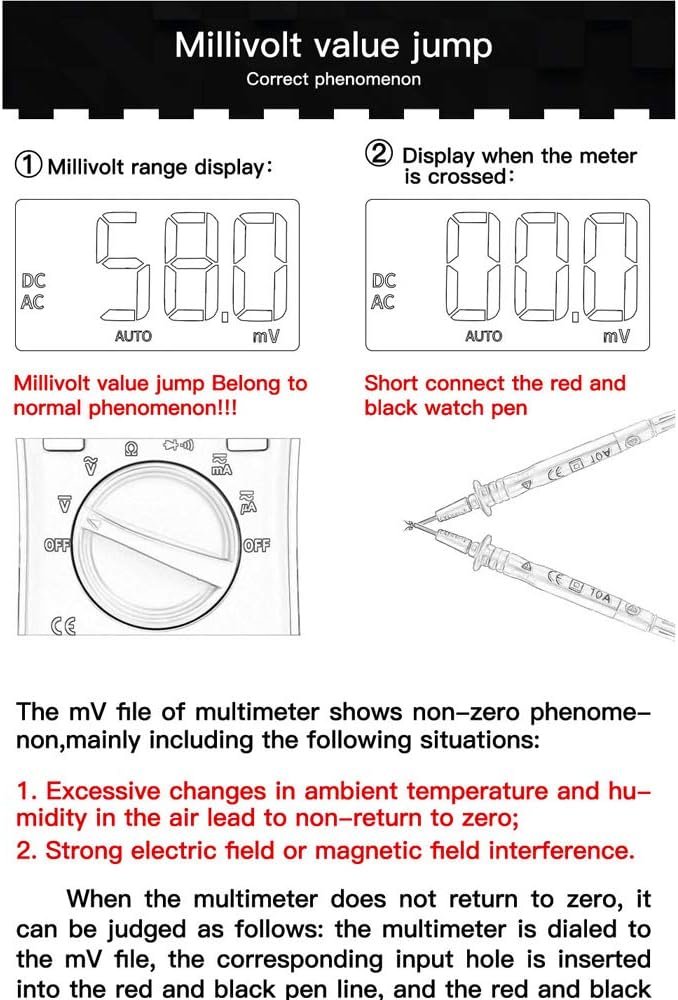
A "millivolt value jump" (non-zero reading) when the multimeter is set to the mV range and no input is connected is a normal phenomenon.
This can occur due to:
- Excessive changes in ambient temperature and humidity in the air, leading to a non-return to zero.
- Strong electric field or magnetic field interference.
If the multimeter does not return to zero in the mV file, you can short the red and black test leads together. The display should then show zero or a very small, stable value. If the issue persists, ensure the environment is free from strong interference.
8. Especificações
| Recurso | Especificação |
|---|---|
| Marca | ANENG |
| Modelo | V01B |
| Mostrar | LCD de 4000 contagens |
| Fonte de energia | Alimentado por bateria |
| Tipo de medição | Multimeter (True-RMS, Auto-Ranging) |
| Características | Backlight, Flashlight, NCV |
| UPC | 630282728844 |
| ASIN | B0831BXWGC |
9. Garantia e Suporte
Information regarding warranty coverage and customer support for the ANENG V01B Digital Multimeter is not available in this document. Please refer to the product packaging or contact the retailer/manufacturer directly for details.


