1. Introdução
Thank you for choosing the Graef CM501EU Coffee Grinder. This manual provides essential information for the safe and efficient use of your appliance. Please read it thoroughly before first use and keep it for future reference.
The Graef CM501EU is designed to grind coffee beans just before preparation, ensuring maximum aroma. Its compact design and 140 grind settings make it suitable for various coffee types, from fine espresso powder to coarse French press grinds. It offers the convenience of grinding directly into a coffee container, a coffee machine's filter basket, or an espresso portafilter.
2. Instruções importantes de segurança
Sempre siga as precauções básicas de segurança ao usar aparelhos elétricos para reduzir o risco de incêndio, choque elétrico e ferimentos.
- Leia todas as instruções cuidadosamente antes de operar o aparelho.
- Não mergulhe o aparelho, o cabo ou a ficha em água ou outros líquidos.
- É necessária supervisão rigorosa quando qualquer aparelho for usado por crianças ou perto delas.
- Desligue da tomada quando não estiver em uso, antes de colocar ou retirar peças e antes de limpar.
- Evite o contato com peças móveis.
- Não opere nenhum aparelho com o cabo ou plugue danificado, ou após o aparelho apresentar mau funcionamento ou ter sido danificado de qualquer forma.
- O uso de acessórios não recomendados ou vendidos pelo fabricante pode causar incêndio, choque elétrico ou ferimentos.
- Não utilize ao ar livre.
- Não deixe o cabo pendurado na borda da mesa ou do balcão, nem toque em superfícies quentes.
- Não coloque sobre ou perto de um queimador a gás ou elétrico quente, nem em um forno aquecido.
- Verifique se há objetos estranhos no recipiente de grãos antes de usá-lo.
- Este aparelho é somente para uso doméstico.
3. Produto acabadoview
Familiarize yourself with the components of your Graef CM501EU coffee grinder.
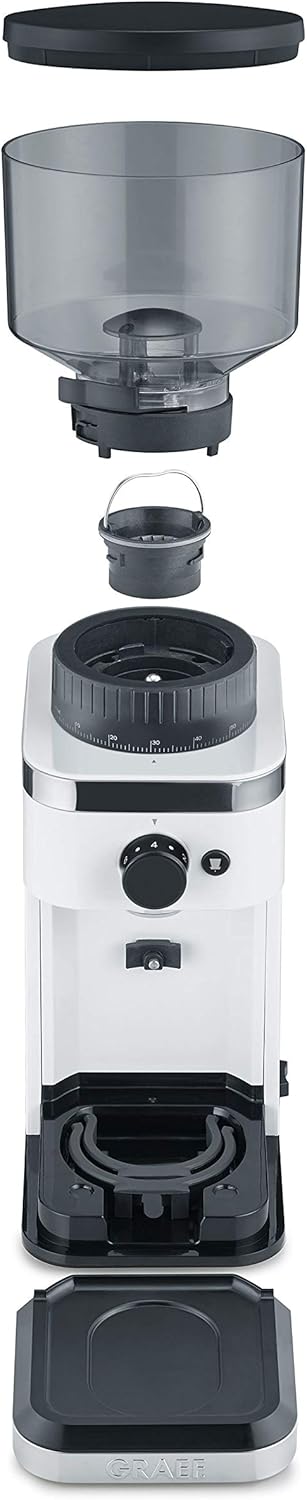
Figura 1: Explodido View de componentes
This image displays the Graef CM501EU coffee grinder disassembled into its main parts, including the bean hopper with lid, conical burr grinder, main unit, portafilter holder, and drip tray. Understanding these components is crucial for assembly and cleaning.

Figura 2: Frente View of Assembled Grinder
This image shows the fully assembled Graef CM501EU coffee grinder from the front, highlighting the bean hopper, grind adjustment ring, control dial, and dispensing area.
Componentes:
- Bean Hopper with Lid: Holds up to 300g of whole coffee beans.
- Anel de ajuste de moagem: Allows selection of 140 different grind levels.
- Unidade principal: Houses the motor and grinding mechanism.
- Controle Dial: For selecting grind duration or cup quantity.
- Ponto de distribuição: Where ground coffee exits.
- Suporte para porta-filtro: Attaches to the unit for direct grinding into an espresso portafilter.
- Bandeja de gotejamento: Collects any stray coffee grounds for easy cleaning.
- Recipiente para café moído: (Not explicitly shown as separate, but implied for collecting grounds).
4. Configuração
Antes da primeira utilização, certifique-se de que todos os materiais de embalagem foram removidos e que o aparelho está limpo.
- Descompacte: Carefully remove the coffee grinder and all accessories from the packaging.
- Limpar: Limpe o exterior da unidade principal com um panoamp cloth. Wash the bean hopper, lid, ground coffee container, and drip tray in warm, soapy water, then rinse and dry thoroughly.
- Montagem da bandeja coletora de gotas: Place the drip tray into its designated slot at the base of the grinder.
- Attach Bean Hopper: Align the bean hopper with the top of the main unit and twist it clockwise until it locks securely into place. Ensure the hopper is correctly seated to allow coffee beans to feed into the grinder.
- Encher o reservatório: Fill the bean hopper with whole roasted coffee beans. Do not overfill beyond the maximum fill line.
- Conecte a energia: Ligue o cabo de alimentação a uma tomada elétrica adequada (230V).

Figure 3: Disassembled Parts for Setup
This image shows the main unit, bean hopper, lid, ground coffee container, portafilter holder, and cleaning brush, illustrating the components that need to be assembled and cleaned during initial setup.
5. Instruções de operação
The Graef CM501EU offers precise control over your coffee grinding process.
5.1. Ajustando o nível de moagem
The grinder features 140 individual grind levels, from very fine for espresso to coarse for French press. To adjust the grind level:
- Ensure the grinder is off and unplugged.
- Rotate the grind adjustment ring located below the bean hopper to your desired setting. Finer settings are indicated by lower numbers, coarser settings by higher numbers.
- Refer to the table below for recommended grind settings for common brewing methods.

Figure 4: Grind Adjustment Ring
Um close-up view of the black ring with numerical markings (e.g., 90, 110, 120) used to select the desired grind fineness. Rotate this ring to change the grind setting.
| Método de preparação | Grind Level (Approx.) | Descrição |
|---|---|---|
| Expresso | 1-30 | Very fine, like flour |
| Filter Coffee (Drip) | 30-80 | Medium, like table salt |
| Prensa Francesa / Cold Brew | 80-140 | Coarse, like sea salt |
5.2. Moer café
You can grind coffee directly into a filter basket, a portafilter, or the included ground coffee container.
- Selecione a saída: Use the switch on the side of the grinder to select between grinding into a container/filter basket (cup icon) or a portafilter (portafilter icon).
- Posicione o contêiner:
- For filter coffee: Place your coffee filter basket directly under the dispensing outlet.
- For espresso: Attach the portafilter holder and insert your portafilter securely.
- For general use: Place the ground coffee container under the dispensing outlet.
- Selecione a quantidade: Use the control dial on the front to select the desired number of cups or grinding duration.
- Comece a moer: Press the start button (often integrated with the control dial or a separate button). The grinder will operate until the selected quantity is reached.
- Pare de moer: The grinder will stop automatically. You can also manually stop it by pressing the start button again or turning the main power switch to 'OFF'.

Figure 5: Control Dial and Cup Selection
This image shows the rotary dial for selecting the grinding duration or number of cups, along with the adjacent button to initiate grinding. The portafilter holder is also visible below.

Figure 6: Grinding into a Filter Basket
The grinder is shown actively dispensing ground coffee into a paper filter held within a filter basket, demonstrating its direct grinding capability for drip coffee makers.

Figure 7: Grinding into a Portafilter
This image illustrates the grinder dispensing fresh coffee grounds directly into an espresso machine's portafilter, secured by the integrated holder.

Figura 8: Interruptor de alimentação
A close-up of the main power switch, typically located on the side or back of the unit, with 'OFF', 'I' (on for container), and 'II' (on for portafilter) settings.
6. Manutenção e Limpeza
A limpeza regular garante o desempenho ideal e prolonga a vida útil do seu moedor de café.
- Desconecte: Desligue sempre o moedor da tomada antes de limpá-lo.
- Funil vazio: Remova todos os grãos de café restantes do reservatório.
- Desmontar: Remove the bean hopper, lid, ground coffee container, and drip tray.
- Limpe as peças removíveis: Wash the bean hopper, lid, ground coffee container, and drip tray in warm, soapy water. Rinse thoroughly and dry completely before reassembling. These parts are generally not dishwasher safe.
- Clean Grinding Burrs:
- Carefully remove the upper grinding burr. Refer to the product diagram for guidance.
- Use the provided cleaning brush to remove any accumulated coffee grounds from both the upper and lower grinding burrs.
- Não utilize água ou produtos de limpeza líquidos nas rebarbas.
- Limpeza da unidade principal: Limpe o exterior da unidade principal com um pano macio e seco.amp pano. Não utilize produtos de limpeza abrasivos nem mergulhe a unidade principal em água.
- Remontar: Once all parts are dry, reassemble the grinder in reverse order of disassembly. Ensure the burrs are correctly seated and the hopper is locked into place.
7. Solução De Problemas
If you encounter issues with your Graef CM501EU coffee grinder, consult the following table before contacting customer support.
| Problema | Possível causa | Solução |
|---|---|---|
| O moedor não liga. | Not plugged in; Power switch off; Hopper not correctly seated; Overload protection activated. | Ensure plug is securely in outlet; Turn power switch to 'I' or 'II'; Re-seat hopper until it locks; Unplug, wait 30 minutes, then try again. |
| No coffee grounds dispensed | No beans in hopper; Grinding burrs clogged; Grind setting too fine. | Fill hopper with beans; Clean grinding burrs (see Maintenance); Adjust to a coarser grind setting. |
| Moagem inconsistente | Burrs are dirty or worn; Foreign object in burrs. | Clean grinding burrs thoroughly; Inspect for foreign objects. If problem persists, burrs may need replacement. |
| Ruído excessivo durante a operação | Objeto estranho em rebarbas; componentes soltos. | Unplug and carefully inspect burrs for foreign objects; Ensure all removable parts are securely in place. |
8. Especificações
| Recurso | Detalhe |
|---|---|
| Marca | GRAEF |
| Número do modelo | CM501EU |
| Poder | 135 Watts |
| Volumetage | 230.0 V |
| Material | Stainless Steel (burrs), Plastic (housing) |
| Capacidade da tremonha de feijão | 300 gramas |
| Dimensões (C x L x A) | 20.5 x 13.5 x 20.5 cm |
| Peso | 2.1 quilos |
| Configurações de moagem | 140 levels (fine to coarse) |
| Uso recomendado | Grinding coffee beans for various brewing methods |
9. Garantia e Suporte
Specific warranty information is typically provided with the product packaging or on the manufacturer's official website. Consulte a documentação incluída na sua compra para obter detalhes sobre a cobertura e os termos da garantia.
For technical support, spare parts, or service inquiries, please contact Graef customer service. Contact details can usually be found on the official Graef website ou no cartão de garantia do seu produto.