1. Introdução
Thank you for choosing the OSD Black 300W Subwoofer Amplifier, Model BK-SAM300. This amplifier is designed to provide powerful and precise low-frequency amplification for passive subwoofers, enhancing your home theater or audio system experience. With its robust Class AB output stage and versatile connectivity options, the BK-SAM300 delivers deep, impactful bass for movies, music, and games.
This manual provides detailed instructions for the proper installation, operation, and maintenance of your subwoofer amplifier. Please read it thoroughly before use and retain it for future reference.
2. Informações de segurança
AVISO: Para reduzir o risco de incêndio ou choque elétrico, não exponha este aparelho à chuva ou umidade.
- Leia todas as instruções antes de operar o ampmais vivo.
- Guarde este manual para referência futura.
- Preste atenção a todos os avisos sobre o ampamplificador e neste manual.
- Siga todas as instruções.
- Não utilize este aparelho perto de água.
- Limpe apenas com um pano seco.
- Não obstrua as aberturas de ventilação. Instale de acordo com as instruções do fabricante.
- Não instale perto de fontes de calor, como radiadores, registros de calor, fogões ou outros aparelhos (incluindo amplificadores) que produzem calor.
- Não anule o propósito de segurança do plugue polarizado ou do tipo aterramento. Um plugue polarizado tem duas lâminas, uma mais larga que a outra. Um plugue do tipo aterramento tem duas lâminas e um terceiro pino de aterramento. A lâmina larga ou o terceiro pino são fornecidos para sua segurança. Se o plugue fornecido não se encaixar na sua tomada, consulte um eletricista para substituir a tomada obsoleta.
- Proteja o cabo de alimentação para que não seja pisado ou comprimido, principalmente nos plugues, nas tomadas de conveniência e no ponto de saída do aparelho.
- Utilize somente acessórios/anexos especificados pelo fabricante.
- Desligue este aparelho durante tempestades com raios ou quando não for utilizado por longos períodos de tempo.
- Entregue todos os serviços de manutenção a pessoal de serviço qualificado. O serviço é necessário quando o aparelho foi danificado de alguma forma, como cabo de alimentação ou plugue danificado, líquido foi derramado ou objetos caíram no aparelho, o aparelho foi exposto à chuva ou umidade, não opera normalmente ou foi derrubado.
3. Conteúdo da embalagem
Por favor, marque a caixa para os seguintes itens:
- Subwoofer OSD Black de 300 W Amplifier (BK-SAM300)
- Cabo de alimentação
- Manual do usuário (este documento)
4. Produto acabadoview
4.1 Controles do painel frontal
The front panel of the BK-SAM300 features essential controls for power and audio adjustments.

Figura 4.1: Frente e Traseira View of the BK-SAM300 Amplifier. This image displays both the front panel with its controls and the rear panel with all input/output connections.
- Botão de energia: Alterna o amplifier's power on or off.
- Phase Control (0° - 180°): Adjusts the phase of the subwoofer output relative to the main speakers. This helps to ensure that the subwoofer's sound waves align correctly with those of the main speakers, preventing cancellation or reinforcement issues at the crossover frequency.
- FREQ (Crossover Frequency) Control: Sets the upper frequency limit for the subwoofer. Frequencies above this setting will be filtered out. Adjustable from approximately 40Hz to 120Hz.
- Controle de GANHO (Volume): Adjusts the overall output level of the subwoofer amplifier. Use this to balance the subwoofer's volume with the rest of your audio system.
4.2 Conexões e controles do painel traseiro
The rear panel houses all the input and output connections, along with additional settings for advanced configuration.
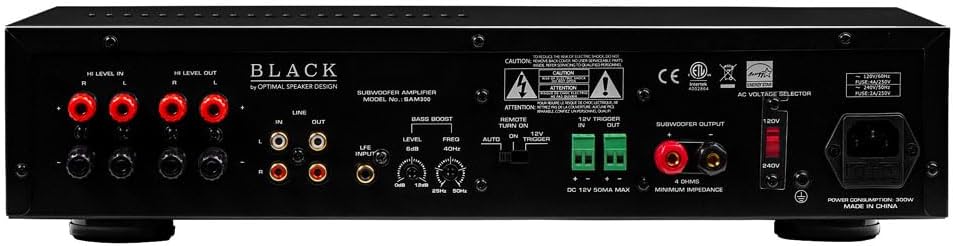
Figure 4.2: Rear Panel of the BK-SAM300 Amplifier. This image provides a detailed view of all input and output terminals, including Hi Level, Line, LFE, Bass Boost, 12V Trigger, and Subwoofer Output.
- HI LEVEL IN (Speaker Level Input): Connects directly to the speaker outputs of your receiver or amplifier. Use this if your receiver does not have a dedicated subwoofer output or LFE output.
- HI LEVEL OUT (Speaker Level Output): Passes the full-range audio signal from the HI LEVEL IN to your main speakers.
- LINE IN (RCA Input): Standard RCA stereo inputs for connecting to the pre-out or line-out of your receiver or audio source.
- LINE OUT (RCA Output): Passes the audio signal from the LINE IN to another amprificador ou dispositivo de áudio.
- LFE INPUT (RCA Input): Dedicated input for connecting to the LFE (Low-Frequency Effects) output of an AV receiver. This bypasses the amplifier's internal crossover, relying on the receiver's bass management.
- BASS BOOST (Level & Freq):
- Level (0dB to 12dB): Adjusts the intensity of the bass boost.
- Freq (25Hz to 50Hz): Selects the center frequency at which the bass boost is applied.

Figure 4.3: Detail of Bass Boost Controls. This image highlights the Level and Freq knobs for fine-tuning the bass boost.
- REMOTE TURN ON (Manual, Auto, 12V Trigger): Seleciona o amplifier's power-on mode.
- Manual: Amplifier is turned on/off manually via the front panel power button.
- Auto: Amplifier automatically turns on when an audio signal is detected and enters standby mode when no signal is present for a period.
- 12V Gatilho de entrada/saída: Permite o amplifier to be turned on/off by a 12V DC trigger signal from a compatible receiver or control system.
- SUBWOOFER OUTPUT (Binding Posts): Connects to your passive subwoofer using speaker wire. Ensure correct polarity (+ to + and - to -). The ampLifier é estável até 4 ohms de impedância.

Figure 4.4: Detail of Subwoofer Output and 12V Trigger. This image shows the binding posts for subwoofer connection and the 12V trigger terminals.
- CA VOLTAGE SELECTOR (120V/240V): Seleciona o volume de entrada apropriadotage para sua região. Ensure this is set correctly before plugging in the ampmais vivo.
- Entrada de alimentação CA: Conecta o cabo de alimentação fornecido.
5. Configuração
5.1 Posicionamento
Coloque o amplifier in a location that allows for adequate ventilation. Avoid enclosed spaces or stacking other components directly on top of the amplifier. Keep it away from direct sunlight, heat sources, and moisture. Ensure it is placed on a stable, level surface.
5.2 Conectando o Ampmais vivo
Choose one of the following connection methods based on your audio system's capabilities:
Method A: Using LFE Input (Recommended for AV Receivers with Subwoofer Output)
- Connect an RCA cable from the LFE or Subwoofer Pre-Out jack on your AV receiver to the LFE ENTRADA jack on the BK-SAM300.
- Conecte seu subwoofer passivo ao SAÍDA DO SUBWOOFER binding posts on the BK-SAM300 using appropriate gauge speaker wire. Ensure correct polarity (+ to + and - to -).
- Proceed to Section 5.3 for power connection.
Method B: Using Line Level Inputs (for Stereo Receivers or Pre-Outs)
- Connect RCA cables from the Pre-Out or Line-Out jacks of your receiver/pre-ampmais vivo para o ENTRADA DE LINHA (Left and Right) jacks on the BK-SAM300.
- Conecte seu subwoofer passivo ao SAÍDA DO SUBWOOFER binding posts on the BK-SAM300 using appropriate gauge speaker wire. Ensure correct polarity (+ to + and - to -).
- Proceed to Section 5.3 for power connection.
Method C: Using High Level Inputs (for Receivers without Dedicated Subwoofer/Pre-Outs)
- Connect speaker wires from the main speaker outputs of your receiver/ampmais vivo para o ALTO NÍVEL EM (Left and Right) binding posts on the BK-SAM300. Ensure correct polarity.
- (Optional) If you wish to pass the signal through to your main speakers, connect speaker wires from the ALTO NÍVEL FORA binding posts on the BK-SAM300 to your main speakers.
- Conecte seu subwoofer passivo ao SAÍDA DO SUBWOOFER binding posts on the BK-SAM300 using appropriate gauge speaker wire. Ensure correct polarity (+ to + and - to -).
- Proceed to Section 5.3 for power connection.
5.3 Conexão de Energia
- Before connecting the power cord, ensure the CA VOLTAGE SELETOR A chave seletora no painel traseiro está configurada para o volume correto.tage for your region (120V or 240V). Incorrect setting can damage the unit.
- Conecte o cabo de alimentação fornecido ao Entrada de energia AC no painel traseiro do ampmais vivo.
- Ligue a outra extremidade do cabo de alimentação a uma tomada de parede adequada.
6. Instruções de operação
6.1 Ligar/Desligar
The BK-SAM300 offers three power-on modes:
- Modo manual: Defina o LIGAÇÃO REMOTA switch to "Manual". Press the front panel Botão de energia para virar o amplifier ligado ou desligado.
- Modo automático: Defina o LIGAÇÃO REMOTA switch to "Auto". The amplifier will automatically turn on when an audio signal is detected at the inputs and will enter standby mode after approximately 15-20 minutes of no audio signal.
- 12V Trigger Mode: Connect a 12V DC trigger cable from your source component (e.g., AV receiver) to the 12V TRIGGER IN terminal. Set the LIGAÇÃO REMOTA switch to "12V Trigger". The amplifier will power on/off with the source component.
6.2 Ajustando os controles
Optimal sound quality depends on proper adjustment of the amplifier's controls to match your subwoofer and listening environment.
- GAIN (Volume): Start with the GAIN control at its minimum setting. Play some audio with significant bass content. Slowly increase the GAIN until the subwoofer's output blends seamlessly with your main speakers. Avoid setting the gain too high, as this can lead to distortion.
- FREQ (Crossover Frequency):
- Se estiver usando o LFE ENTRADA, this control is bypassed. Set your AV receiver's subwoofer crossover frequency.
- Se estiver usando ENTRADA DE LINHA or ALTO NÍVEL EM, adjust the FREQ control to blend the subwoofer's output with your main speakers. A good starting point is typically 80Hz-100Hz, but this may vary depending on the size and frequency response of your main speakers. Smaller main speakers usually require a higher crossover frequency.
- FASE (0° - 180°): The phase control helps to ensure that the subwoofer's sound waves are in sync with your main speakers.
- Play music with a consistent bass line.
- While listening from your primary listening position, slowly adjust the PHASE control from 0° to 180°.
- Stop at the position where the bass sounds the loudest and most impactful. If the bass sounds weak or hollow, try adjusting the phase.
- AUMENTO DE BAIXO: Use the BASS BOOST controls (Level and Freq) to fine-tune the low-frequency response.
- Frequencia: Select the specific low frequency (25Hz to 50Hz) you wish to boost.
- Nível: Adjust the amount of boost (0dB to 12dB) at the selected frequency. Use sparingly to avoid muddy or boomy bass.
7. Manutenção
- Limpeza: Desconecte o amplifier from power before cleaning. Use a soft, dry cloth to wipe down the exterior. Do not use liquid cleaners or aerosol sprays.
- Ventilação: Ensure that the ventilation openings are not blocked by dust or debris. Periodically check and clean if necessary to maintain proper airflow.
- Armazenar: Se armazenar o ampSe não utilizar o amplificador por um período prolongado, desligue-o da corrente elétrica e guarde-o em local fresco e seco, longe da luz solar direta e de temperaturas extremas.
8. Solução De Problemas
| Problema | Possível causa | Solução |
|---|---|---|
| Nenhum poder / Amplifier não liga. |
|
|
| Não há som no subwoofer. |
|
|
| Distorted or muddy bass. |
|
|
| Zumbido ou ruído de vibração. |
|
|
9. Especificações
| Recurso | Detalhe |
|---|---|
| Modelo | BK-SAM300 |
| Potência de saída | 300 Watts (RMS) |
| Estabilidade de impedância | 4-ohm Stable |
| Ampclasse mais vital | Classe AB |
| Resposta de frequência | 20Hz - 160Hz |
| Frequencia cruzada | Adjustable 40Hz - 120Hz |
| Controle de fase | 0° - 180° Variable |
| Bass Boost | 25Hz - 50Hz, up to 12dB |
| Entradas | Low-level (RCA), High-level (Speaker), LFE (RCA), 12V Trigger |
| Saídas | Subwoofer Output (Binding Posts), High-level Pass-through, 12V Trigger |
| Modos de energia | Manual, Auto-Sensing, 12V Trigger |
| Consumo de energia em espera | Menos de 1 watt |
| Dimensões (L x A x P) | 17.25 x 3.75 x 13.88 polegadas (43.8 x 9.5 x 35.2 cm) |
| Peso | 20 libras (9.07 kg) |
| Material do chassi | Heavy-duty steel with brushed aluminum faceplate |
| Volumetage | Switchable 120V/240V |
10. Garantia e Suporte
OSD Audio products are designed and manufactured to the highest quality standards. For specific warranty information regarding your BK-SAM300 Subwoofer Amplifier, please refer to the warranty card included with your product or visit the official OSD Audio webOs termos da garantia normalmente cobrem defeitos de materiais e de fabricação sob uso normal.
For technical support, troubleshooting assistance, or service inquiries, please contact OSD Audio customer support through their official website or the contact information provided with your purchase. Please have your model number (BK-SAM300) and purchase date ready when contacting support.
Recursos on-line: For the latest information, FAQs, and additional support, please visit the Áudio OSD website.


