1. Introdução
This manual provides essential information for the safe and efficient use, installation, and maintenance of your Candy PLE 64 X 4-burner built-in ceramic electric cooktop. Please read these instructions carefully before using the appliance and keep them for future reference.
2. Informações de segurança
Respeite sempre as seguintes precauções de segurança para evitar ferimentos pessoais ou danos ao aparelho.
- Certifique-se de que o aparelho seja instalado por um técnico qualificado, de acordo com as normas locais.
- Do not operate the cooktop if the ceramic surface is cracked or broken. Disconnect from power immediately.
- Mantenha as crianças afastadas do aparelho durante o funcionamento e enquanto ele estiver esfriando. A superfície permanece quente após o uso.
- Do not use abrasive cleaning agents or sharp metal scrapers to clean the cooktop, as they can scratch the surface.
- Nunca deixe o fogão sem supervisão, especialmente ao usar temperaturas altas.
- Garanta ventilação adequada na cozinha durante o uso.
- Não armazene materiais inflamáveis perto do cooktop.
- Desligue o aparelho da fonte de alimentação antes de qualquer limpeza ou manutenção.
3. Instalação
The Candy PLE 64 X cooktop is designed for drop-in installation into a kitchen countertop. Professional installation is recommended.
3.1 Dimensões e recorte
Refer to the diagram below for precise dimensions and the required countertop cut-out measurements.
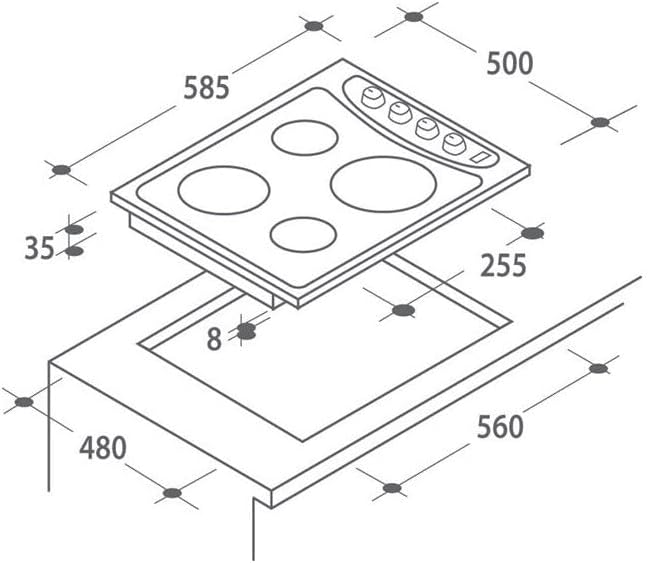
Figura 1: Installation diagram showing the cooktop dimensions (585x500mm) and the required countertop cut-out (560x480mm), with a depth of 35mm and a minimum clearance of 8mm below.
- Dimensões do produto: 51 cm (Depth) x 9 cm (Height) x 61 cm (Width)
- Dimensões do corte: Approximately 56 cm (Width) x 48 cm (Depth)
- Ensure sufficient space for ventilation around the appliance.
3.2 Conexão elétrica
The appliance requires a 220 Volt electrical supply. The electrical connection must be performed by a qualified electrician, ensuring compliance with all local electrical codes and regulations.
- Verify that the household electrical system can support the cooktop's power requirements.
- Install an accessible disconnect switch or circuit breaker near the appliance.
4. Instruções de operação
Your Candy PLE 64 X cooktop features four ceramic heating elements controlled by rotary knobs.
4.1 Painel de controle sobreview

Figura 2: Control panel featuring four rotary knobs for individual burner control.
Each knob corresponds to a specific heating zone. The symbols around the knobs indicate the power levels or functions.
4.2 Turning On and Adjusting Heat
- Coloque uma panela ou frigideira adequada na zona de aquecimento cerâmico desejada.
- Turn the corresponding rotary knob clockwise to the desired heat setting. The settings typically range from minimum (low heat) to maximum (high heat).
- The heating element will begin to heat up. An indicator light may illuminate to show that the zone is active.
4.3 Desligando
To turn off a heating zone, rotate its knob counter-clockwise until it clicks into the 'off' position. The indicator light will extinguish.
4.4 Indicador de calor residual
After turning off a heating zone, the ceramic surface will remain hot for some time. Many ceramic cooktops include a residual heat indicator (often an 'H' symbol) that stays lit until the surface temperature drops to a safe level. Exercise caution when cleaning or touching the cooktop after use.
5. Limpeza e Manutenção
A limpeza e a manutenção regulares garantirão a longevidade e o desempenho ideal do seu fogão.
- Limpeza diária: After each use, once the cooktop has cooled down, wipe the ceramic surface with a damp cloth and a small amount of mild dish soap. Rinse thoroughly and dry with a clean cloth to prevent water spots.
- Manchas teimosas: For burnt-on food or stubborn stains, use a specialized ceramic hob cleaner and a non-abrasive scraper designed for ceramic surfaces. Follow the product instructions carefully.
- Evitar: Do not use abrasive sponges, scouring pads, harsh chemicals, or steam cleaners, as these can damage the ceramic surface.
- Botões de controle: The control knobs can be removed for cleaning. Wipe them with a damp Limpe com um pano e seque bem antes de recolocá-lo.
- Inspeção: Periodically inspect the cooktop for any signs of damage, especially to the ceramic surface or electrical connections. If damage is found, contact a qualified technician.
6. Solução De Problemas
Antes de entrar em contato com o atendimento ao cliente, consulteview A seguir, apresentamos os problemas comuns e suas possíveis soluções.
| Problema | Possível causa | Solução |
|---|---|---|
| O fogão não liga. | No power supply; circuit breaker tripped; appliance not properly connected. | Check the power supply and circuit breaker. Ensure the appliance is correctly plugged in or wired. |
| Heating element not heating. | Knob not set correctly; internal fault. | Ensure the knob is turned to a heat setting. If the issue persists, contact a qualified technician. |
| Cooktop surface is stained or discolored. | Burnt-on food; improper cleaning agents. | Clean with a specialized ceramic hob cleaner and a non-abrasive scraper after the surface has cooled. Avoid abrasive materials. |
| Odores incomuns durante o primeiro uso. | Resíduos do processo de fabricação. | This is normal for initial use. Ensure good ventilation. The odor will dissipate. |
7. Especificações técnicas
| Recurso | Especificação |
|---|---|
| Marca | Doce |
| Modelo | PLE 64 X |
| Tipo de instalação | Aparecer sem hora marcada |
| Tipo de fogão | Cerâmica Elétrica |
| Número de elementos de aquecimento | 4 |
| Tipo de controle | Botão |
| Volumetage | 220 volts |
| Fonte de energia | Elétrico |
| Dimensões do produto (C x A x L) | 51 cm x 9 cm x 61 cm |
| Peso do item | 9 quilos |
| Componentes incluídos | Nenhum |
| Pilhas necessárias | Não |
8. Garantia e Suporte
For warranty information, please refer to the warranty card included with your product or contact your retailer. For technical support or service inquiries, please contact Candy customer service or an authorized service center.
Guarde o recibo de compra como comprovante para solicitações de garantia.