Introdução
This manual provides detailed instructions for the setup, operation, and maintenance of your BUFFBEE Glow Alarm Clock HRS-BLACK. Please read this manual thoroughly before using the product to ensure proper function and longevity.
Produto acimaview
The BUFFBEE Glow Alarm Clock is a versatile device combining a digital alarm clock, FM radio, and a 7-color night light. It is designed to enhance your sleep and wake-up experience with customizable features.
Principais características:
- Funcionalidade 3 em 1: Digital alarm clock, FM radio, and night light.
- Luz noturna de 7 cores: Adjustable with 5 brightness levels.
- Alarmes duplos: Set two independent alarms with choice of FM radio, built-in beep, or bird sounds.
- Ajuste o brilho do visor: 0-100% brightness control for the time display.
- Botões iluminados: For easy operation in low light conditions.
- Temporizador de soneca: Quick nap setting from 10 to 120 minutes.
- Temporizador de desligamento automático: Automatically turns off night light and FM radio after a set duration.
- Porta de carregamento USB: Para carregar dispositivos eletrônicos externos.
- Opções de energia: AC powered with AAA battery backup (batteries not included).
Conteúdo da embalagem:
- 1 x BUFFBEE Glow Alarm Clock
- 1 x adaptador de energia
- 1 x Manual do Usuário
Identificação do componente:
Consulte a imagem abaixo para obter uma visão geral.view of the alarm clock's buttons and display.

Imagem: Frente view of the BUFFBEE Glow Alarm Clock, showing the digital time display, alarm indicators, and control buttons on the top panel. The top edge features a light strip.
Configurar
1. Conexão de energia:
- Conecte o adaptador de energia fornecido à porta de entrada CC na parte traseira do despertador.
- Conecte o adaptador a uma tomada de parede padrão.
2. Bateria de reserva (opcional):
Para operação ininterrupta durante a falta de energia.tages, install 3 AAA batteries (not included) into the battery compartment on the bottom of the unit. The clock will maintain time and alarm settings, and the alarm will still function, but the display and night light may be limited to conserve power.

Imagem: Traseira view of the alarm clock showing the power input and battery compartment, alongside a power adapter and three AAA batteries (not included).
3. Configuração inicial da hora:
- When first powered on, the display will show a default time.
- Pressione e segure o HORÁRIO DEFINIDO button (usually located on the top panel) until the hour digits flash.
- Use o +/- botões (ou botões de navegação semelhantes) para ajustar a hora.
- Imprensa HORÁRIO DEFINIDO Novamente, para confirmar a hora e passar para o ajuste de minutos.
- Use o +/- botões para ajustar os minutos.
- Imprensa HORÁRIO DEFINIDO Confirme mais uma vez e saia do modo de configuração de hora.
- Para alternar entre o formato de 12 horas e o de 24 horas, pressione o 12/24H button (if available, often combined with time set or a dedicated button).
Instruções de operação
1. Setting Alarms (Alarm 1 & Alarm 2):
O relógio suporta dois alarmes independentes.
- Pressione o ALARME 1 botão (ou ALARME 2) once to display the current alarm time.
- Pressione e segure o ALARME 1 (ou ALARME 2) button until the hour digits flash.
- Use o +/- botões para ajustar a hora.
- Pressione o ALARME Pressione novamente para confirmar a hora e passar para o ajuste de minutos.
- Use o +/- botões para ajustar os minutos.
- Pressione o ALARME button again to select the alarm sound: FM radio, built-in beep, or bird sounds. Use +/- para percorrer as opções.
- Pressione o ALARME Pressione o botão mais uma vez para confirmar e ativar o alarme. Um ícone de alarme aparecerá no visor.
- Para desligar um alarme ativo, pressione o botão correspondente. ALARME button. The alarm icon will disappear.
2. Função soneca:
Quando o alarme tocar, pressione o botão grande. SNOOZE / LIGHT button on top to temporarily silence the alarm for 9 minutes. The alarm will sound again after the snooze period.
3. Night Light Operation:
The alarm clock features a 7-color night light with adjustable brightness.

Image: The alarm clock shown with its top light strip illuminated in various colors, demonstrating the 7-color night light feature.
- Pressione o LUZ button (often combined with SNOOZE or a dedicated button) to turn the night light on/off.
- When the night light is on, press the LUZ Pressione o botão repetidamente para alternar entre as 7 cores disponíveis.
- To adjust the brightness, use the +/- buttons while the night light is active. There are 5 brightness levels.
4. Rádio FM:
The built-in FM radio allows you to listen to your favorite stations.
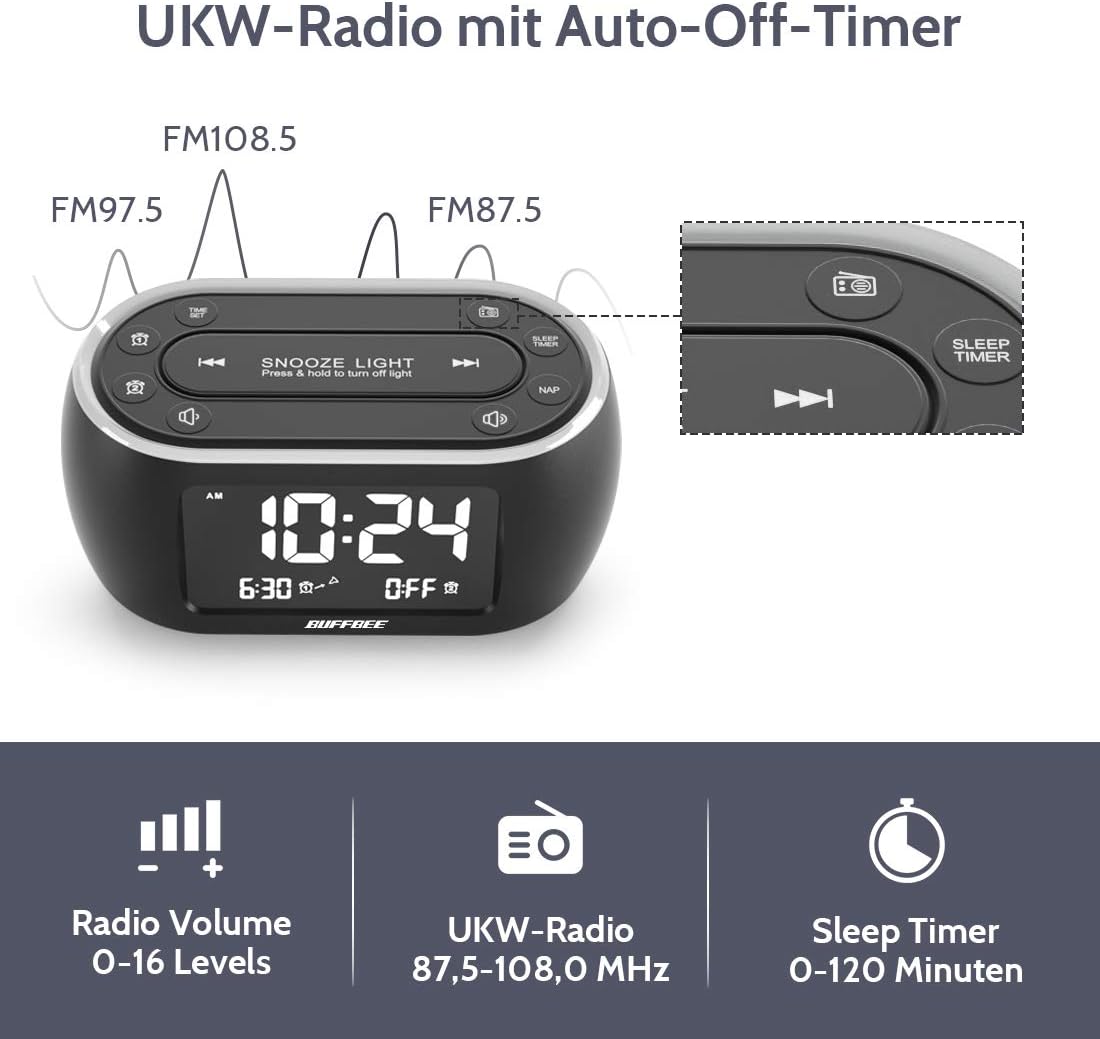
Image: The alarm clock display showing FM radio frequencies (FM108.5, FM97.5, FM87.5) and icons for radio volume and sleep timer.
- Pressione o RÁDIO button to turn the FM radio on/off.
- Pressione o ESCANEAMENTO button (or similar) to automatically scan and save available FM stations.
- Use o ANTERIOR / SEGUINTE buttons to navigate through saved stations or manually tune.
- Ajuste o volume usando o VOLUME +/- buttons. The volume can be set from 0 to 16 levels.
5. Nap Timer:
The nap timer allows for quick, short sleep periods without affecting regular alarm settings.
- Pressione o SESTA button. The display will show the default nap time (e.g., 10 minutes).
- Pressione o SESTA button repeatedly to cycle through preset nap durations (e.g., 10, 20, 30, 60, 90, 120 minutes).
- The nap timer will start automatically after selection.
- To cancel the nap timer, press the SESTA button until "OFF" is displayed.
6. Auto-Off Sleep Timer:
Set a timer for the night light and/or FM radio to automatically turn off after a specified duration.
- While the night light or FM radio is active, press the TEMPORIZADOR DE SONO botão.
- Pressione o TEMPORIZADOR DE SONO button repeatedly to cycle through available durations (e.g., 15, 30, 60, 90, 120 minutes, or OFF).
- The selected duration will be displayed, and the timer will begin. The night light and/or FM radio will turn off automatically when the timer expires.
7. Display Dimmer:
Adjust the brightness of the main time display from 0% to 100%.

Image: Six different views of the alarm clock display, illustrating the range of brightness from very dim to fully bright, and also showing the night light dimmer.
Utilize o dedicado OBSCURO dial or DIMER +/- buttons (if available) to adjust the display brightness to your preference. This allows for comfortable viewem qualquer condição de iluminação.
8. Porta de carregamento USB:
A USB port is located on the back of the unit for charging small electronic devices.

Image: The alarm clock with a smartphone plugged into its side USB port, indicating the charging function.
Connect your device's USB charging cable to the port. The clock must be powered by the AC adapter for the USB charging function to work.
Manutenção
To ensure the longevity and optimal performance of your BUFFBEE Glow Alarm Clock, follow these maintenance guidelines:
- Limpeza: Wipe the unit with a soft, dry cloth. Do not use abrasive cleaners, waxes, or solvents as they may damage the surface.
- Poder: Always disconnect the power adapter from the wall outlet before cleaning or if the unit will be unused for an extended period.
- Ambiente: Keep the alarm clock away from direct sunlight, heat sources, and excessive moisture.
- Substituição da bateria: If using battery backup, replace AAA batteries annually or when the battery indicator suggests low power. Ensure correct polarity when inserting new batteries.
Solução de problemas
If you encounter issues with your BUFFBEE Glow Alarm Clock, refer to the following common problems and solutions:
| Problema | Possível causa | Solução |
|---|---|---|
| Clock display is blank or flickering. | No power or loose connection. Low battery backup. | Ensure the power adapter is securely plugged into the clock and the wall outlet. Check if AAA batteries are installed correctly and have sufficient charge. |
| O alarme não dispara. | Alarme não ativado. Volume do alarme muito baixo. | Verify that the alarm icon is displayed. Check the alarm volume setting. Ensure the correct alarm time is set. |
| A recepção de rádio FM é ruim. | Weak signal. Antenna not extended. Interference. | Extend the FM antenna fully. Try repositioning the clock. Perform an auto-scan for stations again. |
| A luz noturna não está funcionando. | Light function turned off. | Press the LIGHT button to turn it on. Check if the brightness is set to 0%. |
| O carregamento USB não está funcionando. | Clock not connected to AC power. Device not compatible. | Ensure the clock is powered by the AC adapter. Check if your device is compatible with standard USB charging. |
Especificações
| Recurso | Detalhe |
|---|---|
| Marca | BUFFEE |
| Número do modelo | HRS-BLACK |
| Dimensões (C x L x A) | 12 x 3.81 x 6 cm (4.72 x 1.5 x 2.36 polegadas) |
| Peso | 330 gramas (0.73 libras) |
| Entrada de energia | CA 100-240 V, 50/60 Hz |
| Bateria de reserva | 3 pilhas AAA (não incluídas) |
| Tipo de exibição | Digital |
| Brilho da tela | 0-100% ajustável |
| Cores da luz noturna | 7 cores |
| Brilho da luz noturna | 5 níveis ajustáveis |
| Frequência de rádio FM | 87.5-108.0 MHz |
| Volume do alarme | 0-16 níveis ajustáveis |
| Características especiais | Ambient light, Dual Alarm, Nap Timer, Sleep Timer, USB Charging Port |
Garantia e Suporte
BUFFBEE products are designed for reliability and performance. For specific warranty information, please refer to the documentation included with your purchase or contact BUFFBEE customer support.
If you require technical assistance or have questions regarding your BUFFBEE Glow Alarm Clock, please visit the official BUFFBEE webou entre em contato com o departamento de atendimento ao cliente. Os detalhes de contato geralmente são encontrados na embalagem do produto ou no site do fabricante. website.


