1. Introdução
This manual provides comprehensive instructions for the installation, operation, and maintenance of the SINOTIMER TM919B 30A Programmable Electronic Timer Switch. This device is designed to automatically control the ON/OFF switching of various electrical appliances based on user-defined daily or weekly programs. Please read this manual carefully before installation and use to ensure proper function and safety.
2. Informações de segurança
WARNING: Risk of electric shock. Installation should only be performed by a qualified electrician or trained personnel.
- Always disconnect power at the circuit breaker before installing or servicing the timer switch.
- Certifique-se de que todas as conexões elétricas estejam seguras e em conformidade com as normas elétricas locais.
- Não exceda a capacidade máxima de carga de 30A.
- This device is intended for indoor use only. Avoid exposure to moisture or extreme temperatures.
- Não tente desmontar ou reparar a unidade por conta própria. Contate pessoal de serviço qualificado.
3. Produto acabadoview
The SINOTIMER TM919B is a digital timer switch featuring a large LCD display, multiple programming options, and a manual override function. It is designed for DIN rail mounting.
3.1. Componentes e controles
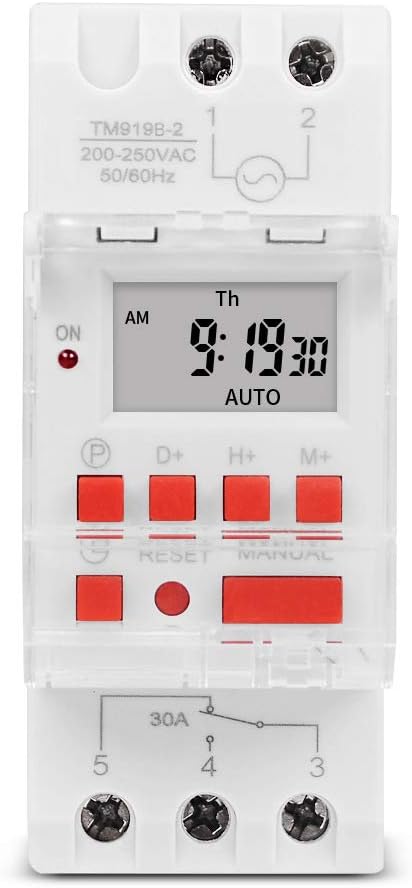
Figura 1: Frente view of the TM919B timer switch, showing the LCD display, control buttons, and terminal connections.

Figura 2: Angulado view of the TM919B with the transparent protective cover open, revealing the programming buttons (P, D+, H+, M+, RESET, MANUAL).
- Tela LCD: Exibe a hora atual, o dia e o status do programa.
- Botão P (Programa): Enters/exits program setting mode.
- D+ (Day) Button: Adjusts day of the week in setting modes.
- H+ (Hour) Button: Adjusts hour in setting modes.
- M+ (Minute) Button: Adjusts minute in setting modes.
- Botão de reset: Limpa todas as configurações e redefine o temporizador para as configurações de fábrica.
- Botão MANUAL: Toggles between ON, AUTO, and OFF modes.
- Conexões terminais: For power input and load output.
4. Especificações
| Recurso | Especificação |
|---|---|
| Modelo | TM919B |
| Volumetage | 220V (AC200-250V) |
| Freqüência | 50/60Hz |
| Carga Máxima | 30A (carga resistiva) |
| Programas | 16 ON/OFF programs per day/week |
| Intervalo mínimo | 1 minuto |
| Bateria de reserva | Built-in rechargeable battery (for memory retention) |
| Montagem | Trilho DIN 35mm |
| Dimensões | Consulte a Figura 3 |

Figura 3: Detailed dimensions of the TM919B timer switch, showing height, width, and depth measurements.
5. Configuração e instalação
Follow these steps for safe and correct installation of your timer switch.
5.1. Montagem
- Ensure power is disconnected at the main circuit breaker.
- Mount the TM919B onto a standard 35mm DIN rail. The device features a clip mechanism on the back for secure attachment.
- Press the orange clip at the bottom of the unit to release it from the DIN rail if removal is necessary.

Figura 4: Lado view of the TM919B, highlighting the orange DIN rail mounting clip.

Figura 5: Voltar view of the TM919B, illustrating the DIN rail mounting mechanism.
5.2. Diagrama de Fiação
Refer to the diagram below for correct wiring connections. Ensure all connections are tight and insulated.

Figura 6: Lado view of the TM919B showing the wiring diagram printed on the casing. Terminals 1 and 2 are for power input (L and N). Terminals 3, 4, and 5 are for load output (Common, Normally Open, Normally Closed).
- Terminais 1 e 2: Power Input (L - Live, N - Neutral). Connect your 220V AC supply here.
- Terminal 3: Common (COM) for the output relay.
- Terminal 4: Normally Open (NO) output. The load will be powered when the timer is ON.
- Terminal 5: Normally Closed (NC) output. The load will be powered when the timer is OFF.
For typical applications where the load is switched ON by the timer, connect the load between Terminal 3 (COM) and Terminal 4 (NO).
6. Instruções de operação
6.1. Initial Setup and Reset
- After connecting power, the display may be blank or show random characters. Press the REINICIAR button with a pointed object (e.g., a pen tip) to clear all memory and reset the timer. The display will show "0:00" and "MO".
- Allow the internal battery to charge for at least 30 minutes before programming for optimal performance and memory retention during power outage.
6.2. Configurar a hora e o dia atuais
- Pressione e segure o D+ button to set the current day of the week (MO, TU, WE, TH, FR, SA, SU).
- Pressione e segure o H+ button to set the current hour (0-23).
- Pressione e segure o M+ button to set the current minute (0-59).
- Release the buttons when the correct time and day are displayed. The timer will automatically save the settings.
6.3. Programação de ciclos LIGADO/DESLIGADO
The TM919B supports up to 16 ON/OFF programs. Each program consists of an ON time and an OFF time.
- Pressione o P button once. The display will show "1 ON". This is for the first ON program.
- Usar D+ to select the day(s) for this program. Options include:
- SEG TER QUA QUI SEX SÁB DOM (Todos os dias)
- MO (Monday only)
- TU (Tuesday only)
- ...
- SEG TER QUA QUI SEX (Dias da semana)
- SA SU (Fins de semana)
- MO TU WE (Mon-Wed)
- TH FR SA (Thu-Sat)
- MO WE FR (Mon, Wed, Fri)
- TU TH SA (Tue, Thu, Sat)
- SEG TER QUA QUI SEX SÁB (Seg-Sáb)
- Usar H+ e M+ to set the desired ON hour and minute.
- Pressione o P button again. The display will show "1 OFF". This is for the first OFF program.
- Usar D+, H+, e M+ to set the desired OFF day, hour, and minute. Ensure the OFF time is after the ON time for the same program.
- Repeat steps 1-5 for additional ON/OFF programs (up to 16). If you don't need all 16 programs, simply press P to cycle through unused programs until you return to the current time display.
- To exit programming mode and save settings, press the clock button (usually labeled with a clock icon, or simply wait for 30 seconds without input).
6.4. Controle manual
Pressione o MANUAL botão para alternar entre os modos de operação:
- EM: The timer output is continuously ON, ignoring all programs.
- CARRO: O temporizador funciona de acordo com os ciclos LIGADO/DESLIGADO programados. Este é o modo de operação padrão.
- OFF: The timer output is continuously OFF, ignoring all programs.
Certifique-se de que o temporizador esteja configurado para AUTO for programmed operation.
7. Manutenção
- The TM919B is designed for maintenance-free operation.
- Limpe a parte externa com um pano macio e seco. Não utilize produtos de limpeza abrasivos ou solventes.
- Ensure the internal battery is charged by keeping the unit powered for at least 24 hours initially, and periodically thereafter, to maintain time and program memory during power outage.
8. Solução De Problemas
| Problema | Possível causa | Solução |
|---|---|---|
| O display está em branco. | Sem fonte de alimentação; bateria interna descarregada. | Check power connections. Allow unit to charge for 30 minutes. |
| Timer not switching load. | Incorrect wiring; timer in MANUAL ON/OFF mode; incorrect program settings. | Verify wiring (refer to Figure 6). Ensure timer is in AUTO mode. Check program times and days. |
| Programs are lost after power outage. | Internal battery not fully charged or faulty. | Ensure unit is powered for at least 24 hours to fully charge the battery. If problem persists, contact support. |
| Os botões não respondem. | Unit frozen; temporary glitch. | Pressione o REINICIAR botão. |
9. Garantia e Suporte
Os produtos SINOTIMER são fabricados de acordo com elevados padrões de qualidade. Para informações sobre garantia ou suporte técnico, consulte a documentação fornecida com sua compra ou visite o site oficial da SINOTIMER. webGuarde o comprovante de compra como prova de aquisição.
For further assistance, you may contact SINOTIMER customer service through their official channels.