1. Introdução
This manual provides comprehensive instructions for the safe and efficient operation, maintenance, and troubleshooting of your FRAL Dry Digit 21 Dehumidifier. Please read this manual thoroughly before operating the appliance and retain it for future reference.
The FRAL Dry Digit 21 is designed to effectively remove excess moisture from the air in residential environments, helping to prevent mold, mildew, and other humidity-related issues. This model replaces the previous Dry Digit 20.
2. Informações de segurança
Observe sempre as seguintes precauções de segurança para reduzir o risco de incêndio, choque elétrico ou ferimentos:
- Certifique-se de que a fonte de alimentação corresponde à etiqueta de especificações da unidade.
- Não utilize o desumidificador se o cabo ou a ficha estiverem danificados.
- Não bloqueie as entradas ou saídas de ar.
- Keep the unit on a stable, level surface.
- Desconecte a unidade antes de limpar ou realizar qualquer manutenção.
- Não mergulhe a unidade em água ou outros líquidos.
- Este aparelho não se destina ao uso por pessoas (incluindo crianças) com capacidades físicas, sensoriais ou mentais reduzidas, ou com falta de experiência e conhecimento, a menos que tenham recebido supervisão ou instruções sobre o uso do aparelho de uma pessoa responsável pela sua segurança.
3. Produto acabadoview
Familiarize yourself with the main components of your FRAL Dry Digit 21 Dehumidifier.

Figura 3.1: Frente view of the FRAL Dry Digit 21 Dehumidifier. Shows the compact, white casing with the control panel on top and air outlet grille.

Figura 3.2: Frente view of the FRAL Dry Digit 21 Dehumidifier with the water collection tank partially pulled out. This illustrates how to access the tank for emptying.
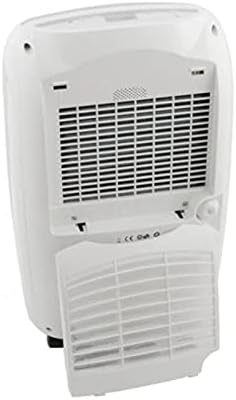
Figura 3.3: Traseira view of the FRAL Dry Digit 21 Dehumidifier, showing the air intake grille and the removable air filter cover. This is where the air filter is located for cleaning or replacement.
Componentes principais:
- Painel de controle: Located on the top of the unit, featuring a digital display and control buttons.
- Grelha de entrada de ar: Located at the rear, where air is drawn into the unit.
- Grelha de saída de ar: Located at the top, where dehumidified air is expelled.
- Water Collection Tank: Removable tank at the front for collecting condensed water.
- Filtro de ar: Located behind the rear grille, filters dust and particles from the air.
- Saída de drenagem contínua: A port for connecting a hose for continuous drainage.
4. Configuração
- Desembalagem: Retire cuidadosamente o desumidificador da embalagem. Guarde os materiais da embalagem para armazenamento ou transporte futuros.
- Colocação: Place the unit on a firm, level surface in the desired location. Ensure there is at least 20 cm (8 inches) of clear space around all sides for proper air circulation. Do not place it near heat sources or in direct sunlight.
- Conexão de energia: Conecte o cabo de alimentação a uma tomada elétrica aterrada. Certifique-se de que o volumetage corresponde às especificações da unidade.
- Operação inicial: Allow the unit to stand upright for at least 1 hour before plugging it in if it was transported on its side. This allows the refrigerant to settle.
- Instalação do tanque de água: Ensure the water collection tank is correctly inserted into the unit. The unit will not operate if the tank is full or incorrectly positioned.
5. Instruções de operação
Painel de controle:
The FRAL Dry Digit 21 features a user-friendly digital control panel. Specific button functions may vary slightly, but generally include:
- Botão de energia: Liga / desliga a unidade.
- Botões de ajuste de umidade (setas para cima/para baixo): Adjusts the desired humidity level (e.g., from 30% to 80% Relative Humidity).
- Botão de modo: Selects operating modes (e.g., Continuous, Auto, Laundry Dry).
- Botão do temporizador: Define um temporizador para operação automática de LIGAR/DESLIGAR.
- Botão de velocidade do ventilador: Ajusta a velocidade da ventoinha (ex.: Baixa, Alta).
- Mostrar: Exibe a umidade atual, a umidade definida ou as configurações do temporizador.
Operação básica:
- Ligar: Press the Power button to switch on the dehumidifier. The display will show the current room humidity.
- Defina a umidade desejada: Use the Up/Down arrow buttons to set your desired humidity level. The unit will operate until the room humidity reaches this level, then cycle on and off to maintain it. A common comfortable range is 40-60% RH.
- Selecione o modo (opcional): Press the Mode button to cycle through available operating modes.
- Adjust Fan Speed (Optional): Press the Fan Speed button to select your preferred fan speed. Higher fan speed results in faster dehumidification but may produce more noise.
- Desligar: Pressione o botão Liga/Desliga novamente para desligar o aparelho.
Drenagem Contínua:
For continuous operation without needing to empty the water tank, connect a suitable drain hose (not included) to the continuous drain outlet at the back of the unit. Ensure the hose is sloped downwards to allow gravity drainage into a floor drain or larger container.
6. Manutenção
A manutenção regular garante o desempenho ideal e prolonga a vida útil do seu desumidificador.
Esvaziar o depósito de água:
When the water tank is full, the unit will automatically shut off and an indicator light (or message on display) will illuminate. Carefully pull out the water tank, empty the collected water, and reinsert the tank firmly until it clicks into place. The unit will resume operation.
Limpeza do filtro de ar:
The air filter should be cleaned every two weeks or more frequently depending on usage and air quality. A dirty filter reduces efficiency and can damage the unit.
- Desligue e desconecte o desumidificador.
- Remove the filter cover from the rear of the unit (refer to Figure 3.3).
- Puxe cuidadosamente o filtro de ar para fora.
- Wash the filter with warm, soapy water, or use a vacuum cleaner to remove dust.
- Enxágue bem e deixe o filtro secar completamente ao ar antes de reinseri-lo.
- Reinstall the dry filter and close the filter cover.
Limpeza da parte externa da unidade:
Limpe o exterior do desumidificador com um pano macio, damp pano. Não utilize produtos de limpeza abrasivos ou solventes, pois estes podem danificar a superfície.
7. Solução De Problemas
Antes de entrar em contato com o suporte ao cliente, consulte os problemas comuns a seguir e suas soluções:
| Problema | Possível causa | Solução |
|---|---|---|
| A unidade não liga. | No power; Water tank full or incorrectly inserted; Room temperature too low. | Check power connection; Empty and reinsert water tank correctly; Ensure room temperature is above 5°C (41°F). |
| Nenhuma água foi coletada. | Humidity level already low; Air filter clogged; Unit in continuous drain mode. | Increase desired humidity setting; Clean air filter; Check continuous drain hose connection. |
| A unidade é barulhenta. | A unidade não está em uma superfície nivelada; filtro de ar obstruído; componentes internos vibrando. | Place on a level surface; Clean air filter; Contact customer support if noise persists. |
| Dehumidification is slow. | Room size too large; Air filter clogged; Doors/windows open. | Ensure unit is appropriate for room size; Clean air filter; Close doors and windows. |
8. Especificações
| Recurso | Especificação |
|---|---|
| Modelo | DD21LCD |
| Marca | Fral |
| Capacidade de desumidificação | 21 litros/dia |
| Dimensões (C x L x A) | 50 x 50 x 28 cm |
| Peso | 13 kg |
| Função especial | Automatic humidity removal |
| Uso recomendado | residencial |
| Modo de operação | Contínuo |
9. Garantia e Suporte
For warranty information and technical support, please refer to the warranty card included with your product or visit the official FRAL webGuarde o comprovante de compra como prova para eventuais solicitações de garantia.
If you encounter issues not covered in the troubleshooting section, or require further assistance, please contact FRAL customer service.