1. Terminadoview
The SINOTIMER TM618 timer module is designed to automatically control the power supply to various electrical apparatus, such as streetlights, neon signs, billboards, and other appliances, based on a preset time schedule. This digital timer switch features a rechargeable internal battery to maintain program settings during power outage.

Figura 1.1: Frente view of the TM618 Timer Module.
2. Principais características
- Design compacto e que economiza espaço.
- Engineered with advanced digital timing technology.
- High functionality for precise time control.
- Built-in rechargeable battery for program retention.
- Multiple ON/OFF programs for weekly scheduling.
3. Configuração e instalação
3.1. Diagrama de Fiação
Proper wiring is crucial for the safe and correct operation of the TM618 timer module. Refer to the diagram below for connection details. Ensure power is disconnected before performing any wiring.
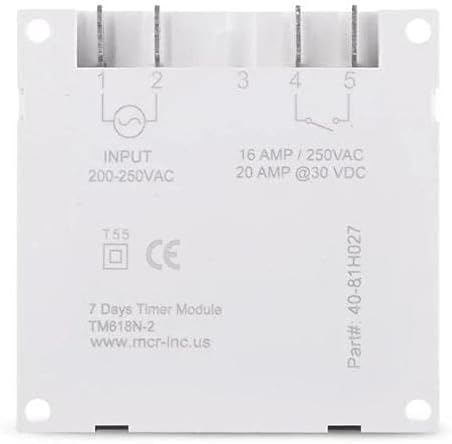
Figure 3.1: Wiring Terminals and Specifications.
- Input (200-250VAC): Connect your main power supply to terminals 1 and 2.
- Output (16 AMP / 250 VCA, 20 AMP @30 VDC): Terminals 3, 4, and 5 are for the controlled output. Terminal 3 is common, Terminal 4 is normally open (NO), and Terminal 5 is normally closed (NC). Connect your load to the appropriate terminals based on your application (e.g., between 3 and 4 for normally off, turning on when timed).
3.2. Initial Power-Up and Battery
Upon initial power-up, the timer's internal rechargeable battery (40mAh) will begin charging. This battery saves your programmed settings during power interruptions. Allow the unit to be powered for at least 30 minutes for the battery to gain sufficient charge before programming or disconnecting power.

Figure 3.2: Internal 40mAh Rechargeable Battery.
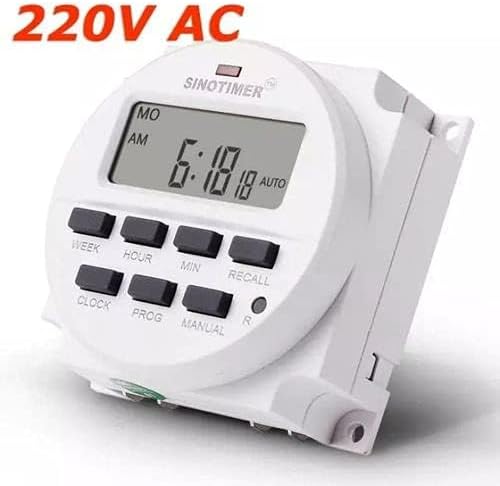
Figure 3.3: TM618 Operating Voltage (220V AC shown).
4. Instruções de operação
The TM618 timer allows for precise control with up to 16 ON/OFF programs per day or week. The buttons on the front panel are used for setting the time and programs.

Figure 4.1: Timer Module with Manual.
4.1. Configurando a hora atual
- Pressione o RELÓGIO Pressione e segure o botão.
- Enquanto segura RELÓGIO, imprensa SEMANA para definir o dia da semana atual.
- Enquanto segura RELÓGIO, imprensa HORA para definir a hora atual.
- Enquanto segura RELÓGIO, imprensa MÍNIMO para definir o minuto atual.
- Solte o RELÓGIO botão. A hora está definida.
4.2. Programação dos horários de LIGAR/DESLIGAR
O temporizador suporta até 16 programas de LIGAR/DESLIGAR. Cada programa consiste em um tempo LIGADO e um tempo DESLIGAR.
- Pressione o PROG. pressione o botão uma vez. O visor mostrará "1 LIGADO".
- Imprensa SEMANA to select the day(s) for this program (e.g., MO, TU, WE, TH, FR, SA, SU, or combinations like MO-FR, SA-SU, MO-SA, etc.).
- Imprensa HORA para definir a hora LIGADA desejada.
- Imprensa MÍNIMO para definir o minuto LIGADO desejado.
- Imprensa PROG. novamente. O visor mostrará "1 OFF".
- Repita os passos 2 a 4 para definir o(s) dia(s), hora e minuto desejados para o desligamento deste programa.
- Imprensa PROG. to advance to the next program ("2 ON") or to exit programming mode if no more programs are needed.
- To clear a program, press LEMBRAR enquanto viewing the specific ON or OFF program you wish to clear.
4.3. Controle manual
Pressione o MANUAL button to cycle through different operating modes:
- AUTO LIGADO: The timer is currently ON and will follow the programmed schedule.
- DESLIGADO AUTOMÁTICO: The timer is currently OFF and will follow the programmed schedule.
- EM: The timer is forced ON, overriding any programs.
- OFF: The timer is forced OFF, overriding any programs.
4.4. Recall Function
O LEMBRAR button (often marked 'R' or 'RESET') is used to clear specific program settings or to reset the timer. A small pinhole button (R) is typically used for a full reset, which clears all programs and resets the time.
5. Manutenção
5.1. Cuidados com a bateria
The TM618 features a built-in rechargeable battery. To ensure its longevity and proper function, keep the timer connected to power for regular charging. If the timer is stored for extended periods without power, the battery may discharge, requiring a full charge upon reconnection.
5.2. Limpeza
Clean the exterior of the timer module with a soft, dry cloth. Do not use abrasive cleaners or solvents, as these can damage the plastic casing or display. Ensure no liquids enter the device.
6. Solução De Problemas
- O display está em branco: Check power connections. Ensure the unit has been powered for at least 30 minutes to charge the internal battery.
- Programas que não estão sendo executados: Verify that the current time is set correctly. Check that the timer is in "AUTO ON" or "AUTO OFF" mode, not forced ON/OFF. Review Para garantir a precisão dos seus horários programados de LIGADO/DESLIGADO, utilize este recurso.
- Timer not responding to buttons: Perform a full reset using the small 'R' pinhole button. If issues persist, ensure proper power supply.
7. Especificações
| Atributo | Valor |
|---|---|
| Marca | Sinotimer |
| Número do modelo | TM618N-2 (Item model number: WN-5KCF-8SVQ) |
| Vol de entradatage | 200-250 VCA |
| Capacidade de saída | 16 AMP / 250 VCA, 20 AMP @30 VCC |
| Número de programas | 16 programas ON / OFF |
| Intervalo de tempo | 1 minute to 168 hours (7 days) |
| Bateria interna | 40mAh recarregável |
| Material | Plástico |
| Cor | Branco |
| Dimensões do produto | 25 x 18 x 8 cm; 11 g |
7.1. Dimensões
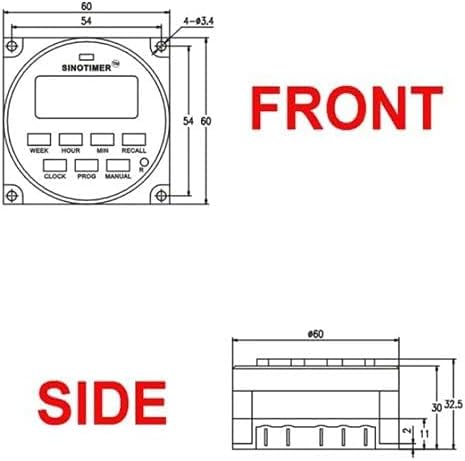
Figure 7.1: Front Dimensions.

Figure 7.2: Side Dimensions.
8. Garantia e Suporte
For information regarding product warranty, technical support, or service, please refer to the documentation provided with your purchase or contact your retailer. Keep your proof of purchase for any warranty claims.


