Definir o tempo
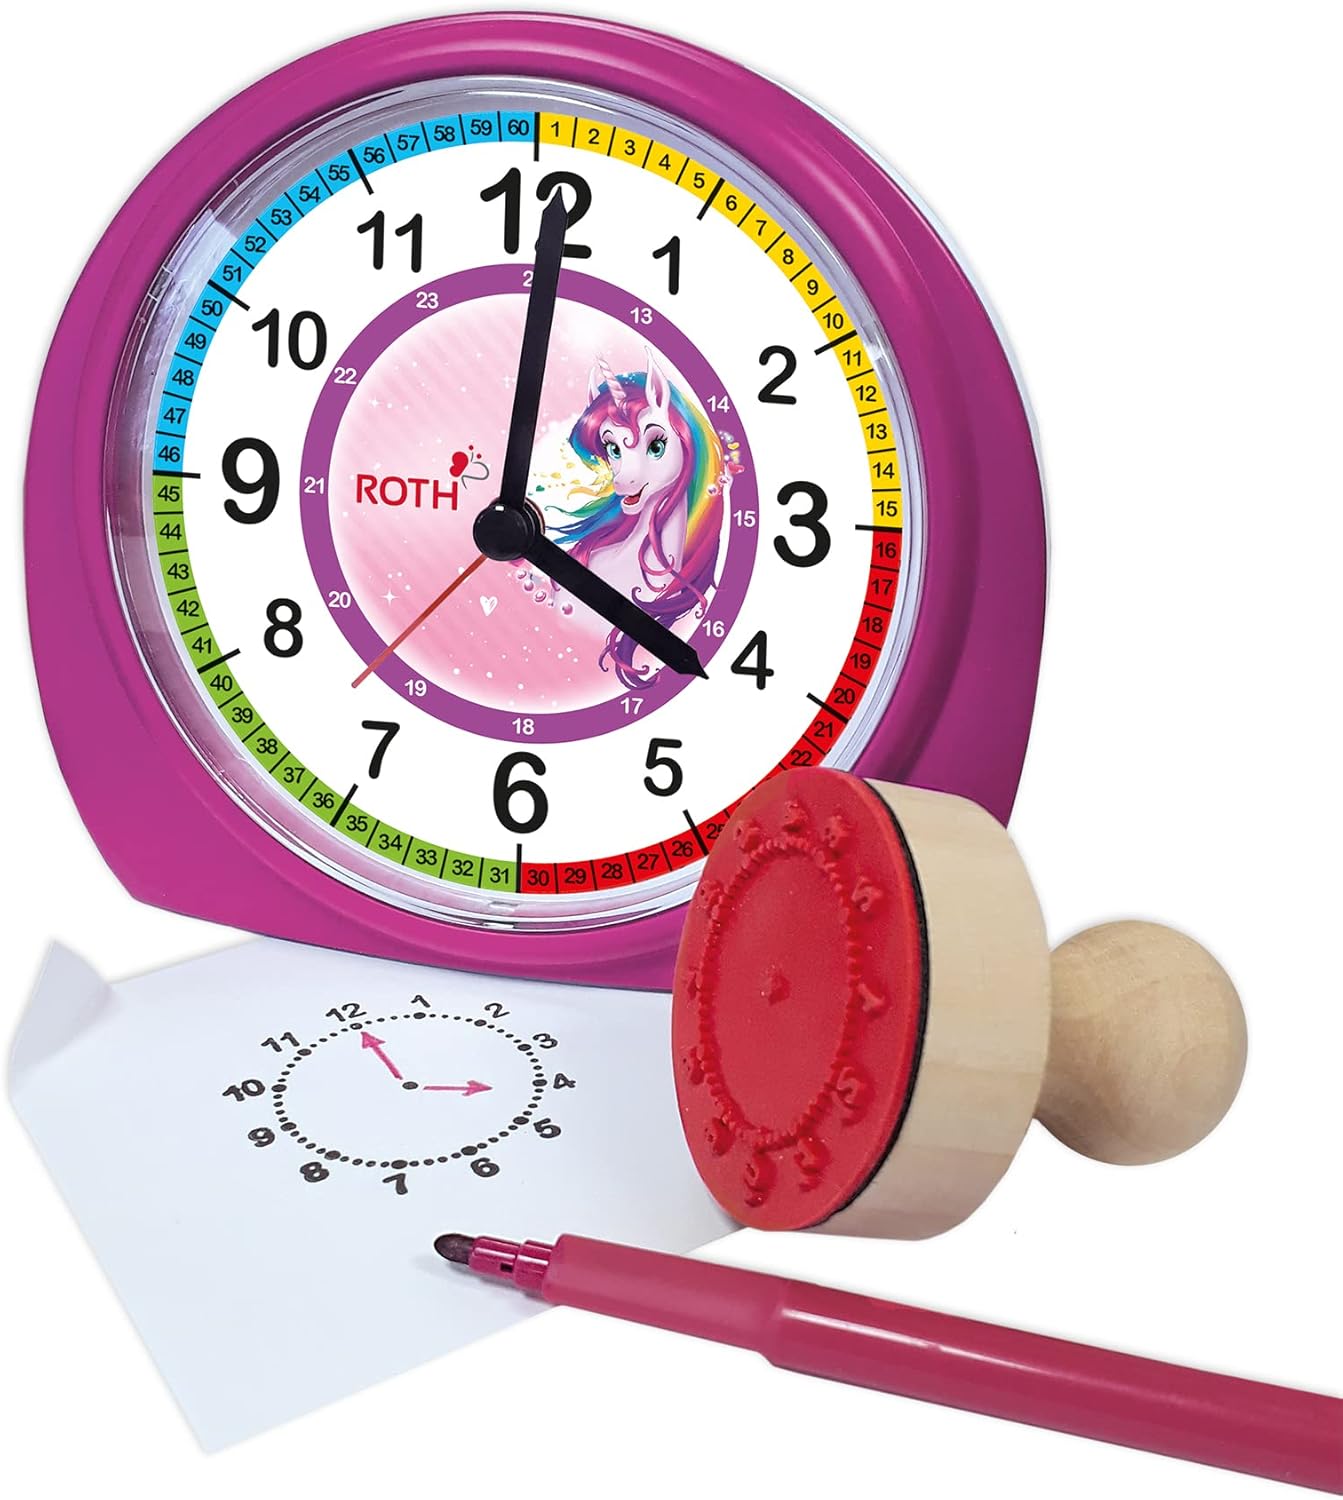
Use the time setting knob located on the back of the clock to adjust the hour and minute hands. Rotate the knob clockwise or counter-clockwise until the correct time is displayed.
Model: B09JKWDFTT | Brand: ROTH
This manual provides comprehensive instructions for the ROTH Educational Alarm Clock and Stamp Set. Designed to assist children in learning to tell time, this set includes an alarm clock with various features and a complementary stamp set for practice. Please read this manual thoroughly before use to ensure proper operation and safety.

ATENÇÃO: RISCO DE ASFIXIA – Peças pequenas. Não recomendado para crianças menores de 3 anos.
Por favor, verifique a embalagem para garantir que todos os itens estejam presentes:

The alarm clock requires 1x AA battery (not included).

Use the time setting knob located on the back of the clock to adjust the hour and minute hands. Rotate the knob clockwise or counter-clockwise until the correct time is displayed.
Use the alarm setting knob, also on the back, to set the desired alarm time. The alarm will sound a beep when the set time is reached. To activate or deactivate the alarm, use the ON/OFF switch located on the side of the clock.

When the alarm sounds, press the large button on the top of the clock to activate the snooze function. The alarm will temporarily stop and sound again after a short interval.
The clock features a backlight for visibility in low-light conditions. Press the backlight button, typically located on the top or side, to illuminate the clock face.
The included wooden stamp and ink pad are designed to help children practice telling time. The stamp creates a clock face outline on paper, allowing children to draw in the hands for various times.

| Problema | Possível causa | Solução |
|---|---|---|
| Relógio não funciona | A bateria está descarregada ou inserida incorretamente. | Replace battery (1x AA) or check polarity. |
| Alarme não soa | O alarme não está ativado ou está configurado incorretamente. | Ensure alarm ON/OFF switch is in the 'ON' position and alarm time is set correctly. |
| A luz de fundo não funciona | Battery low or backlight button not pressed. | Replace battery or press the backlight button firmly. |
| Stamp not making clear impression | Ink pad is dry or stamp not evenly inked. | Ensure ink pad is moist; re-ink stamp evenly. Replace ink pad if necessary. |
| Recurso | Detalhe |
|---|---|
| Dimensões do produto (CxLxA) | 20 x 21.1 x 7.3 cm |
| Peso do item | 350 gramas |
| Características especiais | Snooze, Alarm, Backlight |
| Marca | ROTH |
| Faixa etária (Descrição) | Crianças |
| Material | Wood (Stamp), Plastic (Clock) |
| Cor | Rosa |
| Fonte de energia | Alimentado por bateria |
| Tipo de Bateria | 1x AA (não incluído) |
This product comes with a standard manufacturer's warranty. For specific warranty details, including duration and coverage, please refer to the product packaging or contact ROTH customer support directly. If you encounter any issues or have questions not covered in this manual, please reach out to the retailer or manufacturer for assistance.
For further support, please visit the official ROTH website ou entre em contato com o departamento de atendimento ao cliente.
 |
Guia rápido do módulo de válvula Roth Touchline SL: Instalação e configuração Guia conciso para instalação e configuração do módulo de válvula Roth Touchline SL para sistemas de aquecimento, com modo "Aquecimento sob demanda". Inclui detalhes de conexão e configuração da interface. |
 |
Guia de instalação do termostato Roth Touchline® SL Guia de instalação completo para o termostato ambiente Roth Touchline® SL e sistema de aquecimento de piso. Aprenda a parear, registrar e configurar seu termostato com sensores e controladores de piso. |
 |
Guia de Instalação do Termostato Roth Touchline SL Guia completo de instalação e configuração dos termostatos Roth Touchline SL e SL Plus. Abrange montagem na parede, fiação, conexão de sensores, emparelhamento com controladores, configuração de sensores de piso e funções avançadas. |
 |
Guia de instalação do termostato Roth Touchline® SL Comprehensive installation guide for the Roth Touchline® SL Standard room thermostat and related models. Learn how to install, pair, and configure your thermostat and floor sensors for optimal heating control with Roth's underfloor heating systems. |
 |
Guia de instalação do sistema de tubulação Roth MultiPex® PEX Este guia de instalação fornece instruções detalhadas para os sistemas de tubulação Roth MultiPex® PEX. Ele abrange etapas essenciais, como corte, dobra e fixação de tubos, além de advertências sobre o uso de solventes. O documento também inclui dados técnicos abrangentes e uma lista de acessórios compatíveis, apresentados em inglês para maior clareza. Adequado para aplicações de água potável e aquecimento central. |
 |
Guia de Instalação do Roth MultiPex®: Tubos e Conexões Guia completo de instalação para sistemas de tubulação Roth MultiPex®, abrangendo corte, curvatura, fixação, montagem, especificações técnicas e acessórios. Aprenda a instalar as soluções de encanamento Roth com segurança e eficiência. |