1. Introdução
O Weber Genesis Smart SX-335 LP SS Liquid Propane Grill is designed to provide a comprehensive outdoor cooking experience. This manual provides essential information for the safe and efficient operation, maintenance, and troubleshooting of your new grill.

Figura 1: A Weber Genesis Smart SX-335 LP SS Liquid Propane Grill. This image shows the full grill unit with its stainless steel finish and black cabinet.
2. Informações importantes de segurança
AVISO: O não cumprimento destas instruções pode resultar em incêndio, explosão ou risco de queimaduras, o que pode causar danos materiais, ferimentos pessoais ou morte.
- Utilize sempre a churrasqueira ao ar livre, em uma área bem ventilada.
- Não armazene ou use gasolina ou outros vapores e líquidos inflamáveis nas proximidades deste ou de qualquer outro aparelho.
- Mantenha a área do aparelho limpa e livre de materiais combustíveis, gasolina e outros vapores e líquidos inflamáveis.
- Não obstrua o fluxo de ar de combustão e ventilação.
- Keep any electrical supply cord and fuel supply hose away from heated surfaces.
- Verifique sempre se há vazamentos de gás antes de cada uso.
- Nunca deixe o grelhador sem vigilância enquanto cozinha.
- Mantenha sempre as crianças e os animais domésticos afastados do grelhador.
- Use luvas de proteção ao manusear componentes quentes.
3. O que está na caixa
Seu Weber Genesis Smart SX-335 LP SS grill package includes the following components:
- Weber Genesis Smart SX-335 LP SS Gas Grill Unit
- Cooking Grates (porcelain-enameled cast iron)
- Flavorizer Bars
- Grease Management System (including drip tray and catch pan)
- Side Burner (integrated)
- Weber Connect Smart Grilling Hub (integrated)
- Propane Tank (sold separately, but required for operation)
- Manual de instruções

Figura 2: A Weber Genesis Smart SX-335 LP SS grill with its lid closed, showcasing the stainless steel finish and control panel.
4. Configuração
4.1 Montagem
Assembly of your Weber Genesis Smart SX-335 LP SS grill is required. For detailed, step-by-step interactive 3D instructions, download the free BILT app on your mobile device. This app provides visual guidance for each step of the assembly process.
Video 1: BILT App - Step by Step Interactive Assembly Instructions. This video demonstrates the interactive 3D assembly guide available through the BILT app for the Weber grelha Genesis.
Ensure all parts are accounted for before beginning assembly. It is recommended to have a second person assist with assembly due to the size and weight of some components.
4.2 Connecting the Liquid Propane Tank
- Certifique-se de que todos os botões de controle do queimador estejam na posição OFF.
- Open the cabinet doors located beneath the grill.
- Place the liquid propane tank securely in the designated tank holder.
- Connect the regulator hose from the grill to the propane tank valve. Hand-tighten the connection firmly.
- Abra lentamente a válvula do tanque de propano até o fim.
- Check for any gas leaks using a soapy water solution on all connections. Bubbles indicate a leak. If a leak is detected, close the tank valve, tighten connections, and re-test. If the leak persists, do not use the grill and contact customer service.

Figure 3: A hand connecting the liquid propane tank to the grill's regulator hose inside the cabinet.
The grill cabinet features a hook that indicates the propane level by weight, helping you monitor remaining fuel.
4.3 Inicialização inicial
Before first use, operate the grill on high heat for 15 minutes with the lid closed to burn off any manufacturing residues. This process is called "seasoning" the grill.
5. Instruções de operação
5.1 Acendendo os queimadores principais
- Abra a tampa da grelha.
- Certifique-se de que a válvula do tanque de propano esteja totalmente aberta.
- Turn the leftmost main burner control knob to the START/HIGH position.
- Pressione e segure imediatamente o botão de ignição eletrônica até que o queimador acenda.
- Once the first burner is lit, turn on adjacent burners to the desired heat setting.
- If ignition does not occur within 5 seconds, turn the burner control(s) OFF, wait 5 minutes, and repeat the lighting procedure.

Figura 4: Detalhe do Weber Genesis grill's control knobs, showing the ignition button and burner controls.
5.2 Temperature Control and Smart Features
O Weber Genesis Smart SX-335 LP SS features integrated Weber Connect smart technology for precise temperature monitoring. The digital display on the side table shows real-time food temperatures from connected probes.
- Weber Connect App: Baixe o Weber Connect app to your smartphone for remote monitoring, temperature alerts, and flip & serve notifications.
- Capacidade da sonda: The grill supports up to 2 temperature probes for monitoring different food items simultaneously.
- Powering the Display: The grill display can be powered by plugging it into an electrical outlet or by using a USB-certified, 10,000mAh rechargeable power bank (sold separately) clipped under the side table.

Figura 5: A Weber Connect smart display on the grill's side table, showing temperature readings, alongside a smartphone displaying the Weber Connect app with temperature alerts.
5.3 Using the Sear Zone
The extra-large sear zone is designed for high-heat searing to achieve perfect grill marks and lock in juices. To activate the sear zone, turn the dedicated sear zone burner knob to the HIGH position. Allow it to preheat for 5-10 minutes before placing food directly over it.
5.4 Using the Side Burner
The integrated side burner allows you to sauté vegetables, boil corn, or heat up sauces while grilling. To light the side burner, open its cover, turn the control knob to the START/HIGH position, and press the electronic ignition button until it ignites.

Figura 6: A Weber Genesis grill with the side burner cover open, revealing the burner grate.
5.5 Weber Crafted Outdoor Kitchen Collection
Expand your culinary possibilities with the Weber Crafted Outdoor Kitchen Collection. By replacing a cooking grate with custom-fit grillware (sold separately), you can sear, roast, bake, steam, and stir-fry. The grill locker provides convenient storage for these accessories.

Figura 7: A Weber Crafted grillware frame installed in the grill, ready to accommodate various inserts.

Figure 8: A person stir-frying vegetables and rice in a wok insert on the Weber grelha Genesis.
5.6 Cooking Techniques
- Calor direto: Use direct heat for searing, grilling smaller items, or cooking foods that require quick cooking.
- Indirect Heat: For larger cuts of meat, poultry, or delicate items, use indirect heat. Turn off the burners directly beneath the food and use adjacent burners to maintain the desired temperature. The expandable top cooking grate provides additional space for indirect cooking.

Figure 9: Two whole chickens cooking on the main grates, with temperature probes inserted, demonstrating indirect cooking.

Figure 10: Grilled shrimp, mixed vegetables in a basket, and toasted bread on the upper warming rack, illustrating diverse cooking options.
6. Manutenção
6.1 Limpeza das Grelhas de Cozimento
After each use, while the grates are still warm, use a grill brush to scrape off any food residue. For a deeper clean, remove the grates and wash them with warm, soapy water.
6.2 Sistema de Gerenciamento de Graxa
The improved grease management system simplifies cleaning. Simply pull the grease tray out from the front of the grill and scrape away accumulated grease and debris. Replace the disposable catch pan as needed.
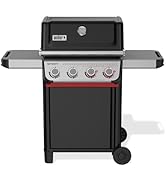
Figure 11: A hand demonstrating the removal and cleaning of the grease management system's pull-out tray.
6.3 Tampa da Grelha
Protect your grill from the elements by using a weather-resistant grill cover when not in use. This helps prolong the life and appearance of your grill.
7. Solução De Problemas
| Problema | Possível causa | Solução |
|---|---|---|
| Queimador não acende | Sem fluxo de gás, queimador entupido, ignitor com defeito. | Check propane tank connection and fuel level. Clean burner ports. Check igniter electrode. |
| Aquecimento desigual | Clogged burner ports, low fuel, wind. | Clean burner ports. Ensure adequate fuel. Position grill away from strong winds. |
| Chama baixa ou nenhuma chama | Low fuel, regulator bypass, gas leak. | Check fuel level. Reset regulator by turning off all gas, disconnecting, waiting 1 minute, and reconnecting. Check for leaks. |
| Weber Connect display not working | No power, battery low (if using power bank). | Ensure plugged into outlet or power bank is charged and connected. |
For further assistance, refer to the full troubleshooting guide in your printed manual or contact Weber Atendimento ao Cliente.
8. Especificações
| Recurso | Detalhe |
|---|---|
| Marca | Weber |
| Nome do modelo | Genesis Smart SX-335 LP SS |
| Número do modelo do item | 35600001 |
| Dimensões do produto | 35.5"P x 31"L x 30.75"A |
| Peso do item | 209 libras |
| Cor | Aço inoxidável |
| Tipo de combustível | Propano Líquido (LP) |
| Contagem do queimador principal | 3 |
| Potência de aquecimento | 13000 Unidades Térmicas Britânicas (BTU) |
| Área de Superfície de Cozinha | 787 polegadas quadradas |
| Recurso especial | Grease Management System, Weber Connect Smart Technology, Sear Zone, Side Burner, Expandable Top Cooking Grate, Grill Locker |
| Material | Aço inoxidável |
| Montagem necessária | Sim |
9. Garantia e Suporte
O Weber Genesis Smart SX-335 LP SS Liquid Propane Grill comes with a Garantia limitada de 12 ano. For detailed warranty information, please refer to the warranty card included with your product or visit the official Weber website.
Para obter suporte ao cliente, assistência técnica ou para encomendar peças de reposição, visite o site. WebLoja er na Amazon ou contato Weber directly through their official channels.
Documentos relacionados - SX-335
 |
WebGuia de montagem da churrasqueira a gás LP Genesis S-335 Instruções de montagem abrangentes para o WebChurrasqueira a gás propano líquido Genesis S-335 LP. Este guia fornece etapas detalhadas, listas de peças, requisitos de ferramentas e informações importantes de segurança, com todo o conteúdo apresentado em inglês para maior clareza e acessibilidade. |
 |
WebGuia de início rápido para Genesis E-325, E-335, EP-335: Instruções para cozinhar churrasco Este guia de início rápido fornece instruções essenciais para WebChurrasqueiras Genesis E-325, E-335 e EP-335. Aprenda métodos de cozimento direto e indireto, entenda as configurações dos queimadores e utilize acessórios para obter resultados ideais ao grelhar e assar. Inclui legendas de ícones e tabelas de cozimento. |
 |
WebGuia de Montagem do Genesis II EX-335 SX-335 Guia de montagem completo para o Weber Genesis II EX-335 and SX-335 LP gas grills, providing step-by-step instructions, safety tips, and essential setup information for a successful build. |
 |
WebGuia de Montagem do Genesis II EX-335 SX-335 Guia de montagem completo para o Weber Genesis II EX-335 and SX-335 propane gas grills. Includes step-by-step instructions and parts lists. |
 |
WebManual do proprietário do Genesis II EX-335 / SX-335 - Guia de grelhados Manual do proprietário completo para o WebGrelhas a gás Genesis II EX-335 e SX-335. Saiba mais sobre o sistema de grelha GS4. WEBER CONNECT technology, safety, installation, operation, maintenance, and troubleshooting for optimal outdoor cooking. |
 |
WebGuia de Montagem do Genesis E-315/E-415 LP Instruções de montagem detalhadas, passo a passo, para o WebEste manual descreve as churrasqueiras a gás LP Genesis E-315 e E-415, incluindo a identificação das peças, os procedimentos de montagem e informações importantes sobre a pré e pós-montagem. |