1. Introdução
This manual provides detailed instructions for the installation, operation, and maintenance of your DS18 SB12A 12-inch Shallow Subwoofer Enclosure with Built-in Amplifier. Please read this manual thoroughly before using the product to ensure proper function and to prevent damage.
The DS18 SB12A is an all-in-one car audio solution designed to deliver powerful bass in vehicles with limited space. It features a 12-inch subwoofer integrated into a sealed enclosure, powered by a built-in 350W RMS (700W MAX) monoblock digital ampmais vivo.
2. Informações de segurança
Precauções importantes de segurança:
- Sempre desconecte o terminal negativo da bateria do veículo antes de iniciar qualquer trabalho elétrico.
- Certifique-se de que toda a fiação esteja devidamente encaminhada e fixada para evitar que seja prensada ou danificada.
- Utilize fios com a bitola adequada para as conexões de energia e aterramento, conforme especificado.
- Install the subwoofer in a secure location to prevent it from shifting during vehicle movement.
- Evite expor o aparelho à umidade ou a temperaturas extremas.
- Não tente abrir ou reparar a unidade por conta própria. Encaminhe todos os serviços de manutenção a pessoal qualificado.
- Prolonged exposure to high sound pressure levels can cause permanent hearing damage.
3. Conteúdo da embalagem
Verifique se todos os itens estão presentes na embalagem:
- DS18 SB12A 12-Inch Shallow Subwoofer Enclosure with Built-in Ampmais vivo
- Remote Bass Level Control Knob with Cable
- Chicote de entrada de alto nível
- Mounting Hardware (screws, brackets if applicable)
- Manual do usuário (este documento)
4. Recursos do Produto
- Integrated 12-inch subwoofer and monoblock digital ampmais vivo.
- Compact sealed enclosure design for space-saving installation.
- 350W RMS / 700W MAX power handling.
- Adjustable Low Pass Filter (LPF).
- Selectable Phase control (0-180°).
- Variable Bass Boost (0-6 dB at 50Hz).
- High-level (speaker level) and Low-level (RCA) inputs for versatile connectivity.
- Remote bass level control for convenient adjustment.
- Protection circuitry: Thermal, Over-Load, DC Output, Short Circuit.
5. Configuração e instalação
A instalação correta é crucial para o desempenho ideal e a segurança. Se você tiver dúvidas sobre qualquer etapa do processo de instalação, consulte um instalador profissional de som automotivo.
5.1 Local de Montagem
Choose a secure and dry location for the subwoofer enclosure, such as the trunk or behind the seats in a truck. Ensure there is adequate ventilation around the amplifier section to prevent overheating. The shallow design of the SB12A is ideal for tight spaces.
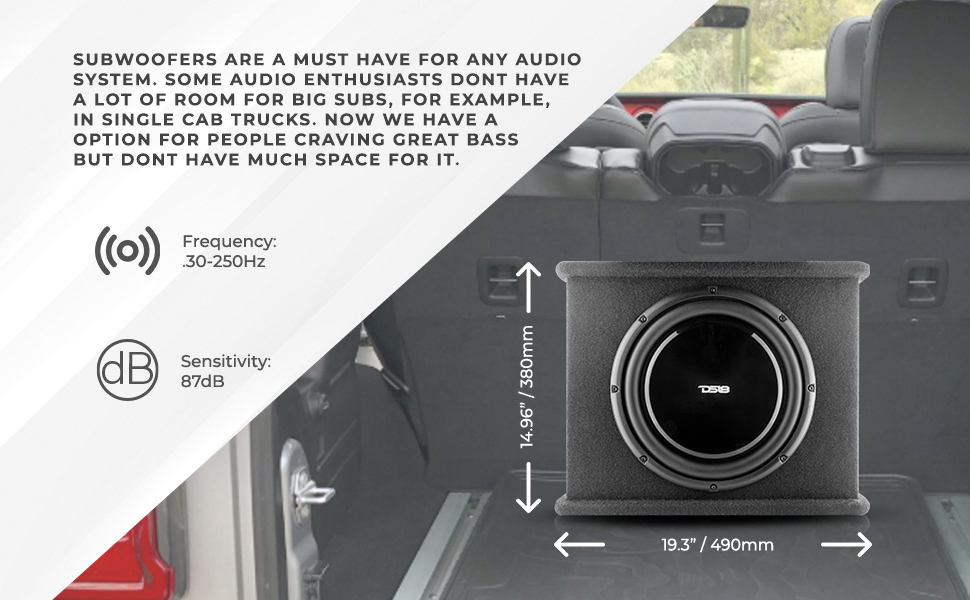
Image: The DS18 SB12A subwoofer enclosure shown installed in a vehicle trunk, highlighting its compact dimensions (14.96" H x 19.3" W x 14.92" D1 / 7.4" D2) suitable for limited spaces.
5.2 Conexões de Fiação
Consulte o amplifier control panel diagram for correct wiring. Ensure all connections are tight and secure.

Imagem: Detalhada view do amplifier control panel. This panel includes connections for power (GND, REM, +12V), fuse, high-level speaker inputs, RCA inputs, and RCA outputs, along with adjustment controls.
- Conexão de energia (+12V): Connect an 8-gauge power cable directly from the vehicle's positive battery terminal to the "+12V" terminal on the amplifier. Install an appropriate fuse (30A) within 18 inches (45 cm) of the battery.
- Conexão de aterramento (GND): Connect an 8-gauge ground cable from the "GND" terminal on the ampConecte o amplificador a uma superfície metálica limpa e sem pintura no chassi do veículo. Certifique-se de que a conexão elétrica esteja em boas condições.
- Ativação remota (REM): Connect a remote turn-on wire from your head unit's remote output to the "REM" terminal on the ampamplificador. Este fio ativa o ampLigar e desligar o amplificador com a unidade principal do seu aparelho.
- Entrada de áudio:
- Entrada de baixo nível (RCA): If your head unit has RCA pre-outs, connect RCA cables from the head unit's subwoofer or rear pre-out to the "INPUT" RCA jacks on the ampmais vivo.
- Entrada de alto nível (nível de alto-falante): If your head unit does not have RCA pre-outs, use the supplied high-level input harness. Connect the speaker wires from your head unit's rear speakers to the corresponding inputs on the harness, then plug the harness into the "SPK IN" connector on the ampmais vivo.
- Controle remoto de graves: Plug the remote bass control knob into the designated port on the amplifier. Mount the knob in a convenient location for easy access.
6. Instruções de operação
Após a instalação, ajuste o ampAjustes do amplificador para um desempenho sonoro ideal.
6.1 Ampmais controles
- GANHO: This control matches the input sensitivity of the amplifier to the output of your head unit. Start with the gain at minimum and slowly increase it until you hear distortion, then back off slightly.
- LPF (filtro passa-baixo): Adjusts the upper frequency limit of the subwoofer. Typically set between 50Hz and 120Hz. Frequencies above this setting will be filtered out.
- AUMENTO DE BAIXO: Increases the bass output at 50Hz. Use sparingly to avoid distortion and potential damage. Adjustable from 0-6 dB.
- FASE: Allows you to adjust the phase of the subwoofer output (0° or 180°) to match the phase of your other speakers. Experiment with both settings to find the one that provides the most coherent bass response.
- CONTROLO REMOTO: Connects the wired remote bass level control.

Image: The remote bass level control knob, which allows for convenient adjustment of the subwoofer's output level from the driver's seat.
7. Manutenção
The DS18 SB12A requires minimal maintenance. Follow these guidelines to ensure longevity:
- Keep the enclosure clean and free of dust and debris. Use a soft, dry cloth for cleaning.
- Garanta uma circulação de ar adequada ao redor do amplifier to prevent overheating. Do not block ventilation ports.
- Verifique periodicamente se todas as conexões da fiação estão bem apertadas e se há corrosão.
- Avoid placing heavy objects on the enclosure.
8. Solução De Problemas
If you experience issues with your DS18 SB12A, refer to the following troubleshooting guide:
| Problema | Possível causa | Solução |
|---|---|---|
| Sem energia / Sem som |
|
|
| Sem som (LED de energia aceso) |
|
|
| Som distorcido |
|
|
| Amplifier Overheating (Protection LED On) |
|
|
9. Especificações
9.1 Especificações do gabinete
- Volume Interno: 16L / 0.56 ft³
- Carregar configuração: Paralelo
- Tipo de caixa: Selado
- Material da caixa: 0.59" MDF
- Material de acabamento: Non-Woven fabric
- Dimensions (H x W x D1 / D2): 14.96" (380mm) x 19.3" (490mm) x 14.92" (125mm) / 7.4" (188mm)
- Peso: Approximately 0.01 Ounces (Note: This value appears to be a data entry error. The actual weight of a subwoofer enclosure would be significantly higher.)
9.2 Subwoofer Specifications
- Tamanho do alto-falante: 12" (312 mm)
- Impedância Total: 2 ohms
- Manipulação de energia RMS: 350 W
- Manipulação de Potência MÁXIMA: 700 W
- Sensibilidade (1w / 1m): 87 dB
- Resposta de frequência: 30-250Hz
- Diâmetro da bobina de voz: 1.75" (44.43 mm)
- Material anterior da bobina de voz: Alumínio
- Material de enrolamento: EISV
- Material do cone: PPI
- Material envolvente: Borracha
- Material da cesta: SPCC
- Material do ímã: Ferrita
- Peso do ímã: 50 onças
9.3 Ampespecificações do lifier
- AmpClasse Lifier: Digital
- AmpLifier Type: Subwoofer monobloco
- Número de canais: 1 CH
- Impedância Mínima: 2 Ohms
- Relação sinal-ruído: 75 dB
- Efficiency @ 4 ohms: 75%
- Distorção Harmônica Total (THD): 0.30%
- Low Level Input Range: 0.1-0.6 V
- High Level Input Range: Sim
- X-Over selecionável: LPF Fixed
- X-Over Filter Range: 51 - 200 Hz
- Faixa de reforço de graves: 0-6 dB
- Frequência de reforço de graves: 50Hz
- Seletor de fase: 0-180°
- Indicador LED: Power - Protection
- Tamanho do terminal de entrada de energia: 8 GA
- Tamanho do fusível: 30 UMA
- Controle Remoto de Nível: Sim
- Proteção térmica: Yes (75°C / 167°F)
- Proteção de sobrecarga: Sim
- Proteção de saída CC: Sim
- Proteção de saída contra curto-circuito: Sim
10. Informações de garantia
This product comes with a Limited Warranty. Please refer to the warranty card included with your product or visit the official DS18 webConsulte o site para obter os termos e condições detalhados referentes à cobertura da garantia, duração e processo de reclamação.
11. Suporte ao cliente
For technical assistance, troubleshooting beyond this manual, or warranty inquiries, please contact DS18 customer support through their official website ou as informações de contato fornecidas com sua compra.
Você também pode visitar o Loja DS18 na Amazon Para obter mais informações e recursos sobre o produto.