Introdução
This manual provides detailed instructions for the installation, operation, and maintenance of your MYPIN Solar Wireless PTZ Security Camera. Please read this manual thoroughly before using the product to ensure proper function and safety. Keep this manual for future reference.
Produto acimaview
O que está incluído
- MYPIN PTZ Security Camera
- Painel solar
- Bateria recarregável de íon-lítio (pré-instalada ou incluída separadamente)
- Suporte de montagem e parafusos
- Cabo de carregamento USB
- Manual do usuário
Principais características
- Vídeo Full HD 1080p: Fornece vídeos claros e detalhadostage.
- Visão noturna colorida: Equipped with infrared LEDs and white light for clear night vision, including full-color options.
- Solar Powered & Rechargeable Battery: Continuous power supply through the solar panel, with a built-in rechargeable battery for uninterrupted operation.
- AI Smart Recognition & PIR Motion Detection: Advanced AI technology distinguishes between humans, pets, and vehicles, reducing false alarms.
- Áudio bidirecional: Built-in speaker and anti-noise microphone allow for real-time two-way communication.
- Funcionalidade PTZ: Pan 335°, Tilt 90°, and 4x digital zoom for flexible viewângulos de inclinação.
- IP65 à prova de intempéries: Designed to withstand various weather conditions, suitable for outdoor use.
- Conectividade sem fio: Supports 2.4 GHz Wi-Fi for easy installation (5 GHz Wi-Fi not supported).
- Múltiplas opções de armazenamento: Supports cloud storage (7-day free playback, max 1GB) and local storage via Micro SD card (up to 128GB, not included).
- Integração de casa inteligente: Compatible with Amazon Alexa for voice control and live view.

Image: MYPIN Solar Wireless PTZ Security Camera with its solar panel.
Configurar
1. Carregamento inicial
Before first use, fully charge the camera's built-in battery using the provided USB cable and a 5V/2A power adapter (not included). A full charge ensures optimal performance, especially during initial setup and periods of low sunlight.
2. Instalação do aplicativo e criação de conta
- Baixe o VicoHome Baixe o aplicativo da loja de aplicativos do seu smartphone (iOS ou Android).
- Abra o aplicativo e siga as instruções na tela para criar uma nova conta ou fazer login, caso já possua uma.
3. Emparelhamento da câmera com o aplicativo
- Certifique-se de que sua câmera esteja ligada.
- In the VicoHome app, tap the "+" icon to add a new device.
- Selecione o modelo da sua câmera na lista.
- Follow the app's instructions to connect the camera to your 2.4 GHz Wi-Fi network. You may need to scan a QR code displayed on your phone with the camera lens.
- Após conectar a câmera, dê um nome a ela e conclua o processo de configuração.
4. Solar Panel and Camera Mounting
The camera and solar panel can be installed in two ways: integrated or separated. Choose a location that provides optimal sunlight exposure for the solar panel and a clear view para a câmera.
- Colocação do painel solar: Mount the solar panel in a location that receives direct sunlight for several hours daily. Ensure the cable can reach the camera.
- Posicionamento da câmera: Use the provided mounting bracket and screws to securely attach the camera to a wall or other stable surface. Adjust the camera angle for optimal surveillance coverage.

Image: Illustration of two installation methods for the solar panel and camera, showing both integrated and separate mounting options.
Instruções de operação
1. Viver View e reprodução
- Open the VicoHome app and select your camera to view a transmissão ao vivo.
- Acesse foo gravadotage through the playback feature in the app.
2. Controle PTZ
Ao vivo view interface, use the on-screen controls to pan (335° horizontally) and tilt (90° vertically) the camera lens. You can also use the digital zoom feature to get a closer look.
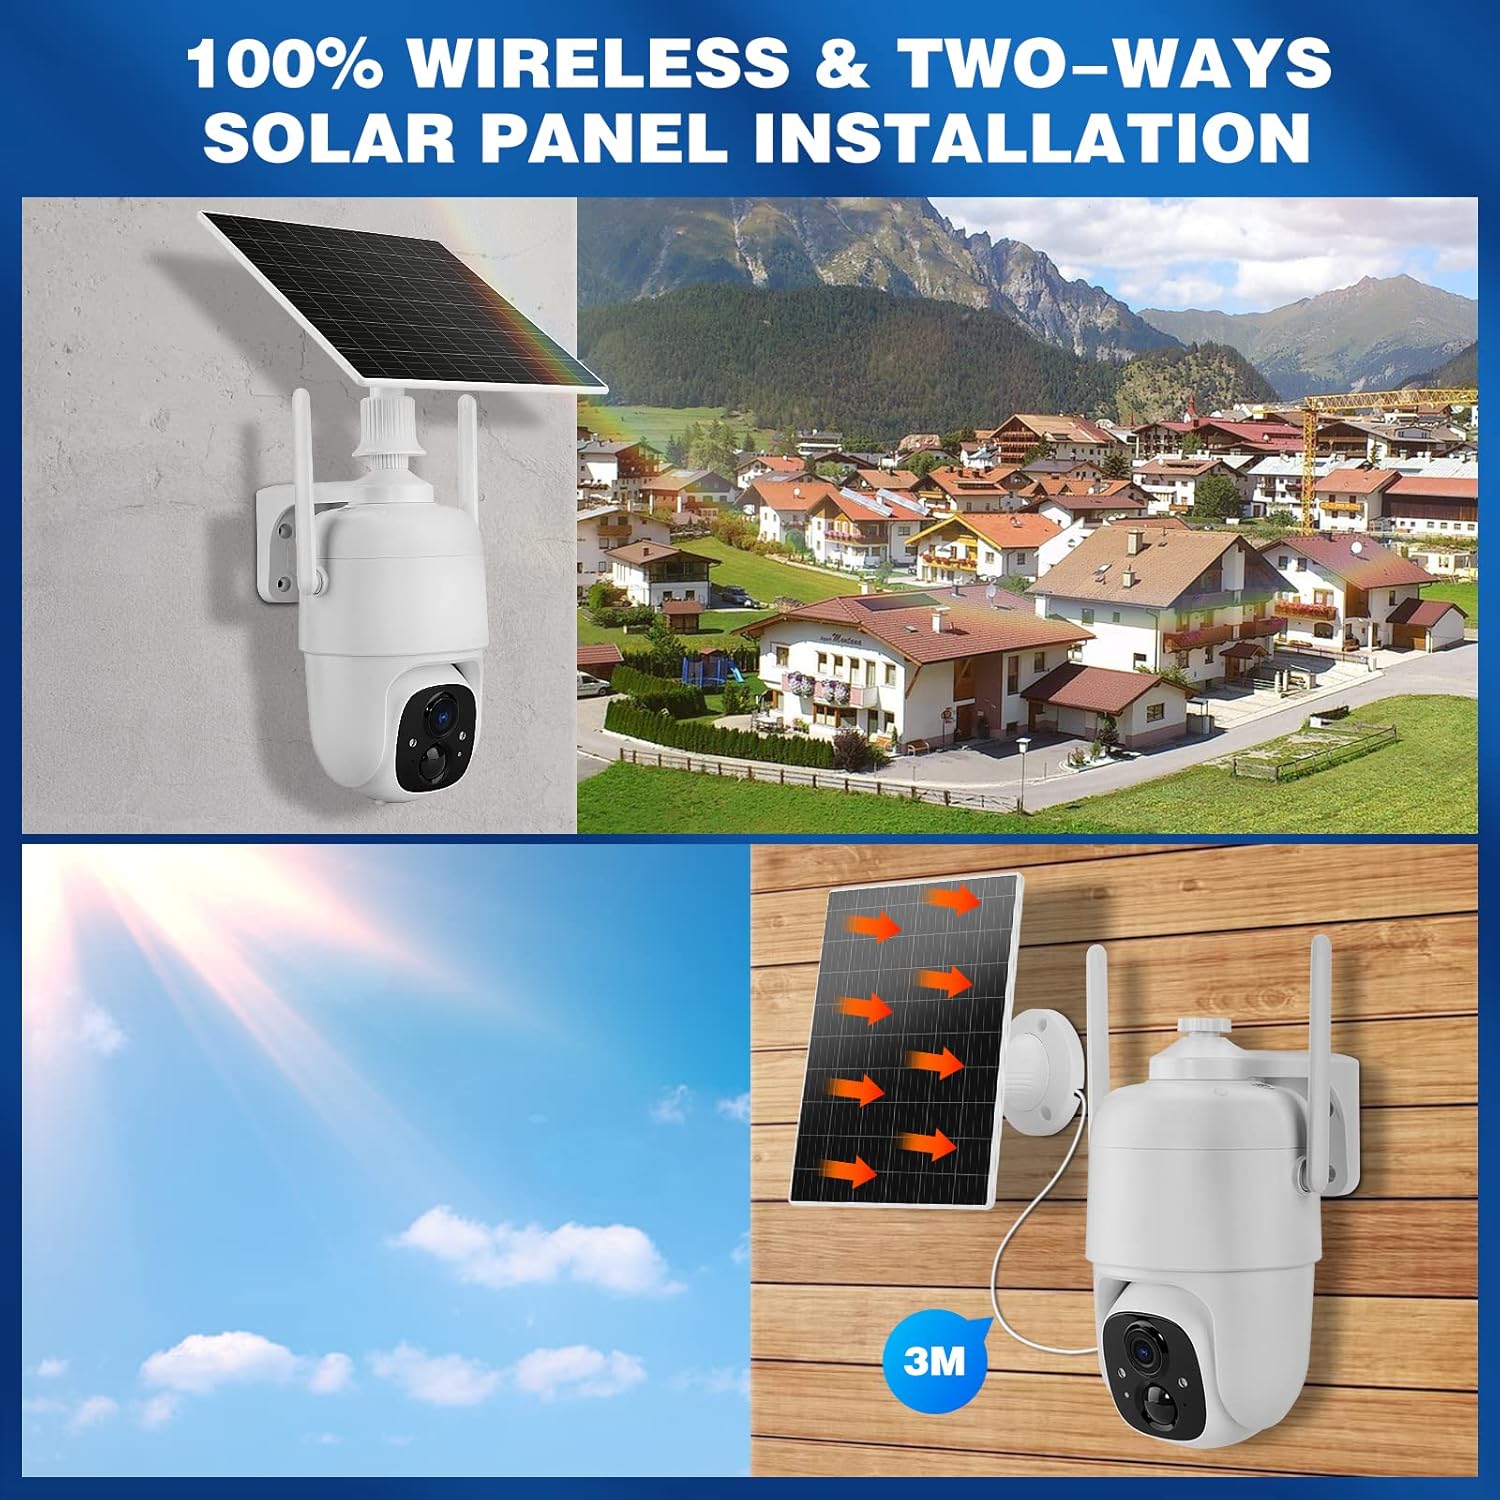
Image: Demonstrates controlling the camera's pan and tilt functions using a smartphone app.
3. Áudio bidirecional
Toque no ícone do microfone na tela ao vivo do aplicativo. view to speak through the camera's speaker. The camera's built-in microphone will capture audio from the camera's vicinity, allowing for two-way communication.

Image: A person speaking through the camera to a delivery person, demonstrating the two-way audio feature.
4. Detecção de movimento e alertas
- Configure motion detection sensitivity and activity zones within the VicoHome app.
- Enable AI Smart Recognition to differentiate between humans, pets, and vehicles for more accurate alerts.
- Receba notificações instantâneas no seu smartphone quando for detectado movimento.

Image: A person walking past a gate, triggering a PIR human detection alert on a smartphone.
5. Modos de visão noturna
The camera offers both infrared (IR) night vision and full-color night vision. You can switch between these modes in the app settings based on your preference and lighting conditions.

Imagem: Uma divisão view showing the difference between color night vision and standard IR night vision at night.
6. Opções de armazenamento
- Armazenamento em nuvem: The camera offers 7 days of free cloud playback (up to 1GB). Additional cloud plans may be available through the app.
- Cartão Micro SD: Insert a Micro SD card (up to 128GB, not included) into the designated slot for local video storage.
7. Integração com a Amazon Alexa
To integrate with Amazon Alexa, enable the VicoHome skill in the Alexa app and link your VicoHome account. You can then use voice commands to view your camera's live feed on compatible Alexa-enabled devices.

Image: A MYPIN camera and an Amazon Echo Show displaying the camera's live feed, illustrating Alexa integration.
Manutenção
1. Limpeza
- Limpe regularmente a lente da câmera e o painel solar com um pano macio e seco.amp pano para remover poeira e detritos.
- Não use produtos químicos fortes ou produtos de limpeza abrasivos.
2. Cuidados com a bateria
- Ensure the solar panel is free from obstructions to maximize charging efficiency.
- If the camera is stored for an extended period, charge the battery periodically to prevent deep discharge.
3. Atualizações de firmware
Check the VicoHome app regularly for firmware updates. Keeping your camera's firmware updated ensures optimal performance, security, and access to new features.
Solução de problemas
| Problema | Solução |
|---|---|
| Câmera não conecta ao Wi-Fi | Ensure your Wi-Fi is 2.4 GHz. Check Wi-Fi signal strength. Restart your router and camera. Re-pair the camera in the app. |
| Má qualidade de vídeo | Check your Wi-Fi connection speed. Clean the camera lens. Ensure adequate lighting for optimal image capture. |
| Bateria não carrega | Ensure the solar panel is clean and receives direct sunlight. Check the connection cable between the solar panel and camera. Charge directly via USB if necessary. |
| Alertas de movimento falso | Adjust motion detection sensitivity in the app. Utilize AI Smart Recognition to filter out non-human movements. Define specific activity zones. |
| Áudio bidirecional não funciona | Check microphone and speaker settings in the app. Ensure your phone's volume is up. Verify network connection stability. |
Especificações
- Modelo: HS0366
- Resolução de vídeo: 1080p Full HD
- Panângulo: 335°
- Ângulo de inclinaçao: 90°
- Zoom digital: 4x
- Visão noturna: Infrared and Color Night Vision
- Conectividade sem fio: Wi-Fi 2.4 GHz (IEEE 802.11b/g/n)
- Fonte de energia: Solar Powered, Rechargeable Lithium-ion Battery (5 Watt-hours)
- Resistência às intempéries: IP65
- Temperatura de operação: -10°C a 45°C (14°F a 113°F)
- Armazenar: Cloud Storage (up to 1GB free for 7 days), Micro SD Card (up to 128GB, not included)
- Áudio: Two-Way Audio (built-in microphone and speaker)
- Detecção de movimento: PIR with AI Human/Pet/Vehicle Recognition
- Material: Metal
- Dimensões: Aproximadamente 20.2 x 19.7 x 13.9 cm
- Peso: Aproximadamente 1.27 kg

Image: The MYPIN camera and solar panel installed outdoors during winter, highlighting its IP65 waterproof rating and operating temperature range.
Garantia e Suporte
For warranty information and technical support, please refer to the contact details provided with your purchase or visit the official MYPIN website. Guarde o recibo de compra como comprovante para solicitações de garantia.


