Introdução
This manual provides instructions for the proper use and maintenance of your Alecto AK-20 Alarm Clock with Thermometer. Please read these instructions carefully before operating the device and retain them for future reference. The AK-20 is designed to display time, date, day, and indoor temperature, featuring multiple alarms, a snooze function, and radio-controlled time synchronization.
Informações de segurança
- Não exponha o dispositivo a temperaturas extremas, luz solar direta ou alta umidade.
- Evite deixar cair o dispositivo ou submetê-lo a impactos fortes.
- Não tente desmontar ou reparar a unidade por conta própria. Encaminhe todos os serviços de manutenção a pessoal qualificado.
- Descarte as baterias usadas de maneira responsável, de acordo com os regulamentos locais.
Conteúdo da embalagem
Ao desembalar, certifique-se de que todos os itens estejam presentes e em boas condições:
- Alecto AK-20 Alarm Clock
- User Manual (NL/EN/DE/FR)
Produto acimaview
The Alecto AK-20 features a clear digital display and intuitive controls for easy operation.

Figura 1: Frente view of the Alecto AK-20 Alarm Clock, showing the large digital display with time, date, day, and temperature, along with control buttons at the bottom.

Figura 2: Angulado view of the Alecto AK-20, highlighting the main display and the alarm ON/OFF switches on the right side.
Controls and Display Elements:
- Grande display digital: Shows time (AM/PM indicator), date, day of the week, and indoor temperature.
- Botão de AJUSTE DE HORA: Utilizado para entrar no modo de configuração de hora.
- - / + Buttons: Used to adjust values (decrease/increase).
- Botão DEFINIR ALARME: Utilizado para entrar no modo de configuração de alarme.
- ALARM 1-4 ON/OFF Switches: Located on the side for individual alarm activation.
- Botão SNOOZE / LUZ: Located on top, activates backlight and snooze function.
- AUTO LIGHT Switch: Located on the back, controls automatic backlight.
- Botão de reset: Located on the back, for factory reset.

Figura 3: lado direito view of the alarm clock, showing the physical ON/OFF switches for Alarm 3 and Alarm 4.

Figura 4: Voltar view of the alarm clock, showing the battery compartment, RESET button, and AUTO LIGHT switch.
Configurar
1. Instalação da bateria
- Locate the battery compartment on the back of the alarm clock (refer to Figure 4).
- Abra a tampa do compartimento da bateria.
- Insira duas pilhas AA, certificando-se da polaridade correta (+ e -).
- Feche bem a tampa do compartimento da bateria.
The display will light up, and the clock will begin searching for the DCF radio signal for automatic time synchronization.
2. Initial Time and Date Synchronization (DCF)
The AK-20 is a radio-controlled clock. Upon battery installation, it will automatically attempt to synchronize with the DCF signal. This process may take several minutes. A signal icon on the display indicates successful reception.
- Place the clock near a window for better signal reception.
- Avoid placing it near electronic devices that may cause interference.
3. Manual Time and Date Setting (Optional)
If DCF synchronization is not desired or unsuccessful, you can set the time and date manually:
- Pressione e segure o HORÁRIO DEFINIDO button until the hour digits start flashing.
- Use o - or + botões para ajustar a hora.
- Imprensa HORÁRIO DEFINIDO Novamente, para confirmar a hora e passar para os minutos.
- Repita o processo para minutos, ano, mês e dia.
- Imprensa HORÁRIO DEFINIDO Mais uma vez para sair do modo de configuração.
4. Seleção de idioma
The device supports multiple languages for day display. To change the language:
- No modo de exibição de hora normal, pressione o - botão repetidamente.
- The day of the week will cycle through available languages (Dutch, French, German, English, Spanish, Italian, Danish, Russian).
- Stop when your desired language is displayed.
Instruções de operação
1. Definição de alarmes
The AK-20 allows setting up to four independent alarms.
- Pressione e segure o ALARME DEFINIDO button until the alarm time (e.g., ALARM-1) starts flashing.
- Use o - or + botões para ajustar a hora do alarme desejada.
- Imprensa ALARME DEFINIDO Novamente, para confirmar a hora e passar para os minutos.
- Use o - or + botões para ajustar os minutos desejados do alarme.
- Imprensa ALARME DEFINIDO to confirm and move to the next alarm (ALARM-2, ALARM-3, ALARM-4).
- Repeat steps 2-4 for each alarm you wish to set.
- After setting all desired alarms, press ALARME DEFINIDO Para sair do modo de configuração do alarme.
2. Activating/Deactivating Alarms
Each alarm has a dedicated ON/OFF switch on the side of the unit (refer to Figure 3).
- Slide the corresponding switch to ON to activate an alarm. An alarm icon will appear on the display.
- Deslize a chave para DESLIGADO to deactivate an alarm. The alarm icon will disappear.
3. Função soneca
Quando o alarme tocar, pressione o SNOOZ / LUZ button on top of the clock. The alarm will temporarily stop and sound again after a few minutes (typically 5-10 minutes, depending on the model's default setting).
4. Função de retroiluminação
The display features a backlight for visibility in low-light conditions.
- Retroiluminação manual: Pressione brevemente o SNOOZ / LUZ Botão para ativar a luz de fundo por alguns segundos.
- Luz de fundo automática: On the back of the unit, slide the LUZ AUTOMÁTICA mudar para ON. The backlight will automatically illuminate in dark environments. Slide to DESLIGADO para desabilitar esse recurso.
5. Display de temperatura
The integrated thermometer displays the indoor temperature.
- Para alternar entre Celsius (°C) e Fahrenheit (°F), pressione o + button while in normal time display mode.
Manutenção
- Limpe o dispositivo com um pano macio e seco. Não utilize produtos de limpeza abrasivos ou solventes.
- Se o dispositivo não for utilizado por um longo período, remova as pilhas para evitar vazamentos.
Solução de problemas
| Problema | Possível causa | Solução |
|---|---|---|
| A tela está em branco ou com brilho reduzido. | As pilhas estão fracas ou inseridas incorretamente. | Substitua as pilhas por pilhas AA novas, certificando-se da polaridade correta. |
| O horário está incorreto. | DCF signal not received or manual time not set. | Ensure the clock is in an area with good signal reception. Manually set the time if necessary. |
| O alarme não dispara. | O alarme não está ativado ou está configurado incorretamente. | Check the alarm ON/OFF switch on the side. Verify alarm time settings. |
| A luz de fundo não está funcionando. | AUTO LIGHT switch is OFF or batteries are low. | Check the AUTO LIGHT switch on the back. Replace batteries if needed. |
Se o problema persistir após tentar essas soluções, entre em contato com o suporte ao cliente.
Especificações
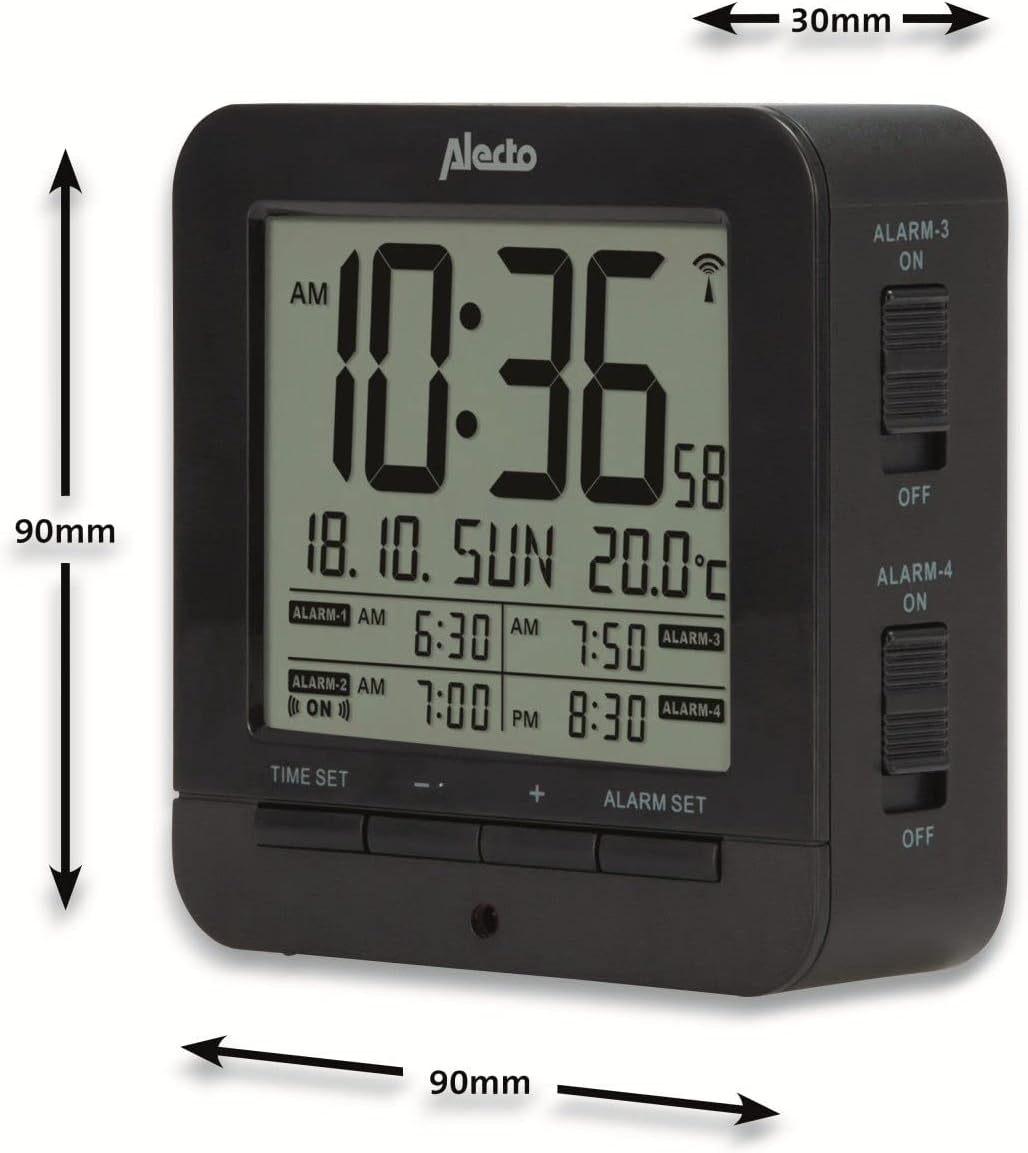
Figure 5: Alecto AK-20 Alarm Clock showing its approximate dimensions: 90mm height, 90mm width, and 30mm depth.
| Recurso | Detalhe |
|---|---|
| Número do modelo | AK-20 (A003319) |
| Marca | Alecto |
| Cor | Preto |
| Material | Acrilonitrila Butadieno Estireno (ABS) |
| Dimensões (A x L x P) | 9 x 9 x 3 cm (aproximadamente 3.54 x 3.54 x 1.18 polegadas) |
| Dimensões do ecrã | 6.4 x 5.4 cm (aproximadamente 2.52 x 2.13 polegadas) |
| Peso | 231 g (aproximadamente 0.51 libras) |
| Fonte de energia | 2 pilhas AA (não incluídas) |
| Tipo de exibição | Digital |
| Características especiais | Temperature Display, 4 Alarms, Snooze Function, Backlight, DCF Radio Control |
| Unidades de temperatura | °C / °F selecionável |
| Idiomas suportados | Dutch, French, German, English, Spanish, Italian, Danish, Russian |
Garantia e Suporte
Alecto products are manufactured to high quality standards. For information regarding warranty terms and conditions, please refer to the documentation provided with your purchase or visit the official Alecto website. For technical support or service inquiries, please contact your retailer or the Alecto customer service department.