Introdução
This manual provides detailed instructions for the setup, operation, and maintenance of your Amazon Basics Projection Alarm Clock. Please read this manual thoroughly before using the product to ensure proper function and to prevent damage.

Image: The Amazon Basics Projection Alarm Clock, showing its digital display and projection lens.
Instruções de segurança
- Não exponha a unidade a temperaturas extremas, luz solar direta, poeira ou umidade.
- Certifique-se de que o adaptador de energia seja compatível com a sua rede elétrica local.
- Mantenha o aparelho longe de água ou outros líquidos.
- Não tente desmontar ou modificar a unidade. Isso anulará a garantia.
- Limpe o aparelho apenas com um pano macio e seco. Não utilize produtos de limpeza líquidos.
- Descarte as baterias corretamente, de acordo com as regulamentações locais.
Conteúdo da embalagem
- Amazon Basics Projection Alarm Clock
- Adaptador de energia CA
- Manual do usuário
Características do produto
- Projection of time onto a wall or ceiling.
- FM Radio with automatic/manual scan and up to 15 preset stations.
- USB port for charging mobile phones or tablets.
- 7-inch high-definition LED display with adjustable brightness.
- Dual alarms for separate wake-up times.
- Snooze function with adjustable duration (2 to 60 minutes).
- Sleep timer for automatic radio shut-off (5 to 90 minutes).
- DST button for Daylight Saving Time adjustment.
- Battery backup (requires 2 AAA batteries, not included) to maintain time settings during power outage.

Imagem: Acimaview of key features including sleep timer, radio presets, and snooze function.
Controles e exibição
Familiarize yourself with the buttons and ports on your alarm clock for optimal use.

Imagem: Lado view illustrating the location of controls, USB charging port, and projection lens.
- Botão de ajuste de hora: Usado para definir a hora atual.
- Botões de alarme 1/2: Utilizado para configurar e ativar o Alarme 1 e o Alarme 2.
- Botão soneca/regulador de intensidade: Activates snooze during an alarm; adjusts display brightness when not alarming.
- Radio/Sleep Button: Turns FM radio on/off; sets sleep timer.
- Volume/Tune Dial: Adjusts radio volume and tunes FM frequencies.
- Projection On/Off/Flip Button: Controls the projection feature and flips the projected time.
- Projection Focus Wheel: Ajusta a clareza do tempo projetado.
- Ajustador do ângulo de projeção: Altera o ângulo do tempo projetado.
- Porta de carregamento USB: Para carregar dispositivos externos.
- Botão DST: Toggles Daylight Saving Time.
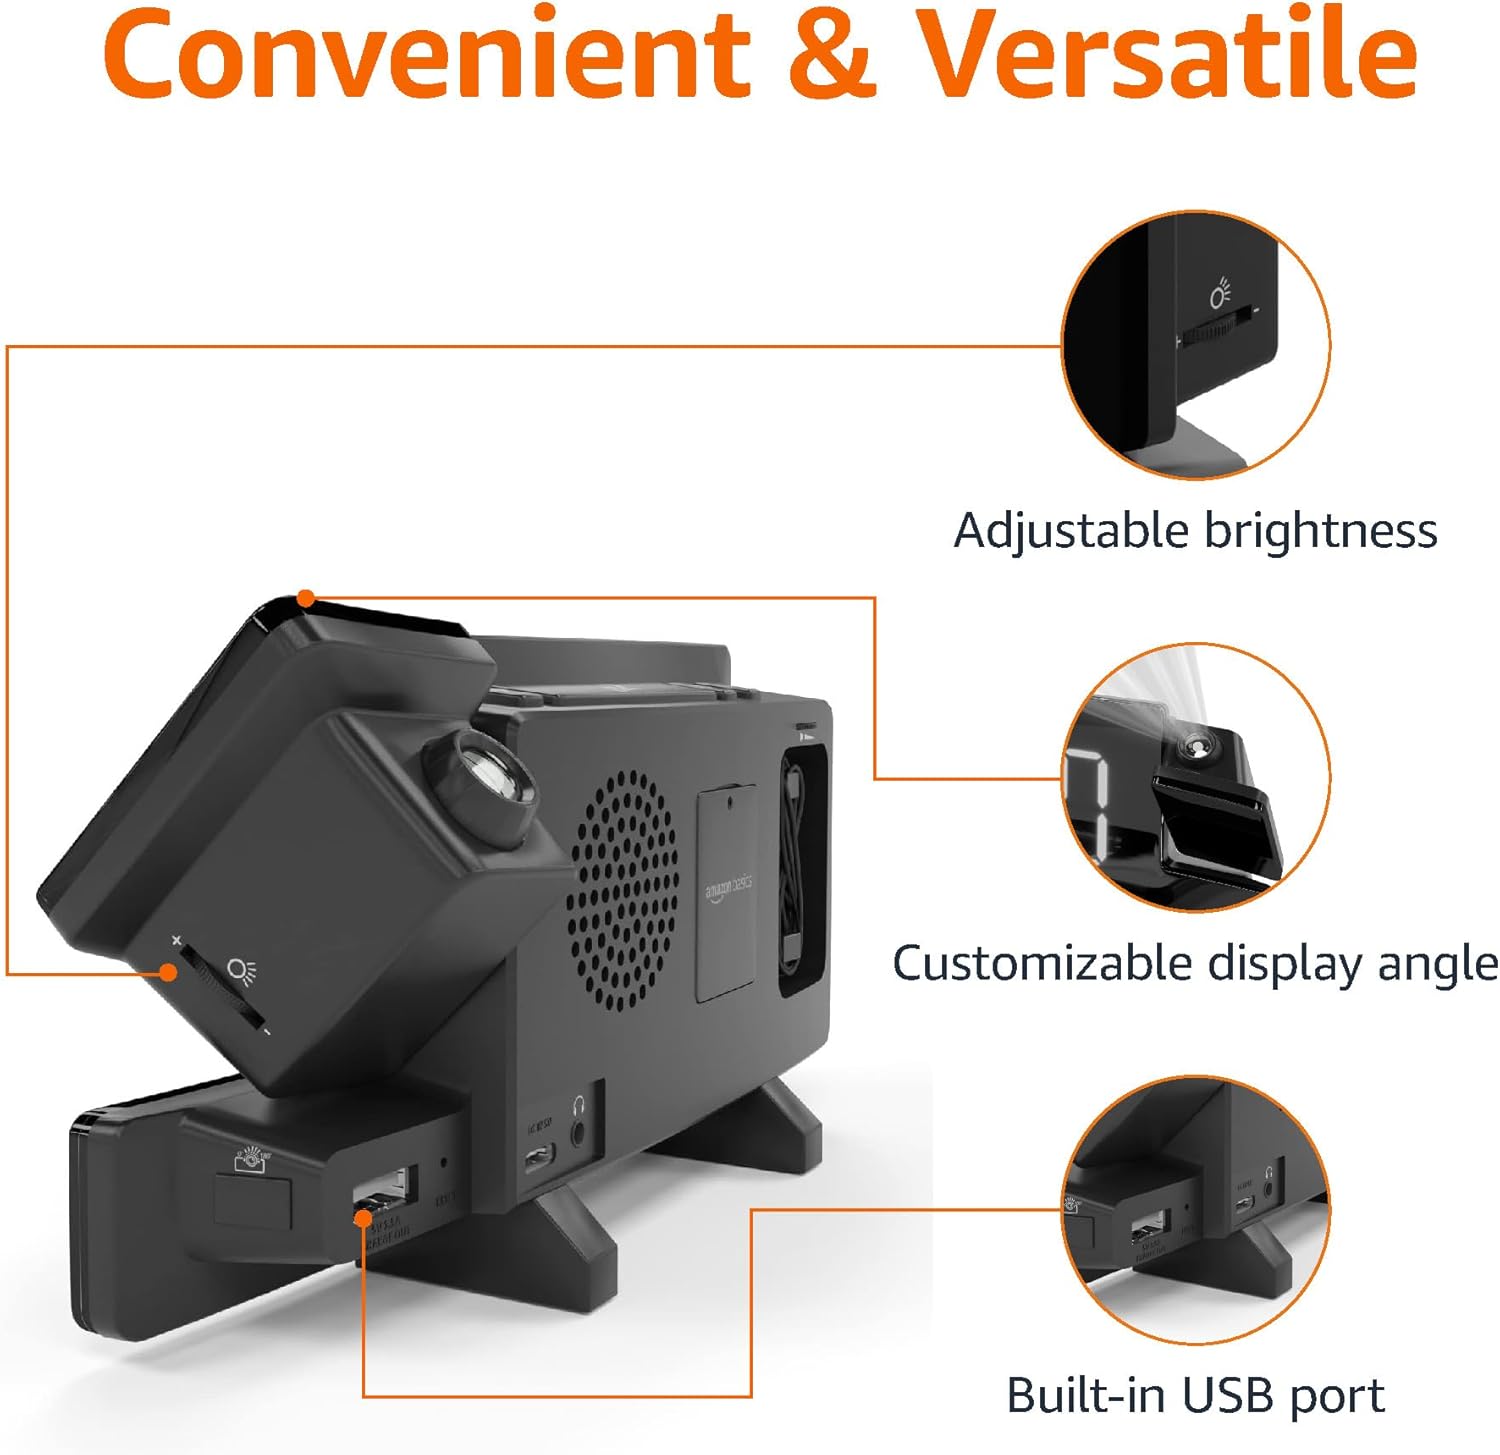
Image: Diagram highlighting the adjustable brightness, customizable projection angle, and USB charging port.
Configurar
1. Conexão de energia
Connect the AC power adapter to the DC IN port on the back of the alarm clock and plug it into a standard wall outlet. The display will light up.
2. Instalação de bateria reserva
For battery backup, open the battery compartment on the bottom of the unit. Insert 2 AAA batteries (not included), ensuring correct polarity (+/-). Close the compartment. The battery backup maintains time settings during power outages but does not power the display or alarm functions.
3. Configuração inicial da hora
- Pressione e segure o Tempo definido botão. Os dígitos das horas piscarão.
- Use o Volume/Tune Dial para ajustar a hora. pressione Tempo definido novamente para confirmar.
- Os dígitos dos minutos irão piscar. Use o Volume/Tune Dial para ajustar os minutos. pressione Tempo definido novamente para confirmar.
- The time format (12H/24H) will flash. Use the Volume/Tune Dial to select your preferred format. Press Tempo definido Para confirmar e sair do modo de configuração de hora.
4. Horário de verão (DST)
Pressione o Horário de verão button to toggle Daylight Saving Time on or off. The DST indicator will appear or disappear on the display.
Instruções de operação
1. Configurar alarmes (Alarme 1 e Alarme 2)
- Pressione e segure o Alarme 1 or Alarme 2 botão. Os dígitos da hora do alarme piscarão.
- Use o Volume/Tune Dial to adjust the alarm hour. Press the respective Alarme botão novamente para confirmar.
- Os dígitos dos minutos do alarme piscarão. Use o Volume/Tune Dial to adjust the alarm minutes. Press the respective Alarme botão novamente para confirmar.
- The alarm source (FM radio or buzzer) will flash. Use the Volume/Tune Dial to select your preference. Press the respective Alarme Pressione o botão para confirmar e ativar o alarme. Um ícone de alarme aparecerá no visor.
- Para desativar um alarme, pressione o respectivo botão. Alarme Pressione o botão uma vez. O ícone do alarme desaparecerá.
2. Using Snooze
Quando o alarme tocar, pressione o Snooze / Dimmer button to temporarily silence the alarm. The alarm will sound again after the set snooze duration. The default snooze duration is 9 minutes. To adjust the snooze duration, press and hold the Snooze / Dimmer botão e, em seguida, use o Volume/Tune Dial to select a duration between 2 and 60 minutes. Press Snooze / Dimmer novamente para confirmar.
3. Operação de rádio FM
- Ligar/Desligar: Pressione o Radio/Sleep botão para ligar ou desligar o rádio FM.
- Sintonize as estações: Use o Volume/Tune Dial to manually tune to a desired FM frequency.
- Analise automatica: Pressione e segure o Radio/Sleep button to automatically scan and save available FM stations as presets.
- Selecione Predefinições: Once stations are saved, short press the Radio/Sleep button to cycle through the preset stations.
- Ajustar volume: Gire o Volume/Tune Dial to adjust the radio volume.
4. Despertador
Enquanto a rádio FM estiver tocando, pressione o Radio/Sleep button repeatedly to set the sleep timer. Options typically range from 5 to 90 minutes. The radio will automatically turn off after the selected duration.
5. Recurso de Projeção

Image: The alarm clock projecting the time onto a bedroom ceiling.
- Ativar/Desativar: Pressione o Projection On/Off/Flip Botão para ativar ou desativar a projeção de tempo.
- Ajustar ângulo: Manually adjust the projection arm to direct the time onto your desired surface (wall or ceiling).
- Foco: Gire o Projection Focus Wheel to achieve a clear image.
- Flip Display: Pressione o Projection On/Off/Flip button repeatedly to rotate the projected time 180 degrees, ensuring correct orientation.

Image: The alarm clock on a nightstand, projecting the time onto a wall, demonstrating its use in a bedroom setting.
6. Carregamento USB
Connect your mobile phone or tablet's USB charging cable to the Porta de carregamento USB on the back of the alarm clock. The device will begin charging. This port is for charging only and does not support data transfer.
7. Ajuste de brilho da tela
Pressione o Snooze / Dimmer button (when no alarm is sounding) to cycle through different brightness levels for the main LED display.
Manutenção
1. Limpeza
Wipe the unit with a soft, dry, lint-free cloth. Do not use abrasive cleaners, waxes, or solvents as they may damage the surface.
2. Substituição da bateria
If the battery backup is not functioning correctly (e.g., time resets after a power outage), replace the 2 AAA batteries in the battery compartment, ensuring correct polarity.
Solução de problemas
| Problema | Possível causa | Solução |
|---|---|---|
| O display está em branco. | Sem conexão de energia. | Certifique-se de que o adaptador CA esteja firmemente conectado à unidade e a uma tomada elétrica em funcionamento. |
| O alarme não dispara. | O alarme não está ativado ou o volume está muito baixo. | Check if the alarm icon is visible on the display. Re-set the alarm if necessary. Increase radio volume if FM is selected as alarm source. |
| O tempo projetado está impreciso. | Projection focus is not adjusted. | Gire o Projection Focus Wheel até a imagem ficar nítida. |
| Projected time is not visible. | Projection is off or room is too bright. | Pressione o Projection On/Off/Flip button to activate. The projection is best viewed in a dark room. |
| A recepção de rádio é fraca. | Antenna position or interference. | Adjust the position of the FM antenna wire. Move the unit away from other electronic devices that may cause interference. |
| O carregamento USB não está funcionando. | Problema com o cabo ou incompatibilidade do dispositivo. | Ensure the USB cable is functional and properly connected. Try a different cable or device. |
Especificações
- Modelo: MET8831-EUA
- Entrada de energia: Adaptador AC (incluído)
- Bateria de reserva: 2 pilhas AAA (não incluídas)
- Mostrar: LED de 7 polegadas
- Frequência de rádio: FM
- Saída USB: 5V, 1A (for charging)
- Dimensões (C x L x A): 7.1 x 1.6 x 3.7 polegadas (18.03 x 4.06 x 9.4 cm)
- Peso: Aproximadamente 0.59 lbs (267.62 g)

Image: Product dimensions for the Amazon Basics Projection Alarm Clock.
Informações de garantia
This product is covered by the Amazon Basics warranty. For detailed information regarding warranty terms and conditions, please refer to the official Amazon Basics website ou entre em contato com o suporte ao cliente.
Suporte ao cliente
For further assistance, troubleshooting, or product inquiries, please contact Amazon Basics customer support through the Amazon website or your purchase platform. Have your product model number (MET8831-US) and purchase details ready.


