1. Introdução
This manual provides comprehensive instructions for the installation, operation, and maintenance of the TYAN B7126T65V10E4HR Thunder SX TS65-B7126 Storage Server. Please read this manual thoroughly before operating the server to ensure proper functionality and to prevent damage.
2. Informações de segurança
Observe as seguintes precauções de segurança para evitar ferimentos e danos ao equipamento:
- Desligue sempre a energia antes de realizar qualquer instalação ou manutenção.
- Garanta um aterramento adequado para evitar choque elétrico.
- Operate the server in a well-ventilated environment to prevent overheating.
- Do not expose the server to moisture or extreme temperatures.
- Somente pessoal qualificado deve realizar serviços ou reparos.
3. Conteúdo da embalagem
Verifique se todos os itens estão presentes na embalagem:
- TYAN B7126T65V10E4HR Thunder SX TS65-B7126 Storage Server Unit
- Cabos de energia)
- Accessory Kit (screws, cables, etc.)
- Quick Installation Guide (this manual serves as the detailed guide)
4. Produto acabadoview
The TYAN Thunder SX TS65-B7126 is a high-performance storage server designed for demanding data center environments. It features extensive storage capabilities and flexible expansion options.
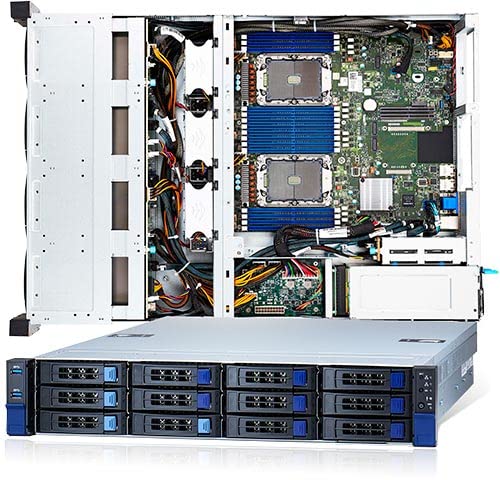
Figura 4.1: Frente view of the TYAN B7126T65V10E4HR Thunder SX TS65-B7126 Storage Server, showing drive bays and front panel controls.
Principais características:
- Memória: 16 DIMM slots supporting DDR4 3200 memory.
- Front Storage: 12 x 3.5" SATA hot-swap, tool-less drive bays, with optional support for 4 NVMe U.2 drives.
- Compartimento traseiro: 2 x 2.5" SATA hot-swap, tool-less drive bays.
- Rede: PCIe 3.0 x16 OCP v2.0 LAN mezzanine slot (Type 1).
- Armazenamento interno: 1 x NVMe/PCIe 3.0 x2 M.2 2280 slot.
5. Configuração
5.1 Instalação do Rack
The server is designed for standard 19-inch rack mounting. Secure the server using appropriate rack rails and screws (typically included in the accessory kit) to ensure stability and proper airflow.
5.2 Instalação da unidade
- 3.5" SATA/NVMe Drives: Open the drive bay latch, slide the drive into the bay until it clicks into place. For NVMe U.2 drives, ensure the correct backplane configuration is in place.
- 2.5" SATA Rear Drives: Locate the rear 2.5" drive bays. Slide the drives into the bays until secured.
- M.2 NVMe Drive: Install the M.2 drive into the dedicated M.2 2280 slot on the motherboard, securing it with the provided screw.
5.3 Instalação de Memória
Install DDR4 3200 DIMMs into the 16 available slots. Refer to the motherboard manual for specific memory population rules to optimize performance.
5.4 Conexão de Energia
Connect the power cord(s) to the server's power supply unit(s) and then to a grounded power outlet or PDU. Ensure all power connections are secure.
5.5 Inicialização inicial
Press the power button on the front panel. Monitor the boot process and access the BIOS/UEFI setup as needed to configure boot devices, RAID arrays, and other system settings.
6. Instruções de operação
6.1 Instalação do Sistema Operacional
Install your preferred operating system (e.g., Windows Server, Linux distribution) using a bootable USB drive or network installation. Ensure all necessary drivers are installed for optimal hardware performance.
6.2 Configuração de Armazenamento
Configure your storage drives. For SATA drives, you may use the onboard RAID controller or a separate HBA. For NVMe drives, ensure the operating system has the appropriate drivers. Create logical volumes or file systems as required for your application.
6.3 Configuração de Rede
Configure the network interfaces, including the OCP v2.0 LAN mezzanine card, with appropriate IP addresses, subnet masks, and gateway settings for your network environment.
7. Manutenção
7.1 Limpeza
Regularly clean the server's exterior and ensure air vents are free from dust accumulation. Use compressed air to clear dust from internal components, ensuring power is disconnected first.
7.2 atualizações de firmware
Verifique periodicamente as instruções do fabricante. website for updated BIOS/UEFI, BMC, and RAID controller firmware. Apply updates as recommended to improve stability, performance, and security.
7.3 Substituição da unidade
The server features hot-swap drive bays. For failed drives, identify the faulty unit, unmount it from the operating system (if applicable), and carefully remove it. Insert a new, compatible drive, ensuring it seats correctly.
8. Solução De Problemas
8.1 Sem energia
- Check power cord connections to the server and power outlet.
- Verify the power supply unit (PSU) status indicators.
- Certifique-se de que a tomada elétrica esteja funcionando.
8.2 System Not Booting
- Check memory modules are properly seated.
- Verify boot device order in BIOS/UEFI.
- Listen for POST (Power-On Self-Test) beep codes and consult the motherboard manual for their meaning.
8.3 Unidade não detectada
- Ensure the drive is fully seated in its bay.
- Check drive status LEDs.
- Verify cabling for non-hot-swap drives.
- Check BIOS/UEFI or RAID controller settings for drive detection.
9. Especificações
| Recurso | Detalhe |
|---|---|
| Modelo | B7126T65V10E4HR Thunder SX TS65-B7126 |
| Fabricante | TYAN |
| Suporte de memória | 16 DIMM slots, DDR4 3200 |
| Front Drive Bays | 12 x 3.5" SATA (hot-swap, tool-less) w/ opt. 4 NVMe U.2 |
| Rear Drive Bays | 2 x 2.5" SATA (hot-swap, tool-less) |
| Internal M.2 Slot | 1 x NVMe/PCIe 3.0 x2 M.2 2280 |
| LAN Mezzanine Slot | PCIe 3.0 x16 OCP v2.0 (Type 1) |
| ASIN | B0BLGZ15V10E4HR |
| Data da primeira disponibilidade | 4 de novembro de 2022 |
10. Garantia e Suporte
For warranty information and technical support, please refer to the official TYAN website or contact your authorized reseller. Keep your proof of purchase for warranty claims.
Recursos on-line: Visit the TYAN official website for the latest drivers, firmware, and additional documentation.


