
1. Instruções importantes de segurança
Leia atentamente todas as instruções antes de usar este aquecedor. O não cumprimento destas instruções pode resultar em incêndio, choque elétrico ou ferimentos.
- Não utilize este aquecedor ao ar livre. Ele foi projetado apenas para uso interno.
- Sempre conecte aquecedores diretamente em uma tomada/receptáculo de parede. Nunca use com um cabo de extensão ou torneira de energia reposicionável (tomada/redutor de energia).
- Este aquecedor fica quente quando em uso. Para evitar queimaduras, não deixe a pele exposta tocar superfícies quentes.
- Mantenha materiais combustíveis, como móveis, travesseiros, roupas de cama, papéis, roupas e cortinas a pelo menos 3 m (0.9 pés) da frente do aquecedor e longe das laterais e da parte traseira.
- É necessário extremo cuidado quando qualquer aquecedor for usado por crianças ou inválidos ou perto deles, e sempre que o aquecedor for deixado funcionando e sem supervisão.
- Sempre desligue o aquecedor quando não estiver em uso.
- Não opere nenhum aquecedor com um cabo ou plugue danificado ou após o aquecedor apresentar mau funcionamento, ter sido derrubado ou danificado de qualquer maneira. Devolva o aquecedor a uma oficina de serviço autorizada para exame, ajuste elétrico ou mecânico ou reparo.
- Não insira nem permita que objetos estranhos entrem em nenhuma abertura de ventilação ou exaustão, pois isso pode causar choque elétrico ou incêndio, ou danificar o aquecedor.
- Para evitar um possível incêndio, não bloqueie as entradas ou saídas de ar de nenhuma maneira. Não use em superfícies macias, como uma cama, onde as aberturas podem ficar bloqueadas.
- This heater has an automatic overheat protection system. If the heater overheats, it will automatically shut off. Unplug the heater, wait 10 minutes for it to cool down, then plug it back in.
- This heater is equipped with a tip-over safety switch. If the heater is accidentally tipped over, it will automatically shut off. Place the heater on a firm, level surface to resume operation.
2. Produto acabadoview
The PELONIS PSH10C2ABB is a compact and portable 1500W ceramic electric fan heater designed for efficient indoor heating. It features multiple heat settings and a fan-only mode for year-round use.
Principais características:
- 3 Configurações de Calor: 700W, 900W, and 1500W for customizable warmth.
- Modo somente para ventiladores: Allows for air circulation without heat, suitable for all seasons.
- Termostato ajustável: Maintain your desired room temperature.
- Design compacto e portátil: Easy to move between rooms with a cool-touch handle.
- Elemento de aquecimento cerâmico: Provides rapid and energy-efficient heating.
- Características de segurança: Overheat protection and tip-over switch for enhanced safety.
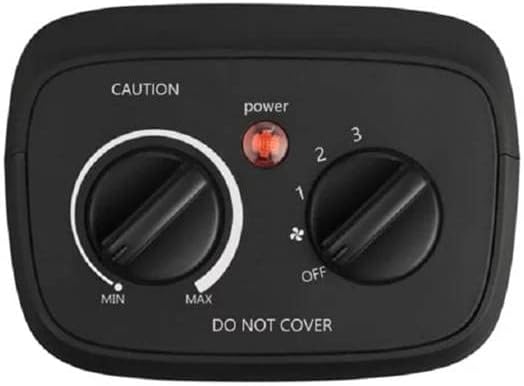
Imagem: Topo view of the heater's control panel, showing the thermostat dial (Min to Max) and the mode selector dial (Off, Fan, Heat 1, Heat 2, Heat 3) with a power indicator light.
3. Configuração
Conteúdo da embalagem:
- PELONIS PSH10C2ABB Ceramic Electric Fan Heater
- Manual do usuário
Colocação:
- Unpack the heater from its packaging and remove all packing materials.
- Place the heater on a firm, level, and stable surface. Ensure it is at least 3 feet (0.9 meters) away from walls, furniture, and other combustible materials.
- Ensure the power cord is not pinched or placed under the heater.
- Ligue o aquecedor diretamente a uma tomada de parede de 127V AC, 60Hz. Não utilize extensões ou réguas de energia.

Image: The PELONIS ceramic heater positioned on a shelf, demonstrating proper placement in a living space.
4. Instruções de operação
The heater features two control dials on the top panel: one for thermostat control and one for mode selection.
Seletor de Modo de Operação:
This dial controls the power and operating mode of the heater. Rotate the dial to select your desired setting:
- OFF: Desliga o aquecedor.
- FAN (indicated by fan icon): Ativa o ventilador sem aquecimento, proporcionando circulação de ar.
- HEAT 1 (700W): Configuração de baixa temperatura.
- HEAT 2 (900W): Configuração de fogo médio.
- HEAT 3 (1500W): High heat setting for maximum warmth.
Mostrador de controle do termostato:
This dial allows you to set your desired room temperature. It works in conjunction with the heat settings.
- Turn the Mode Selection Dial to one of the HEAT settings (1, 2, or 3).
- Rotate the Thermostat Control Dial clockwise towards "MAX" for higher temperatures, or counter-clockwise towards "MIN" for lower temperatures.
- Once the room reaches your desired temperature, slowly turn the Thermostat Control Dial counter-clockwise until the heater turns off. The heater will now cycle on and off to maintain this temperature.
Luz indicadora de energia: A red light on the control panel illuminates when the heater is powered on and operating.
5. Manutenção
Regular cleaning and proper storage will help ensure the longevity and efficient operation of your heater.
Limpeza:
- Desligue sempre o aquecedor da tomada e deixe-o arrefecer completamente antes de o limpar.
- Use um pano macio e macioamp Use um pano para limpar as superfícies externas do aquecedor. Não utilize produtos de limpeza abrasivos ou solventes.
- Use a vacuum cleaner with a brush attachment to gently remove dust and lint from the air intake and exhaust grilles.
- Nunca mergulhe o aquecedor em água nem permita que a água goteje para dentro do aquecedor.
Armazenar:
When not in use, store the heater in its original packaging or a clean, dry place. Wrap the power cord loosely to prevent damage.
6. Solução De Problemas
| Problema | Possível causa | Solução |
|---|---|---|
| Aquecedor não liga. |
|
|
| Heater produces no heat in a heat setting. |
|
|
| O aquecedor liga e desliga com frequência. |
|
|
7. Especificações
- Modelo: PSH10C2ABB (DUDULAILE-311-2643)
- Marca: PELONIS
- Potência de saída: 700 W / 900 W / 1500 W
- Volumetage: 127 Volts
- Número de velocidades: 3 (Heat settings) + Fan-only
- Dimensões: Approximately 26 x 22 x 13 cm (Package dimensions, actual unit is similar)
- Peso: Aproximadamente 500 g
- Características especiais: Compact, space-saving, energy-saving, lightweight, portable, overheat protection, tip-over switch.
- Cor: Preto

Image: Diagram showing the approximate dimensions of the PELONIS heater: 23cm height, 10cm depth, 20cm width.
8. Garantia e Suporte
For warranty information and customer support, please refer to the warranty card included with your product or visit the official PELONIS webGuarde o comprovante de compra como prova para eventuais solicitações de garantia.
If you experience any issues not covered in the troubleshooting section, please contact PELONIS customer service for assistance.
Recursos on-line:
- Official PELONIS Website: www.pelonis.com (Nota: Este é um espaço reservado. URL, please refer to your product documentation for the correct website.)