1. Instruções importantes de segurança
Leia atentamente todas as instruções antes de usar o aparelho. Guarde este manual para futuras consultas.
- Garantir o volumetage indicado no aparelho corresponde ao seu volume de alimentação localtage antes de conectar.
- Não mergulhe o aparelho, cabo de alimentação ou plugue em água ou qualquer outro líquido.
- Always unplug the coffee maker from the power outlet before cleaning and when not in use. Allow it to cool down before adding or removing parts.
- Não opere nenhum aparelho com o cabo ou plugue danificado, ou após o aparelho apresentar mau funcionamento ou ter sido danificado de qualquer forma.
- O aparelho é apenas para uso doméstico. Não use ao ar livre.
- Não deixe o cabo pendurado na borda de uma mesa ou balcão, nem toque em superfícies quentes.
- Place the coffee maker on a firm, flat surface, away from hot gas or electric burners and heated ovens.
- Não toque em superfícies quentes. Use alças ou botões.
- É necessária supervisão rigorosa quando qualquer aparelho for usado por crianças ou perto delas.
- Não utilize o aparelho para outro fim que não o pretendido.
2. Produto acabadoview
The Cecotec Coffee 66 Drop & Thermo Time is a drip coffee maker designed for ease of use and consistent coffee brewing. It features a programmable timer, intensity control, and a thermal carafe to keep your coffee warm.

Figura 2.1: Frente view of the Cecotec Coffee 66 Drop & Thermo Time Drip Coffee Maker. This image shows the main body, control panel with LCD display, and the thermal carafe in its position.
Componentes:
- Tanque de água: Located at the back, with a clear water level indicator.
- Tampa: Covers the water tank and coffee filter basket.
- Cesta de filtro: Holds the reusable mesh filter or paper filter.
- Filtro de malha reutilizável: For holding coffee grounds.
- Garrafa térmica: Stainless steel carafe with a capacity of up to 10 cups, designed to keep coffee hot.
- Painel de controle: Features an LCD display and buttons for various functions.
- Colher de medida: For accurate coffee ground measurement.
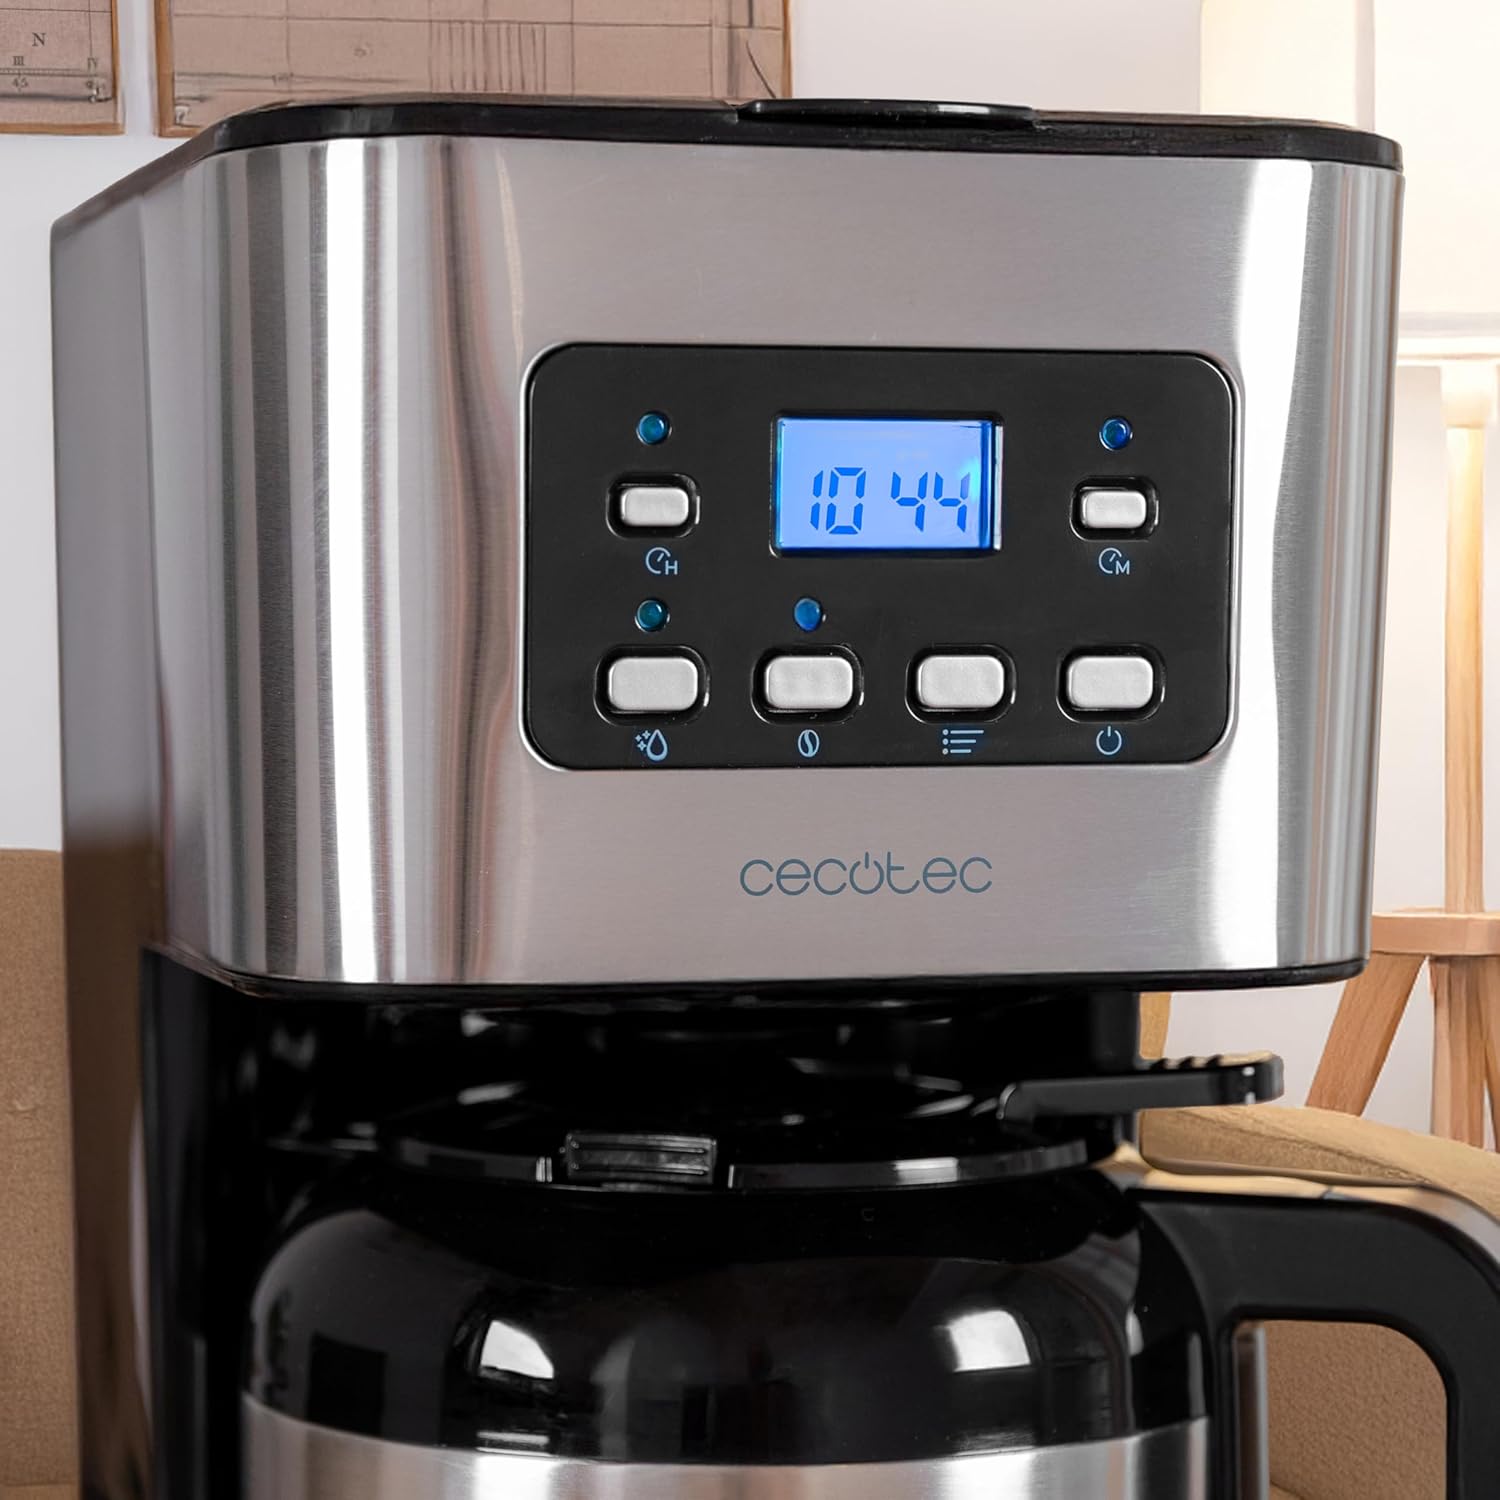
Figura 2.2: Fechar-se view of the control panel. The LCD display shows the time, and various buttons for power, intensity, timer, and programming are visible.
3. Configuração e primeiro uso
3.1 Desembalagem e limpeza inicial
- Remova cuidadosamente todos os materiais de embalagem e etiquetas promocionais.
- Wash the thermal carafe, lid, and reusable mesh filter in warm, soapy water. Rinse thoroughly and dry.
- Limpe o exterior da cafeteira com adamp pano.
- Before first use, run a brewing cycle with only water (no coffee grounds) to clean the internal components. Fill the water tank to the MAX level, place the empty filter basket and carafe, and start a cycle. Discard the water.
3.2 Ajustando o Relógio
- Plug the coffee maker into a power outlet. The LCD display will show '12:00' or flash.
- Press the 'TIME' button. The hour digits will flash.
- Use the 'MIN' and 'PROG' buttons to adjust the hour.
- Press 'TIME' again. The minute digits will flash.
- Use the 'MIN' and 'PROG' buttons to adjust the minutes.
- Press 'TIME' a third time or wait a few seconds for the setting to be saved.
4. Instruções de operação
4.1 Preparando Café
- Abra a tampa da cafeteira.
- Fill the water tank with fresh, cold water up to the desired level, indicated by the water level gauge. Do not exceed the 'MAX' line.
- Place the reusable mesh filter into the filter basket. If using a paper filter, place it inside the mesh filter.
- Add the desired amount of ground coffee into the filter. A general guideline is one level measuring spoon (approximately 7g) per cup. Adjust to your taste.
- Feche bem a tampa.
- Ensure the thermal carafe is correctly placed on the warming plate.
- Pressione o botão 'LIGAR/DESLIGAR' para iniciar o preparo. A luz indicadora acenderá.
- The brewing process will begin. Once complete, the coffee maker will automatically turn off.
- Carefully remove the carafe and pour your coffee.

Figura 4.1: A person pouring freshly brewed coffee from the thermal carafe into a mug. The carafe's handle and spout are visible.
4.2 Using the Intensity Function (Aroma)
To adjust the coffee strength:
- After adding water and coffee grounds, but before pressing 'ON/OFF', press the 'INTENSITY' (aroma) button.
- The display will indicate the selected intensity level.
- Press 'ON/OFF' to start brewing with the chosen intensity.
4.3 Programming the Delay Brew Timer
You can set the coffee maker to start brewing at a specific time:
- Prepare the coffee maker with water and coffee grounds as described in section 4.1.
- Press the 'PROG' button. The display will show 'PROG' and the hour digits will flash.
- Use the 'MIN' and 'PROG' buttons to set the desired hour for brewing to start.
- Press 'PROG' again. The minute digits will flash.
- Use the 'MIN' and 'PROG' buttons to set the desired minutes.
- Press 'PROG' a third time or wait a few seconds. The 'PROG' indicator will light up, confirming the timer is set.
- A cafeteira começará a preparar o café automaticamente no horário programado.
5. Manutenção e Limpeza
A limpeza regular garante o desempenho ideal e prolonga a vida útil da sua cafeteira.
5.1 Limpeza Diária
- Sempre desligue o aparelho e deixe-o esfriar completamente antes de limpá-lo.
- Remove the thermal carafe, lid, and reusable mesh filter. Wash them in warm, soapy water. Rinse thoroughly and dry.
- Descarte a borra de café usada.
- Limpe as superfícies externas da cafeteira com um pano macio e seco.amp pano. Não use produtos de limpeza abrasivos ou esfregões.
- The thermal carafe is não lavável na máquina de lavar louça.
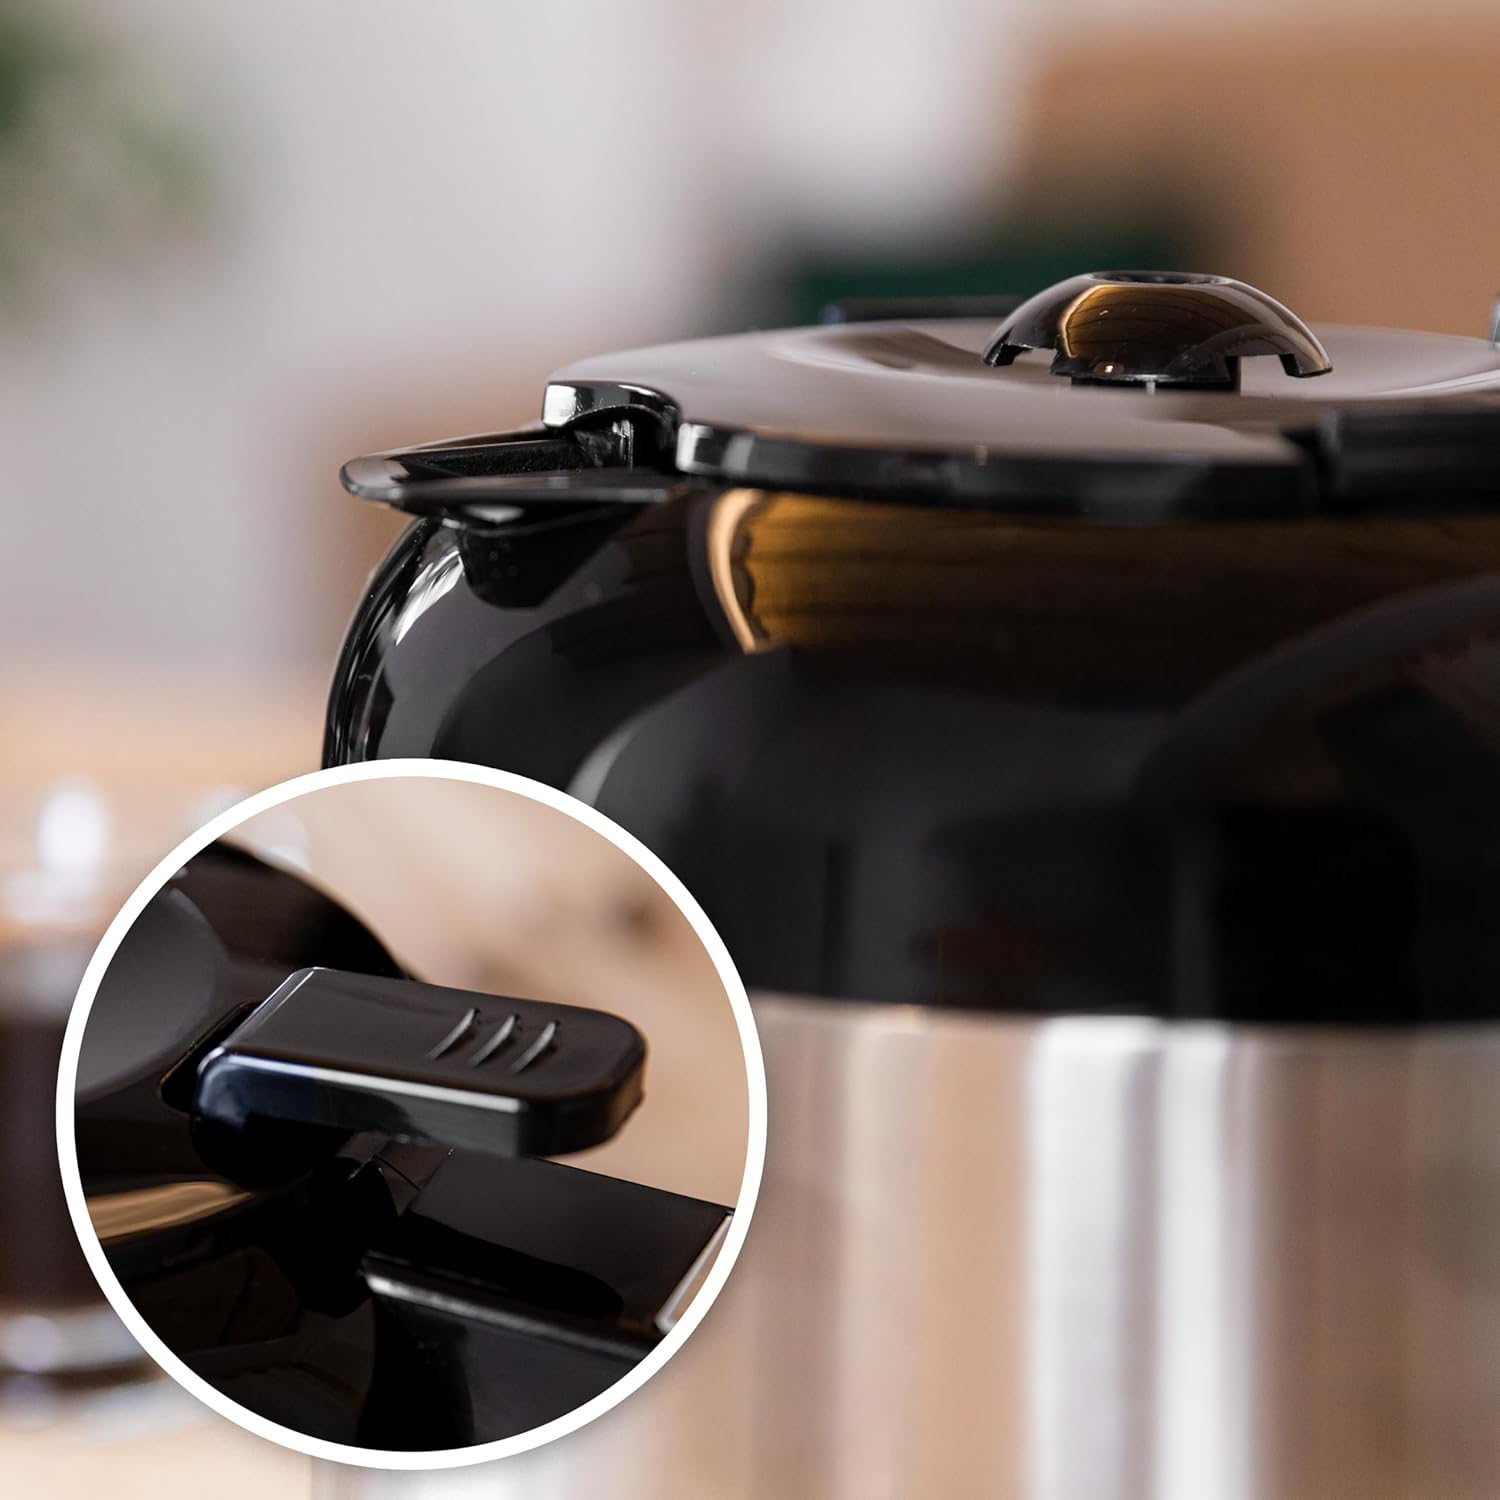
Figura 5.1: Close-up of the thermal carafe lid, highlighting the drip-stop mechanism. This part should be cleaned regularly to prevent blockages.
5.2 Descalcificação
Mineral deposits (limescale) can build up in your coffee maker over time, affecting its performance. Descale your coffee maker every 2-3 months, or more frequently if you have hard water.
- Fill the water tank with a solution of white vinegar and water (1 part vinegar to 2 parts water).
- Coloque a garrafa térmica vazia na placa de aquecimento.
- Inicie um ciclo de preparo sem pó de café.
- After about half the solution has brewed through, turn off the coffee maker and let it sit for 15-20 minutes to allow the solution to work.
- Ligue a cafeteira novamente para completar o ciclo de preparo.
- Descarte a solução de vinagre da garrafa.
- Run 2-3 cycles with fresh, clean water to rinse out any remaining vinegar taste or odor.
6. Solução De Problemas
Se você tiver problemas com sua cafeteira, consulte a tabela a seguir:
| Problema | Possível causa | Solução |
|---|---|---|
| O café não se prepara. | No power; water tank empty; carafe not in place; timer set. | Check power connection; fill water tank; ensure carafe is correctly positioned; check timer settings. |
| O café está muito fraco. | Not enough coffee grounds; coarse grind; intensity setting too low. | Add more coffee grounds; use a finer grind; select a higher intensity setting. |
| O café transborda do filtro. | Too many coffee grounds; filter clogged; carafe not in place. | Reduce coffee grounds; clean filter thoroughly; ensure carafe is fully inserted. |
| Unusual noise during brewing. | Acúmulo de calcário. | Perform a descaling cycle (see Section 5.2). |
7. Especificações
| Recurso | Detalhe |
|---|---|
| Marca | Cecotec |
| Nome do modelo | Coffee 66 Drop & Thermo Time |
| Número do modelo do item | 00274 |
| Tipo | Máquina de café gota a gota |
| Capacidade | 1.2 Litres (up to 10 cups) |
| Material da jarra | Stainless Steel (Thermal) |
| Poder | 950 W |
| Características especiais | Removable Tank, Thermal Carafe, Water Filter, Programmable Timer (24 hours), Intensity Function, Drip-free feature, Overheating protection |
| Dimensões do produto | 25 cm de profundidade x 17 cm de largura x 32.5 cm de altura |
| Peso do item | 2 kg 100 g |
| Componentes incluídos | Filter coffee maker, instruction manual, Measuring spoon |
8. Garantia e Suporte
This Cecotec appliance is covered by a manufacturer's warranty. Please refer to the warranty card included with your product for specific terms and conditions, including the warranty period and coverage details.
Para suporte técnico, peças de reposição ou solicitações de garantia, entre em contato com o serviço de atendimento ao cliente da Cecotec através do site oficial. website or the contact information provided in your product packaging. Ensure you have your model number (00274) and proof of purchase available when contacting support.


