Introdução
The CDN Digital Probe Cooking, Cooling Thermometer, Smoker Oven Grill Candy Deep Frying, Multifunctional Thermometer/Timer/Clock (Model DTTC-W) is a versatile tool designed to assist in precise temperature monitoring for various cooking and cooling applications. This manual provides detailed instructions for setup, operation, maintenance, and troubleshooting to ensure optimal performance and longevity of your device.
Informações de segurança
- Always handle the stainless steel probe with care as it can become very hot during use. Use oven mitts or heat-resistant gloves when removing the probe from hot food or ovens.
- Do not immerse the main thermometer unit in water or any other liquid. The unit is not waterproof. Clean only the probe and cable.
- Ensure the probe cable is not pinched or damaged by oven doors or grill grates, as this can affect accuracy and damage the cable.
- Mantenha o dispositivo fora do alcance de crianças.
- Não use o termômetro em forno de micro-ondas.
- Only use the specified battery type (1 AAA).
Componentes
Your CDN DTTC-W package includes the following components:
- Digital Thermometer/Timer/Clock Unit
- Stainless Steel Probe with High-Heat Sensor Cable
- Prendedor de panela
- 1 bateria AAA (incluída)

Image: The CDN Digital Probe Thermometer DTTC-W unit, showing the main display, control buttons, the stainless steel probe, and the pot clip.
Configurar
- Instalação da bateria:
Locate the battery compartment on the back of the main unit. Open the compartment cover and insert one AAA battery, ensuring correct polarity (+/-). Close the cover securely.
- Conexão da sonda:
Insert the plug of the stainless steel probe cable into the jack located on the side of the main unit. Ensure it is fully inserted for proper connection.

Imagem: Um close-up view of the stainless steel probe and its high-heat sensor cable, ready for connection to the main unit.
- Colocação da unidade:
The DTTC-W offers two mounting options:
- Parte traseira magnética: The unit has magnetic strips on its back, allowing it to be securely attached to metal surfaces like a refrigerator door or oven exterior.
- Suporte dobrável: A hinge allows the unit to sit upright on a countertop or stovetop for easy viewindo.
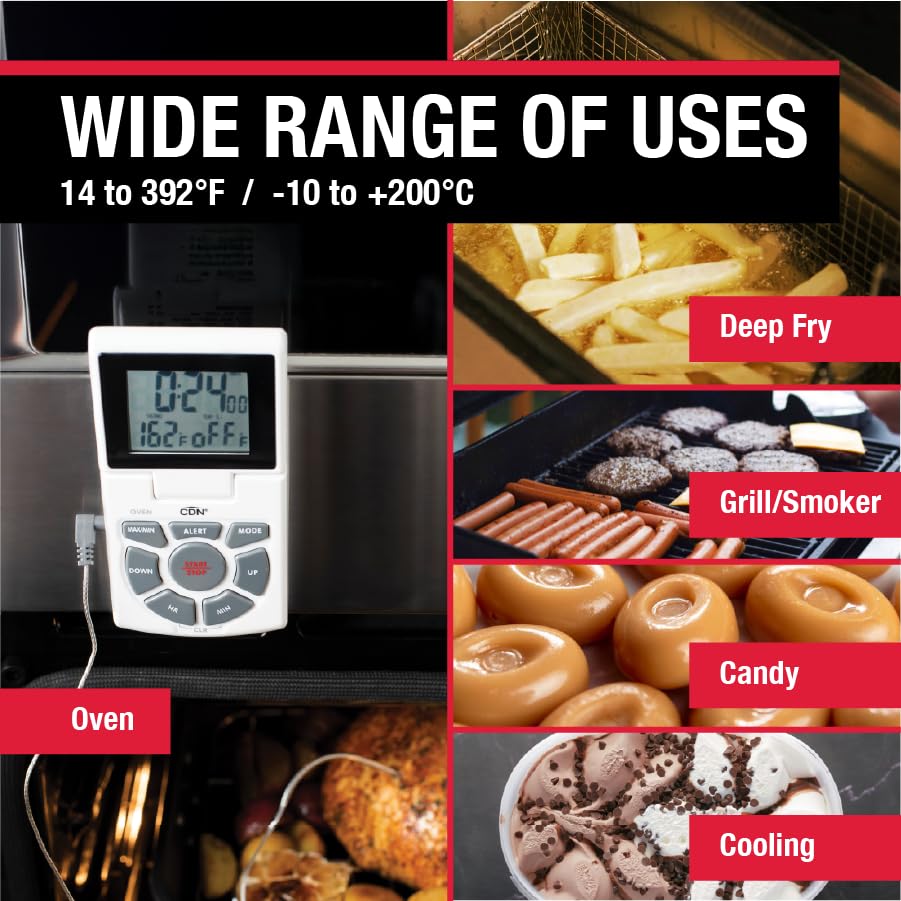
Image: The thermometer unit attached to an oven door via its magnetic back, demonstrating the magnetic mounting option.
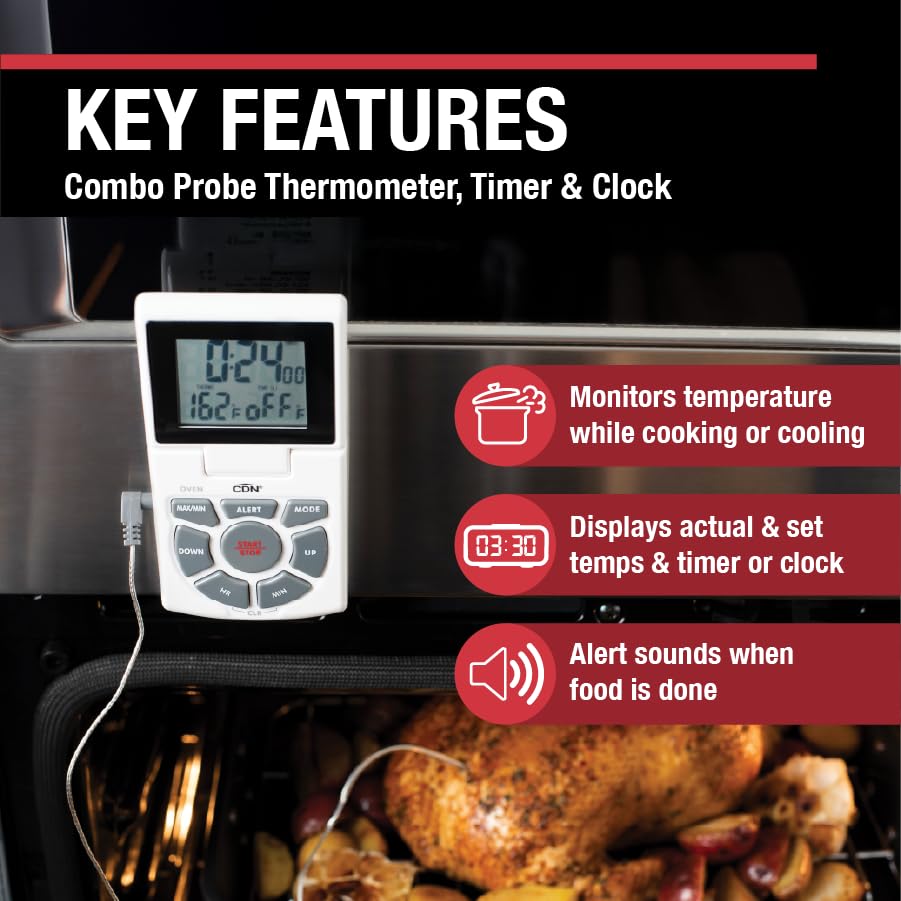
Image: The thermometer unit standing upright on a countertop using its integrated fold-out stand.
Instruções de operação
The DTTC-W features a clear LED screen displaying time, current food temperature, and set temperature. Buttons are clearly marked for ease of use.
Modos de operação:
Pressione o MODO button to cycle through the three main modes: Thermometer, Timer, and Clock.
1. Thermometer Mode:
- Medição de temperatura: Insert the stainless steel probe into the thickest part of the food, avoiding bone or gristle. The current internal temperature will be displayed on the screen.
- Setting Temperature Alert:
- Pressione o ALERTA button. The set temperature will flash.
- Use o UP e ABAIXO botões para ajustar a temperatura alvo desejada.
- Imprensa ALERTA novamente para confirmar a configuração.
- When the food reaches the set temperature, an alarm will sound. Press any button to silence the alarm.
- Fahrenheit/Celsius Selection: Use the switch on the back of the unit to toggle between Fahrenheit (°F) and Celsius (°C) temperature scales.
- Using the Pot Clip: For deep frying or candy making, attach the pot clip to the side of your saucepan. Insert the probe through the clip, ensuring the probe tip is submerged in the liquid but not touching the bottom of the pan.
Image: The pot clip securely attached to the rim of a saucepan, holding the probe in place for accurate temperature monitoring during cooking.
2. Modo temporizador:
- Configurando o temporizador de contagem regressiva:
- Pressione o HR e MÍNIMO botões para definir o tempo de contagem regressiva desejado.
- Imprensa INICIAR/PARAR para começar a contagem regressiva.
- Para pausar, pressione INICIAR/PARAR Pressione novamente. Pressione novamente para continuar.
- Para limpar o cronômetro, pressione CLR.
- An alarm will sound when the timer reaches zero. Press any button to silence.
- Count-Up Timer:
From Timer mode, ensure the timer is set to 0:00. Press INICIAR/PARAR to begin counting up. Press INICIAR/PARAR to pause/resume, and CLR para redefinir.
3. Clock Mode:
- Ajustando o relógio:
- In Clock mode, press and hold the MODO Pressione o botão até que os dígitos da hora comecem a piscar.
- Use o HR e MÍNIMO buttons to set the hour and minute respectively.
- Imprensa MODO para confirmar cada configuração.
- The clock displays 12-hour or 24-hour time.

Image: The thermometer probe accurately measuring the internal temperature of a chicken roasting inside an oven.

Image: The thermometer probe inserted into chicken breasts cooking on a grill, demonstrating its use for outdoor cooking.
Manutenção
- Limpeza:
The stainless steel probe and cable can be cleaned with a damp cloth and mild detergent. Rinse thoroughly and dry immediately. The main unit should be wiped clean with a damp cloth only. Do not immerse the main unit in water.

Image: The thermometer unit and probe resting on a wooden cutting board, illustrating the ease of access for cleaning after use.
- Substituição da bateria: Replace the AAA battery when the display dims or the unit stops functioning correctly.
- Armazenar: Store the thermometer in a clean, dry place when not in use. Avoid extreme temperatures or direct sunlight.
Solução de problemas
| Problema | Possível causa | Solução |
|---|---|---|
| Sem imagem ou imagem fraca. | Bateria descarregada ou instalada incorretamente. | Substitua a pilha AAA, certificando-se da polaridade correta. |
| Leituras de temperatura imprecisas. | Probe not fully inserted, damaged probe/cable, or probe tip touching bone/pan. | Ensure probe is fully inserted. Check cable for damage. Reposition probe to avoid bone/pan. If issues persist, the probe may need replacement. |
| Alarme não soando. | Alarm volume too low (if adjustable, though this model doesn't specify), or alarm setting incorrect. | Verify alarm temperature is set correctly. Ensure the unit is not in a location where the sound is muffled. |
| Unit resets or freezes. | Bateria fraca ou mau funcionamento interno. | Substitua a bateria. Se o problema persistir, entre em contato com o suporte ao cliente. |
Especificações
- Faixa de medição: 14 to 392°F / -10 to +200°C
- Intervalo do temporizador: Up to 24 hours by hr/min
- Comprimento da sonda: 5.5 polegadas (14.0 cm)
- Comprimento do cabo do sensor: 3 pés (91.4 cm)
- Sensor Cable Heat Resistance: Até 600°F/315°C
- Fonte de energia: 1 x 1.5V AAA IEC LR03 Alkaline Battery (included)
- Tipo de exibição: LCD digital
- Opções de montagem: Magnetic back, Fold-out stand
- Materiais: Stainless Steel probe, Plastic unit casing
- Dimensões do produto: 10.5 x 6 x 1.3 polegadas; 4 onças (aproximadamente)
Garantia
The CDN Digital Probe Cooking Thermometer (DTTC-W) is covered by a two-year warranty against defects in materials and workmanship from the date of purchase. This warranty does not cover damage resulting from misuse, abuse, accident, or unauthorized alteration or repair. Please retain your proof of purchase for warranty claims.
Apoiar
For technical assistance, warranty claims, or general inquiries, please contact CDN Customer Service. Refer to the official CDN website para obter as informações de contato mais atualizadas.
Website: www.cdn-timeandtemp.com


