1. Produto acabadoview
The MACHINIST B75 Micro ATX Gaming PC Motherboard is designed to support Intel 2nd and 3rd generation Core i3, i5, i7, Xeon E3/V2 series, Celeron G series, and Pentium G series processors. This motherboard features a compact Micro-ATX form factor, making it suitable for various desktop PC builds, including gaming systems and workstations. It integrates essential components and expansion capabilities for a balanced performance.

Image: The MACHINIST B75 Micro ATX Motherboard alongside its product packaging, highlighting its compact design and readiness for integration into a PC system.
2. Principais características
- Soquete Intel LGA 1155: Supports Intel 2nd or 3rd gen Core i3/i5/i7, Xeon E3/V2 series, Celeron G series, and Pentium G series processors.
- PCI/PCI-E 2.0 Expansion Slots: Includes 2 PCI-E slots (1x PCIe 2.0 X16, 1x PCIe 2.0 X1) and 1 PCI slot for graphics cards, sound cards, and network cards.
- SATA M.2 Interface: Supports AHCI protocol with transfer rates up to 6Gbps, providing a fast storage solution.
- Dual-channel DDR3 Memory Slots: Two DDR3 Non ECC desktop memory slots supporting 1280/1333/1600/1866MHz frequencies, up to 16GB capacity.
- Saída de vídeo de alta definição: Compatible with VGA+HDMI dual output interface, supporting 4K video and audio output.
- Design robusto: 6-layer PCB motherboard with all solid capacitors for stable operation and durability.

Imagem: Close-up view of the PCI-E X16, PCI-E X1, and PCI expansion slots on the motherboard, indicating their positions and types.

Image: Illustration of the SATA M.2 (NGFF M.2) interface, showing its location on the motherboard and highlighting its function for high-speed storage.

Image: Diagram illustrating the VGA and HDMI output ports, emphasizing the motherboard's capability for high-definition dual screen display.
3. Guia de configuração
3.1 Conteúdo da embalagem
Antes de iniciar a instalação, certifique-se de que todos os componentes estejam presentes:
- 1x MACHINIST B75 Motherboard
- 1x Cabo SATA
- 1x Defletor de E/S

Image: A visual representation of the items included in the product package: the motherboard, a SATA cable, and an I/O baffle.
3.2 Instalação da CPU
Follow these steps carefully to install your CPU:
- Press the wire buckle by hand and lift it up. Do not remove the black cover before installing the CPU.
- The motherboard base has 3 bayonets, and the CPU itself has three bayonets. Align them one by one, and then place the CPU gently into the socket.
- Lower the wire buckle that was lifted up, and the black cover on it will pop up automatically. Remember not to remove the black cover before installing the CPU.
- Cuidado: Não abra a tampa superior do processador. Não toque nos pinos do processador para evitar contato com o núcleo. Não toque nos pinos de interface da placa-mãe.
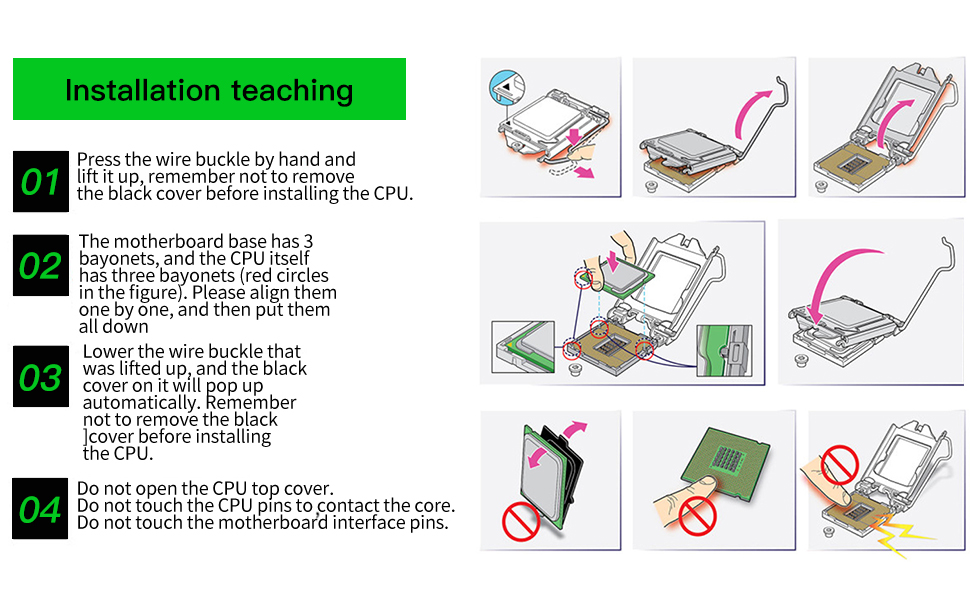
Image: Step-by-step visual guide for installing the CPU into the LGA 1155 socket, emphasizing proper alignment and handling.
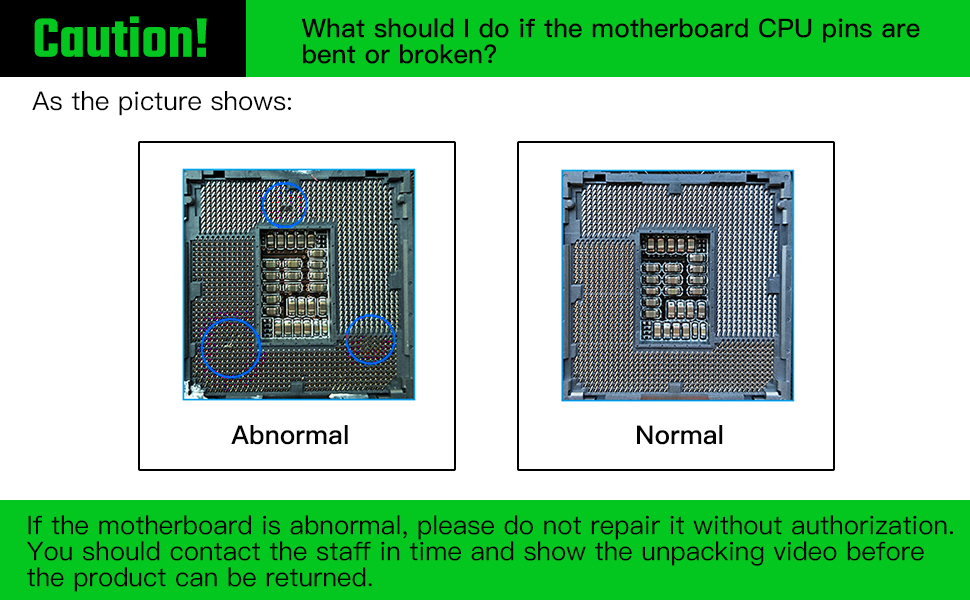
Image: A warning illustration showing the difference between abnormal (bent/broken) and normal CPU pins, advising against unauthorized repair.
3.3 Instalação da memória (RAM)
The motherboard features two dual-channel DDR3 memory slots. To install RAM:
- Open the clips on both ends of the memory slot.
- Alinhe o entalhe no módulo de memória DDR3 com a chave no slot de memória.
- Pressione firmemente ambas as extremidades do módulo de memória até que as presilhas se encaixem no lugar.

Image: Close-up of the DDR3 memory slots on the motherboard, highlighting their design and support for DDR3 modules.
3.4 Storage Device Installation (SATA & M.2)
This motherboard supports both SATA and M.2 storage devices.
- Dispositivos SATA: Connect your SATA SSDs or HDDs to the SATA 3.0 (6Gbps) or SATA 2.0 ports using SATA cables.
- M.2 Devices: Install your SATA M.2 (NGFF M.2) SSD into the dedicated M.2 slot. Ensure it is properly seated and secured with the provided screw. Note that using the M.2 slot may disable one SATA 3.0 port.
3.5 Conexões de energia
Connect the main 24-pin ATX power connector and the 4-pin CPU power connector from your power supply unit (PSU) to the corresponding ports on the motherboard.
3.6 Conexões do painel frontal
Connect the front panel headers (Power LED, HDD LED, Power Switch, Reset Switch, USB, Audio) to their respective pins on the motherboard. Refer to the motherboard layout diagram for pin assignments.

Image: Detailed layout of the motherboard, showing the location of various ports and connectors including USB, audio, Ethernet, and front panel headers.
4. Instruções de operação
4.1 Initial Boot-up and BIOS Access
After assembling your PC, connect a monitor, keyboard, and mouse. Power on the system. To enter the BIOS/UEFI setup utility, repeatedly press the "Del" key immediately after pressing the power button. Do not wait for the startup logo to appear, as it may be too late.
Within the BIOS, you can configure boot order, system time, and other hardware settings. Save changes before exiting.
4.2 Instalação do driver
For optimal performance, install the necessary drivers for your motherboard components (chipset, audio, LAN, etc.).
- If you are using Windows 10, the operating system can often automatically detect and install most drivers.
- For specific drivers or if automatic installation fails, visit the MACHINIST official website or refer to the product page for driver downloads.
4.3 Integrated Graphics Usage
The motherboard supports integrated graphics output via VGA and HDMI. Note that some Intel Xeon E3 V1 and V2 series CPUs do not have integrated graphics. Generally, only CPU models with the suffix "5" (e.g., E3-1245) or Intel Core i3, i5, i7 series (unless they have an "F" suffix) support integrated display.
5. Manutenção
A manutenção adequada garante a longevidade e o funcionamento estável da sua placa-mãe:
- Remoção de poeira: Regularly clean dust from the motherboard and other PC components using compressed air. Ensure the system is powered off and unplugged before cleaning.
- Monitoramento de temperatura: Ensure adequate airflow within your PC case to prevent overheating. Monitor CPU and chipset temperatures using system monitoring software.
- BIOS Battery: The motherboard requires a CR2032 CMOS battery (not included in package). Replace it if you experience issues with BIOS settings resetting or incorrect system time.
- Gerenciamento de cabos: Organize internal cables to improve airflow and prevent interference.
6. Solução De Problemas
Se você encontrar problemas após instalar a placa-mãe, considere as seguintes etapas de solução de problemas:
- No Display/No Boot/No Picture:
- Certifique-se de que todos os cabos de alimentação (ATX de 24 pinos, CPU de 4 pinos) estejam firmemente conectados.
- Reseat the RAM modules. Try booting with only one RAM stick if you have multiple.
- Reseat the CPU. Check for any bent pins on the CPU socket (refer to the "Caution!" image in Setup Guide).
- If using a dedicated graphics card, ensure it is properly seated in the PCIe slot and has adequate power. Try booting without the graphics card if your CPU has integrated graphics.
- Reset CMOS: Locate the CMOS clear jumper or remove the CMOS battery for a few minutes, then reinsert it.
- Sem placa de rede/Sem placa de som:
- Ensure drivers are correctly installed. For Windows 10, try updating drivers via Device Manager.
- Check BIOS settings to ensure integrated LAN/Audio are enabled.
- Instabilidade/travamentos do sistema:
- Verify RAM compatibility and ensure it is running at supported frequencies.
- Check CPU and chipset temperatures.
- Ensure all components are properly seated and connections are secure.
If the motherboard is abnormal (e.g., bent CPU pins), do not attempt to repair it without authorization. Contact support and provide an unboxing video if possible before returning the product.
7. Especificações
| Recurso | Detalhe |
|---|---|
| Dimensões do produto | 9.45 x 6.69 x 1.5 polegadas |
| Peso do item | 1.43 libras |
| Fabricante | MAQUINISTA |
| Número do modelo do item | B75 PRO U5 |
| Soquete da CPU | LGA 1155 |
| Dispositivos compatíveis | Computador pessoal |
| Tecnologia de memória RAM | DDR3 |
| Processadores compatíveis | Intel 2nd/3rd Gen Core i3/i5/i7, Xeon E3/V2 series, Celeron G series, Pentium G series (e.g., E3-1220, i7-3770, i5-3570, i3-3250) |
| Tipo de chipset | Intel B75 expresso |
| Velocidade do relógio de memória | 1600 MHz (supports 1280/1333/1600/1866MHz) |
| Plataforma | Windows 10 |
| Capacidade máxima de RAM | 16 GB |
| Ranhuras PCI-E | 1x PCI-E 3.0 X16, 1x PCI-E X1 |
| Slots PCI | 1x PCI |
| Interface SATA | 1x SATA3.0, 3x SATA2.0, 1x SATA M.2 (NGFF M.2) |
| Interface USB | 2x USB 3.0, 3x USB 2.0 |
| Placa de rede | Ethernet Gigabit |
| Gráficos Integrados | Yes (VGA+HDMI dual output) |

Image: A visual table summarizing the key technical parameters and specifications of the B75 Pro U5 motherboard.
8. Garantia e Suporte
MACHINIST provides support for its products. While a physical manual is not included, a PDF user manual can be downloaded from the product page on Amazon. For driver issues, using Windows 10 is recommended as it often resolves driver problems automatically.
If you encounter issues that cannot be resolved through troubleshooting, or if you suspect physical damage (e.g., bent CPU pins), it is recommended to contact MACHINIST customer support. Providing an unboxing video may be required for returns or warranty claims related to physical damage.
Para obter mais assistência, visite o site oficial. Loja MACHINIST na Amazon.
9. Vídeo do produto
Video: An official display video showcasing the key features and components of the MACHINIST B75 Motherboard.


