1. Introdução
This manual provides essential instructions for the safe and efficient operation, setup, maintenance, and troubleshooting of your OMTech 100W CO2 Laser Engraver. Please read this manual thoroughly before operating the machine to ensure proper usage and to prevent damage or injury. Retain this manual for future reference.
The OMTech 100W CO2 Laser Engraver is designed for precision engraving and cutting across a variety of materials, including wood, glass, and acrylic. It features a 28"x20" workspace, four-way pass-through doors, autofocus capability, and integrated air assist.

Image 1.1: The OMTech 100W CO2 Laser Engraver, a large blue and grey machine with a transparent lid open, showcasing the internal laser head and work area.
2. Informações de segurança
Operating a laser engraver involves potential hazards. Adhere to all safety guidelines to prevent injury or damage to the equipment.
- Radiação laser: This product is a Class 2 laser device with 0.827 mW output power. Never look directly into the laser beam or at reflections. Always wear appropriate laser safety glasses.
- Ventilação: Ensure adequate ventilation to remove smoke, fumes, and particulate matter generated during operation. Connect the machine to an external exhaust system.
- Risco de incêndio: Certain materials are flammable when exposed to a laser. Always supervise the machine during operation. Keep a fire extinguisher nearby.
- Segurança elétrica: Certifique-se de que a máquina esteja devidamente aterrada. Não opere com as mãos molhadas ou em ambientes com corrente elétrica.amp conditions. Disconnect power before performing maintenance.
- Compatibilidade de materiais: Only engrave or cut materials approved for CO2 lasers. Avoid materials that produce toxic fumes or are highly reflective.
- Parada de emergência: Familiarize-se com a localização e o funcionamento do botão de parada de emergência.
3. Conteúdo da embalagem
Verifique se todos os componentes estão presentes ao desembalar:
- OMTech 100W CO2 Laser Engraver Unit
- LightBurn Software License (if included with purchase)
- Water Pump for cooling system
- Air Assist Compressor
- Ventilador de exaustão e dutos
- USB Cable, Ethernet Cable
- Cabo de energia
- Tool Kit and Accessories
- Manual do usuário e documentação
4. Configuração
4.1. Desembalagem e colocação
Carefully remove the engraver from its packaging. Place the machine on a stable, level surface capable of supporting its weight (approximately 251 lb.). Ensure sufficient clearance around the machine for ventilation and access to the pass-through doors.
4.2. Connecting Cooling System
The CO2 laser tube requires water cooling. Connect the provided water pump to the designated inlet and outlet ports on the machine. Fill the water reservoir with distilled water. Ensure the water pump is submerged and operating correctly before powering on the laser.
4.3. Connecting Air Assist
Connect the air assist compressor to the machine's air inlet. The air assist system helps to clear debris from the laser's path and reduce scorching during cutting and engraving.
4.4. Exhaust System Installation
Attach the exhaust fan and ducting to the machine's exhaust port. Route the ducting to an outdoor vent or a suitable filtration system to safely remove smoke and fumes from the workspace.
4.5. Conexão elétrica
Connect the power cable to the machine and a grounded electrical outlet. Ensure the power supply matches the machine's requirements.
4.6. Software Installation (LightBurn)
Install the LightBurn software on your computer. Follow the instructions provided with your LightBurn license for installation and activation. Connect the engraver to your computer via USB or Ethernet cable.

Image 4.1: A computer screen displaying the LightBurn software interface, used for designing and controlling laser engraving and cutting operations.
5. Operação
5.1. Ligando
Ensure all connections (power, water, air, exhaust) are secure. Turn on the main power switch on the machine. Allow the water cooling system to circulate before proceeding.
5.2. Carregando Material
Open the machine lid and place your material onto the workbed. Ensure the material is flat and securely positioned. For larger materials, utilize the four-way pass-through doors.
5.3. Função de foco automático
The machine features an autofocus function. Position the laser head over the material and activate the autofocus. The laser head will automatically adjust to the optimal focal distance for your material, ensuring precise engraving and cutting.

Imagem 5.1: Um close-up view of the laser head with a red dot indicating the laser's position, performing an automatic focus adjustment on a piece of material.
5.4. Using LightBurn Software
Create or import your design in LightBurn. Configure the appropriate laser settings (power, speed, passes) based on your material and desired outcome. Preview O trabalho consiste em garantir o posicionamento e a escala corretos.
5.5. Processo de gravação e corte
Close the machine lid. Initiate the job from LightBurn. The machine will begin the engraving or cutting process. Monitor the operation closely. The maximum engraving speed is 600 mm/s.
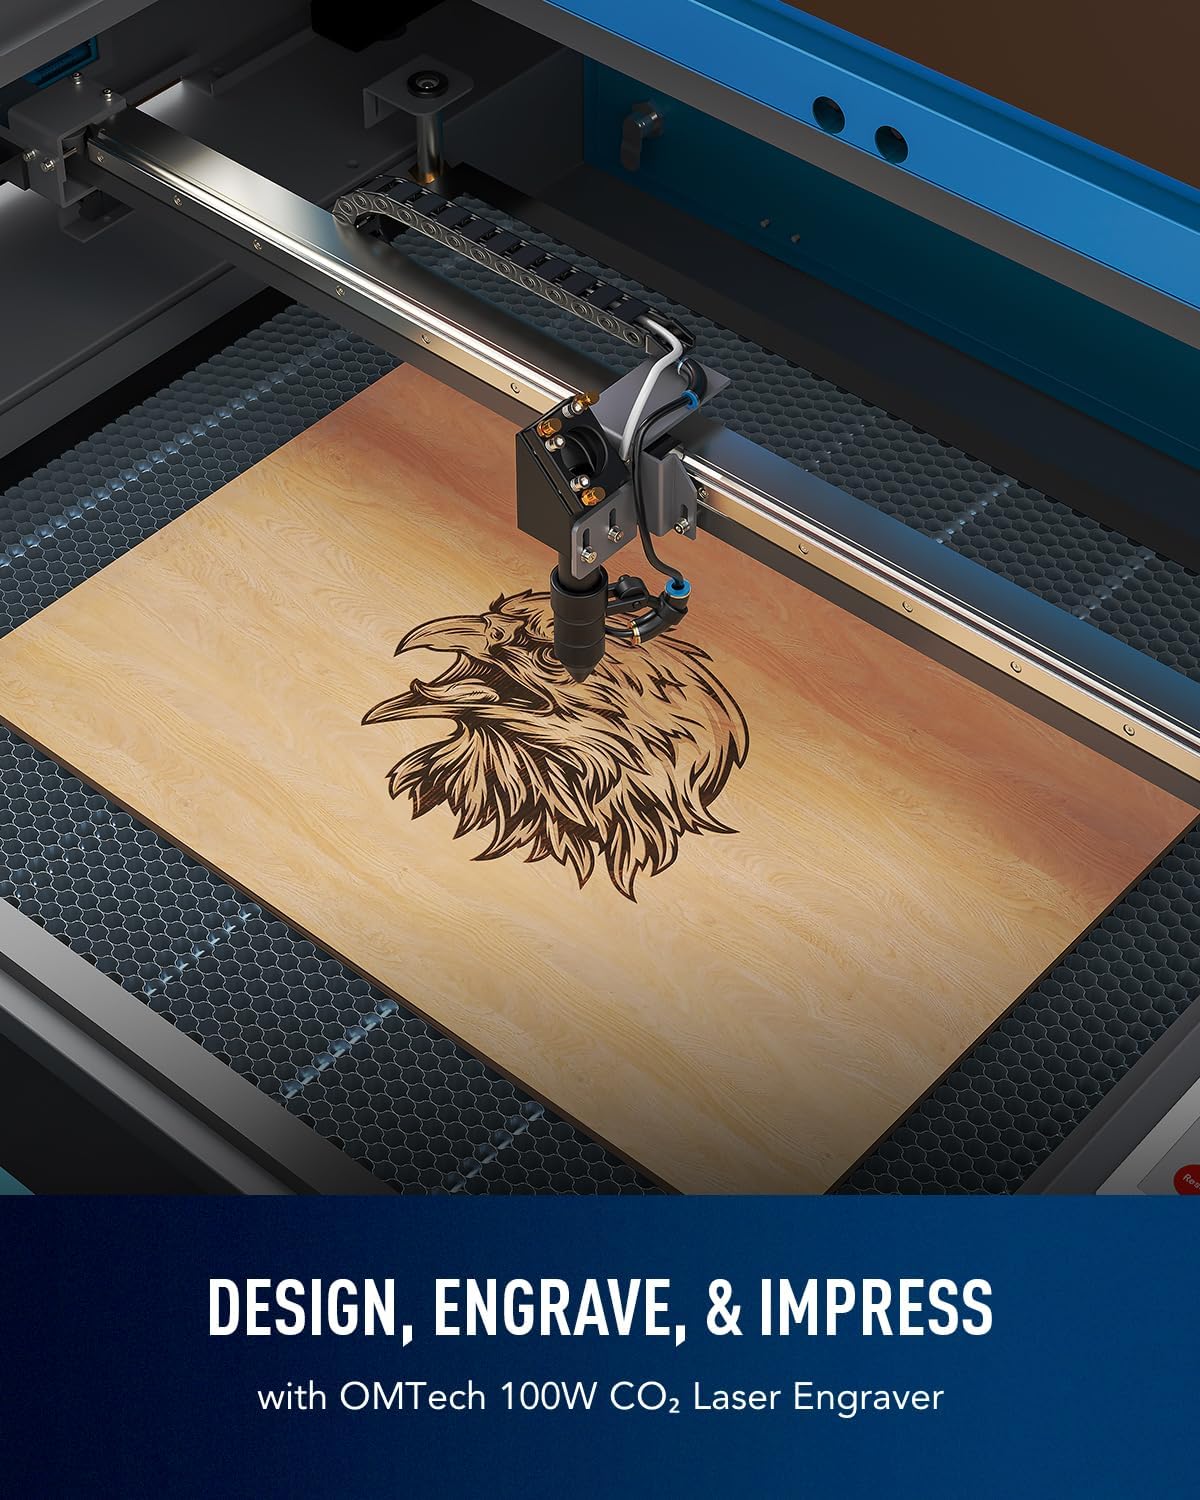
Image 5.2: The laser engraver in operation, precisely engraving a detailed eagle design onto a wooden surface.

Image 5.3: An illustration of the laser head moving at high speed (600 mm/s) across a wooden surface, demonstrating the machine's operational efficiency.
6. Manutenção
A manutenção regular garante o desempenho ideal e prolonga a vida útil da sua gravadora a laser.
- Limpeza de lentes e espelhos: Periodically clean the laser lens and mirrors with a specialized lens cleaning solution and cotton swabs. Dust and debris can degrade laser performance.
- Sistema de refrigeração a água: Regularly check the water level in the cooling reservoir and replenish with distilled water as needed. Replace the water every 1-2 months to prevent algae growth and maintain cooling efficiency.
- Bocal de assistência pneumática: Inspect and clean the air assist nozzle to ensure unobstructed airflow.
- Limpeza da cama de trabalho: Clean the honeycomb workbed to remove accumulated debris and residue.
- Lubrificação: Apply a small amount of lubricant to the guide rails and moving parts as recommended by the manufacturer to ensure smooth operation.
7. Solução De Problemas
Esta seção aborda problemas comuns que você pode encontrar.
| Problema | Possível causa | Solução |
|---|---|---|
| Laser não dispara | Lid open, water flow error, power issue, emergency stop engaged | Ensure lid is closed, check water pump and flow sensor, verify power connections, disengage emergency stop. |
| Qualidade de gravação/corte ruim | Incorrect focus, dirty lens/mirrors, incorrect power/speed settings, material issues | Perform autofocus, clean optics, adjust laser settings in LightBurn, ensure material is flat and suitable. |
| A máquina não está conectando ao computador. | Cable issue, driver issue, software settings | Check USB/Ethernet cable, reinstall drivers, verify LightBurn device settings. |
| Excesso de fumaça/fumaça | Inadequate ventilation, material type | Ensure exhaust system is fully functional and properly vented. Use appropriate materials. |
8. Especificações
| Recurso | Detalhe |
|---|---|
| Modelo | RYGEL-USB0705U5 |
| Tipo de laser | Laser de CO2 |
| Potência do laser | 100 W |
| Área de trabalho | 28" x 20" (700 mm x 500 mm) |
| Máx. Velocidade de Gravação | 600 mm/s |
| Profundidade máxima de corte (madeira) | 0.6 polegadas (15 mm) |
| Portas de passagem | Four-way (Front/Back: 32.8"x3.7", Side/Side: 20.4"x0.7") |
| Focando | Foco automático |
| Assistência Aérea | Construído em |
| Sistema de refrigeração | Water Pump (external) |
| Transmissão de dados | Cabo USB, Cabo Ethernet, Pen drive USB, Offline |
| Compatibilidade de software | Queimadura de luz |
| Dimensões do produto | 65 x 34.3 x 36.6 polegadas |
| Peso da máquina | 251 libra. |

Image 8.1: A visual representation of the OMTech 100W CO2 Laser Engraver with key specifications overlaid, including engraving speed, data transmission methods, pass-through sizes, and machine dimensions.
9. Garantia e Suporte
A OMTech oferece suporte completo para sua gravadora a laser.
- Garantia: The product includes 2 years of comprehensive service. Refer to your purchase documentation for specific terms and conditions.
- Suporte técnico: A 24/7 global support team is available for expert assistance, including technical guidance.
- Informações de contato: For support, please refer to the contact details provided with your product documentation or visit the official OMTech website.


