1. Introdução
This user manual provides detailed instructions for the installation, operation, and maintenance of your Xprinter XP-D200N Thermal Receipt Printer. The XP-D200N is a high-speed thermal printer designed for reliable and efficient receipt printing in various business environments. Please read this manual thoroughly before using the printer to ensure proper functionality and to prevent damage.
2. Informações de segurança
Para garantir o funcionamento seguro e evitar danos à impressora ou ferimentos, observe as seguintes precauções de segurança:
- Always use the provided power adapter. Using an incorrect adapter may damage the printer and void the warranty.
- Não exponha a impressora à água, umidade ou temperaturas extremas.
- Evite colocar a impressora sob luz solar direta ou perto de fontes de calor.
- Não tente desmontar ou reparar a impressora por conta própria. Encaminhe todos os serviços de manutenção a pessoal qualificado.
- Certifique-se de que a impressora esteja colocada em uma superfície estável e nivelada.
- Keep the printer away from dust and debris to maintain optimal performance.
3. Conteúdo da embalagem
Please check the contents of your package. If any items are missing or damaged, contact your vendor immediately.
- Xprinter XP-D200N Thermal Receipt Printer
- Adaptador de energia
- Cabo de alimentação
- Cabo USB
- Rolo de papel térmico (inicial)
- Manual do usuário (este documento)
4. Produto acabadoview
The Xprinter XP-D200N is a compact and efficient thermal receipt printer. Below are images illustrating its key components and design.
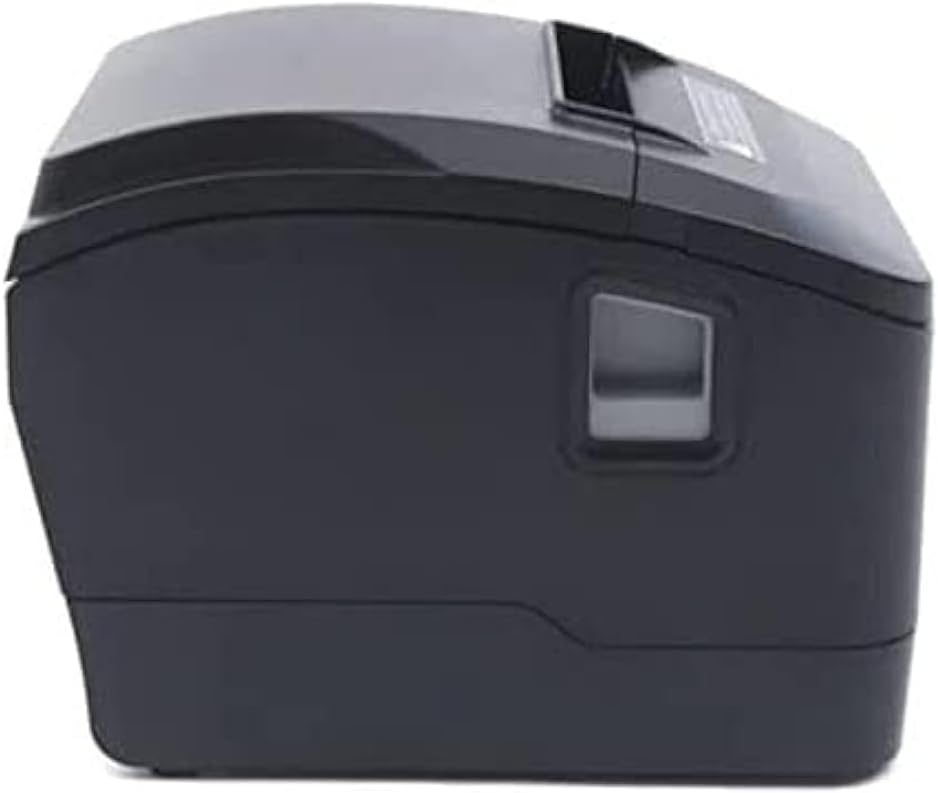
Figura 4.1: Frente view of the Xprinter XP-D200N Thermal Receipt Printer. This image shows the sleek, black casing and the paper output slot.
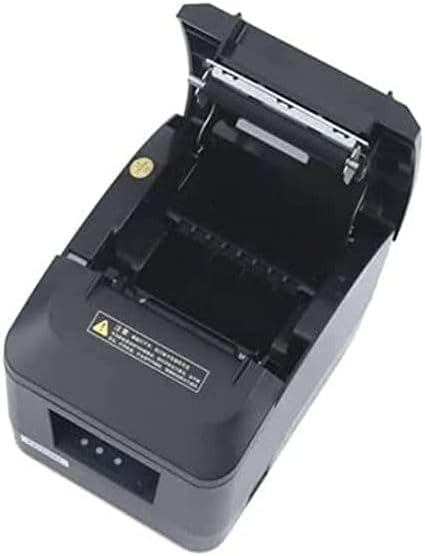
Figura 4.2: Lado view of the Xprinter XP-D200N Thermal Receipt Printer. This perspective highlights the compact design and the power switch on the right side.

Figura 4.3: Principal view of the Xprinter XP-D200N Thermal Receipt Printer with the cover open, revealing the thermal paper roll compartment and the print head mechanism. This view is essential for paper loading and maintenance.
5. Configuração
5.1 Conectando a Energia
- Certifique-se de que o interruptor de alimentação da impressora esteja na posição DESLIGADO.
- Conecte o adaptador de energia à porta de entrada de energia na parte traseira da impressora.
- Plug the power cord into the power adapter, then into a standard electrical outlet.
5.2 Conectando a um Computador
The XP-D200N supports both USB and LAN connectivity.
Conexão USB:
- Conecte uma extremidade do cabo USB à porta USB da impressora.
- Conecte a outra extremidade do cabo USB a uma porta USB disponível no seu computador.
Conexão LAN (Ethernet):
- Connect an Ethernet cable to the LAN port on the printer.
- Conecte a outra extremidade do cabo Ethernet ao roteador ou switch de rede.
- Refer to the printer's advanced settings or driver utility for network configuration (e.g., IP address settings).
5.3 Carregando papel térmico
- Open the printer cover by pressing the release button or lifting the cover latch. (Refer to Figure 4.3).
- Insert the thermal paper roll into the compartment with the paper feeding from the bottom and the leading edge extending towards the front of the printer. Ensure the paper is aligned correctly.
- Puxe uma pequena quantidade de papel para fora da lâmina de corte.
- Feche a tampa da impressora firmemente até ouvir um clique.
5.4 Instalação do driver
After connecting the printer, you will need to install the appropriate drivers on your computer. Drivers are typically provided on a CD included with the printer or can be downloaded from the official Xprinter webSiga as instruções na tela durante a instalação.
6. Instruções de operação
6.1 Ligar/Desligar
- To power on: Ensure the power cord is connected, then flip the power switch to the ON position. The indicator light will illuminate.
- To power off: Flip the power switch to the OFF position.
6.2 Impressão básica
Once the printer is connected and drivers are installed, you can print receipts from your point-of-sale (POS) software or other applications. Select the Xprinter XP-D200N as your default printer in your application's print settings.
6.3 Indicadores de Status
The printer features indicator lights (usually on the front panel) that provide information about its status:
- Indicador de energia: Solid light indicates the printer is powered on.
- Indicador de erro: Flashing or solid light indicates an error (e.g., paper out, cover open, print head overheat). Refer to the troubleshooting section.
- Paper Out Indicator: Illuminates when the paper roll is empty or nearly empty.
7. Manutenção
7.1 Limpeza da cabeça de impressão
A limpeza regular da cabeça de impressão garante uma qualidade de impressão ideal e prolonga a vida útil da impressora.
- Desligue a impressora e desconecte o cabo de alimentação.
- Abra a tampa da impressora.
- Use um cotonete levementeampened with isopropyl alcohol (70% or higher) to gently wipe the thermal print head surface. Avoid touching the print head with bare hands.
- Allow the print head to dry completely before closing the cover and reconnecting power (approximately 2-3 minutes).
7.2 Limpeza Geral
Limpe a parte externa da impressora com um pano macio e seco.amp pano. Não use produtos de limpeza abrasivos ou solventes.
7.3 Replacing the Paper Roll
When the paper out indicator illuminates or print quality degrades, it's time to replace the paper roll. Follow the steps in Section 5.3 "Loading Thermal Paper".
8. Solução De Problemas
| Problema | Possível causa | Solução |
|---|---|---|
| A impressora não liga. | No power, faulty power adapter/cord. | Check power connections. Ensure power switch is ON. Test outlet. |
| Proibida a impressão. | Paper out, cover open, incorrect driver, incorrect printer selected, cable disconnected. | Load paper, close cover, check USB/LAN connection, verify driver installation, select correct printer in software. |
| Poor print quality (faint, blank lines). | Dirty print head, low quality thermal paper, print head damage. | Clean print head (Section 7.1). Replace thermal paper. If problem persists, contact support. |
| Atolamento de papel. | Carregamento incorreto do papel, objeto estranho. | Turn off printer, open cover, carefully remove jammed paper. Reload paper correctly. |
| Error indicator light is on/flashing. | General error, paper out, cover open. | Check for paper out, ensure cover is closed. Power cycle the printer. If error persists, consult manufacturer's support. |
9. Especificações
| Marca: | Impressora X |
| Modelo: | XP-D200N |
| Tipo de impressora: | Impressora térmica de recibos |
| Método de impressão: | Térmica direta |
| Velocidade de impressão: | 220 mm/sec (as per product description) |
| Tamanho máximo da mídia: | 8 cm (80 mm) |
| Conectividade: | USB, LAN (Ethernet) |
| Entrada de energia: | 24V – 2.5A |
| Saída da impressora: | Monocromático |
| Características especiais: | Sleek, Compact, Lightweight Design, High Print Quality, Durability, Low Noise, Automatic Paper Cutting |
| Dimensões do produto: | 18.4 x 14 x 13.5 cm |
| Peso do item: | 1.63 kg |
10. Garantia e Suporte
The Xprinter XP-D200N Thermal Receipt Printer comes with a standard manufacturer's warranty. For specific warranty terms and conditions, please refer to the warranty card included with your product or visit the official Xprinter website. For technical support, driver downloads, or service inquiries, please contact your local dealer or the Xprinter customer support team through their official channels.
Para obter as informações mais recentes e recursos de suporte, visite: www.xprinter.net


