1. Introdução
Thank you for choosing the Midea MT100W220/W-MX Semi-Automatic Twin Tub Washing Machine. This manual provides essential information for the safe and efficient use, installation, operation, maintenance, and troubleshooting of your appliance. Please read it thoroughly before use and keep it for future reference.

Figura 1: Frente view of the Midea MT100W220/W-MX washing machine.
2. Instruções de segurança
Para evitar ferimentos ao usuário ou outras pessoas e danos à propriedade, as seguintes instruções devem ser seguidas. A operação incorreta devido a ignorar as instruções pode causar danos ou danos.
- Certifique-se sempre de que a máquina de lavar esteja devidamente aterrada.
- Não permita que crianças brinquem com o aparelho ou o operem.
- Desligue o aparelho da tomada antes de limpá-lo ou realizar qualquer manutenção.
- Não lave peças de roupa que estejam sujas com gasolina, solventes de lavagem a seco ou outras substâncias inflamáveis ou explosivas.
- Ensure the power cord is not damaged and avoid placing heavy objects on it.
- Do not open the spin tub lid until the tub has completely stopped.
3. Produto acabadoview
Componentes

Figura 2: Lateral view with control panel and tubs.
The Midea MT100W220/W-MX features two tubs: one for washing and rinsing, and another for spinning. The control panel is located on the top right side.
Principais características
- Dual Force Pulsator: Washes, rinses, and spins simultaneously. Provides a deeper wash with its dual-force motor.
- Magic Pro Filter: An effective lint trap filter, easy to remove and clean, ensuring your clothes are free of residue.
- Air Fresh Spin: The exclusive cover design enhances spinning efficiency, allowing the cycle to complete in less than 5 minutes by circulating air.
- 2 Wash Cycles: Normal and Strong, for versatile cleaning.
- 4 Large Ergonomic Knobs: Designed for easy and comfortable grip and control.
Figure 3: Dual Force Pulsator technology.

Figure 4: Magic Pro Filter for lint collection.

Figure 5: Air Fresh Spin feature.
4. Configuração
Desembalando
Carefully remove the washing machine from its packaging. Inspect for any damage during transit. Keep packaging materials until you are satisfied with the product.
Localização
Place the washing machine on a firm, level surface. Ensure there is adequate space around the machine for ventilation and operation. Avoid direct sunlight or excessively humid environments.
Conexão de água
Connect the water inlet hose to a cold water tap. Ensure the connection is secure to prevent leaks. The machine has a single water inlet for both wash and rinse cycles.
Drenagem
Position the drain hose to allow for proper water discharge. The hose should be placed in a sink or a floor drain, ensuring it is not kinked or blocked.

Figura 6: Traseira view with water inlet and drain hose.
Conexão de energia
Plug the power cord into a grounded 127V AC electrical outlet. Do not use extension cords or adapters.

Figura 7: Dimensões do produto para referência de posicionamento.
5. Instruções de operação
Painel de controle encerradoview

Figure 8: Control panel with wash timer, wash selector, drain selector, and spin timer.
The control panel features four large ergonomic knobs:
- Temporizador de lavagem: Define a duração do ciclo de lavagem.
- Seletor de lavagem: Choose between 'Normal' and 'Strong' wash cycles.
- Seletor de drenagem: Controla o escoamento da água.
- Cronômetro giratório: Sets the duration of the spin cycle.
Procedimento de lavagem
- Carregar roupa: Open the wash tub lid and place clothes loosely into the tub. Do not overload. The maximum capacity is 22kg.
- Adicione detergente: Add the appropriate amount of detergent directly into the wash tub.
- Encha com água: Turn on the water tap to fill the wash tub to the desired level.
- Selecione Ciclo de Lavagem: Turn the 'Wash Selector' knob to either 'Normal' or 'Strong' depending on the fabric type and soil level.
- Configurar o temporizador de lavagem: Turn the 'Wash Timer' knob to the desired wash duration. The machine will start automatically.
- Drenar Água: Once the wash cycle is complete, turn the 'Drain Selector' knob to drain the water.
Procedimento de enxágue
- Refill with Water: After draining, refill the wash tub with clean water.
- Limpar: You can either perform a short wash cycle (e.g., 2-3 minutes) or manually agitate the clothes for rinsing.
- Drenar Água: Drain the rinse water by turning the 'Drain Selector' knob. Repeat rinsing if necessary.
Spinning Procedure
- Transferência de Lavanderia: Carefully transfer the wet clothes from the wash tub to the spin tub. Distribute them evenly to prevent imbalance.
- Close Spin Lid: Certifique-se de que a tampa do recipiente de centrifugação esteja bem fechada.
- Configurar temporizador de centrifugação: Turn the 'Spin Timer' knob to the desired spin duration (e.g., 1-5 minutes). The machine will start spinning.
- Wait for Stop: Do not open the spin tub lid until the tub has completely stopped rotating.
6. Manutenção
Cleaning the Magic Pro Filter
The Magic Pro Filter should be cleaned regularly to maintain optimal performance and prevent lint buildup on clothes.
- Remover filtro: Gently pull out the Magic Pro Filter from its housing in the wash tub.
- Clean Lint: Remove any accumulated lint and debris from the filter. You can rinse it under running water.
- Reinstalar filtro: Ensure the filter is clean and dry, then securely reinsert it into its original position.
Limpeza do Exterior
Limpe a parte externa da máquina de lavar com um pano macio e seco.amp pano. Não utilize produtos de limpeza abrasivos ou solventes que possam danificar a superfície.
Winter Storage (if applicable)
If the machine is to be stored in an area where it might freeze, drain all water from the hoses and tubs to prevent damage.
7. Solução De Problemas
Antes de entrar em contato com o serviço de atendimento ao cliente, consulte a tabela a seguir para obter informações sobre problemas comuns e suas soluções.
| Problema | Possível causa | Solução |
|---|---|---|
| A máquina não liga | Cabo de alimentação desconectado; Energia outage; Tampa não fechada corretamente. | Check power connection; Check household fuse/breaker; Ensure wash/spin tub lid is fully closed. |
| A água não escoa | Mangueira de drenagem dobrada ou obstruída; Seletor de drenagem não configurado para 'Drenar'. | Straighten drain hose, clear blockage; Turn drain selector to 'Drain'. |
| Vibração/ruído excessivo durante a centrifugação | Laundry unevenly distributed in spin tub; Machine not level. | Rearrange clothes evenly; Adjust machine's feet to level it. |
| Vazamentos de água | Water inlet hose loose; Drain hose improperly positioned. | Tighten water inlet hose connections; Ensure drain hose is secure and not leaking. |
8. Especificações
| Especificação | Detalhe |
|---|---|
| Marca | Midea |
| Número do modelo | MT100W220/W-MX |
| Cor | Branco |
| Dimensões do produto (P x L x A) | 55.5 x 99.5 x 110.5 cm |
| Capacidade | 22 quilos |
| Volumetage | 127 Volts (CA) |
| Material | Polipropileno |
| Características especiais | 2 independent motors, Air Fresh, Magic Pro Filter |
| Peso do produto | 37.5 quilos |
| Local de acesso | Carga superior |
| Opções de Ciclo | Normal, Strong |
9. Garantia e Suporte
Informações de garantia
This Midea washing machine comes with the following warranty:
- Garantia de 1 anos: Covers parts and labor.
- Garantia de 3 anos: Covers the transmission.
Figure 9: Warranty details.
If you are not satisfied with the performance of your Midea product, registered on time in the program, you may call the contact center within a maximum of 60 days after the product is delivered to your home to request an exchange.
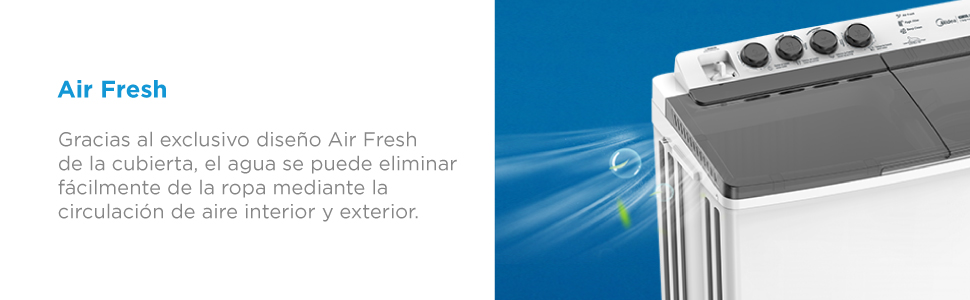
Figure 10: Quality guarantee and support information.
Suporte ao cliente
For technical assistance, warranty claims, or any questions regarding your Midea washing machine, please contact Midea customer service. Refer to your purchase documentation or the official Midea website para obter detalhes de contato específicos para sua região.