1. Introdução
Thank you for choosing the Geek Smart L7 Robot Vacuum and Mop. This device is designed to provide efficient and thorough cleaning for your home, combining powerful vacuuming with intelligent mopping capabilities. Featuring advanced LDS navigation, Wi-Fi connectivity, and smart app control, the L7 ensures a customized cleaning experience for various floor types, including carpets and hard floors.
This manual provides essential information for the safe operation, setup, maintenance, and troubleshooting of your robot vacuum. Please read it carefully before use and retain it for future reference.
2. Instruções de segurança
To reduce the risk of injury or damage, read and follow all safety precautions when setting up, using, and maintaining your robot vacuum.
- Este aparelho pode ser usado por crianças com 8 anos ou mais e pessoas com capacidades físicas, sensoriais ou mentais reduzidas ou com falta de experiência e conhecimento, desde que tenham recebido supervisão ou instruções sobre o uso do aparelho de forma segura e entendam os perigos envolvidos.
- As crianças devem ser supervisionadas para garantir que não brinquem com o aparelho.
- A limpeza e a manutenção do usuário não devem ser feitas por crianças sem supervisão.
- Utilize apenas o adaptador de energia original fornecido pelo fabricante.
- Não utilize o robô em ambientes com chamas abertas ou materiais inflamáveis.
- Mantenha cabelos, roupas largas, dedos e todas as partes do corpo longe de aberturas e peças móveis.
- Não utilize o robô em quartos onde haja um bebê ou criança dormindo.
- Não utilize o robô para recolher detritos grandes, líquidos ou objetos em chamas.
- Ensure the robot is placed on a stable surface and cannot fall from high places.
- Turn off the robot and unplug the charging dock before cleaning or maintenance.
3. Conteúdo da embalagem
Ao desembalar, verifique se todos os componentes estão presentes e em boas condições.
- Geek Smart L7 Robot Vacuum and Mop
- Doca de carregamento
- Adaptador de energia
- Escovas laterais (2 pares)
- Escova principal
- Dust Bin (680ML)
- 2-in-1 Water Tank & Dust Bin (350ML water tank & 260ML dust bin)
- Panos de esfregão (2)
- High-Efficiency Filter (pre-installed in dust bin)
- Ferramenta de limpeza
- Manual do usuário
4. Produto acabadoview
Componentes para robôs aspiradores

Image: The Geek Smart L7 Robot Vacuum, showcasing seu topo view with control buttons, LDS sensor, and accompanying accessories like the charging dock and replacement filters.
- Sensor de navegação LDS: Located on top, for precise mapping and navigation.
- Botões de controle: Power/Clean, Home/Recharge.
- Pára-choque dianteiro: Detecta obstáculos.
- Escovas laterais: Varra os detritos para a trilha principal da vegetação.
- Escova principal: Recolhe sujeira e detritos.
- Rodas motrizes: Allow movement across various surfaces.
- Contatos de carregamento: Conecte-se à base de carregamento.
- Dust Bin / Water Tank: Removable compartments for dust collection and water for mopping.
Doca de carregamento
The charging dock provides power to recharge the robot's battery. It should be placed in an open area with sufficient clearance.
5. Configuração
5.1 Posicionamento da base de carregamento
- Place the charging dock against a wall in an open area.
- Certifique-se de que haja pelo menos 0.5 metros (1.6 pés) de espaço livre em ambos os lados da doca e 1.5 metros (4.9 pés) na frente.
- Conecte o adaptador de energia à base de carregamento e ligue-a a uma tomada de parede.
- Ensure the power indicator on the charging dock illuminates.
5.2 Carregamento Inicial
- Place the robot onto the charging dock, ensuring the charging contacts align.
- The robot will automatically begin charging. Allow it to fully charge before its first use (approximately 4-5 hours).
5.3 Conexão e mapeamento de aplicativos

Image: The Geek Smart L7 Robot Vacuum actively scanning its environment using LDS navigation to create a detailed map, with digital map representations floating above it.
- Download the Geek Smart app from your mobile device's app store (available for iOS and Android).
- Registre uma conta e faça o login.
- Follow the in-app instructions to add your L7 robot vacuum. This typically involves connecting to the robot's Wi-Fi hotspot and then connecting the robot to your home Wi-Fi network.
- Once connected, initiate a full cleaning cycle. The robot will use its LDS navigation to create an accurate map of your home. This map will be saved in the app for future use, allowing for features like selective room cleaning and setting no-go zones. The robot can save up to 5 different maps.
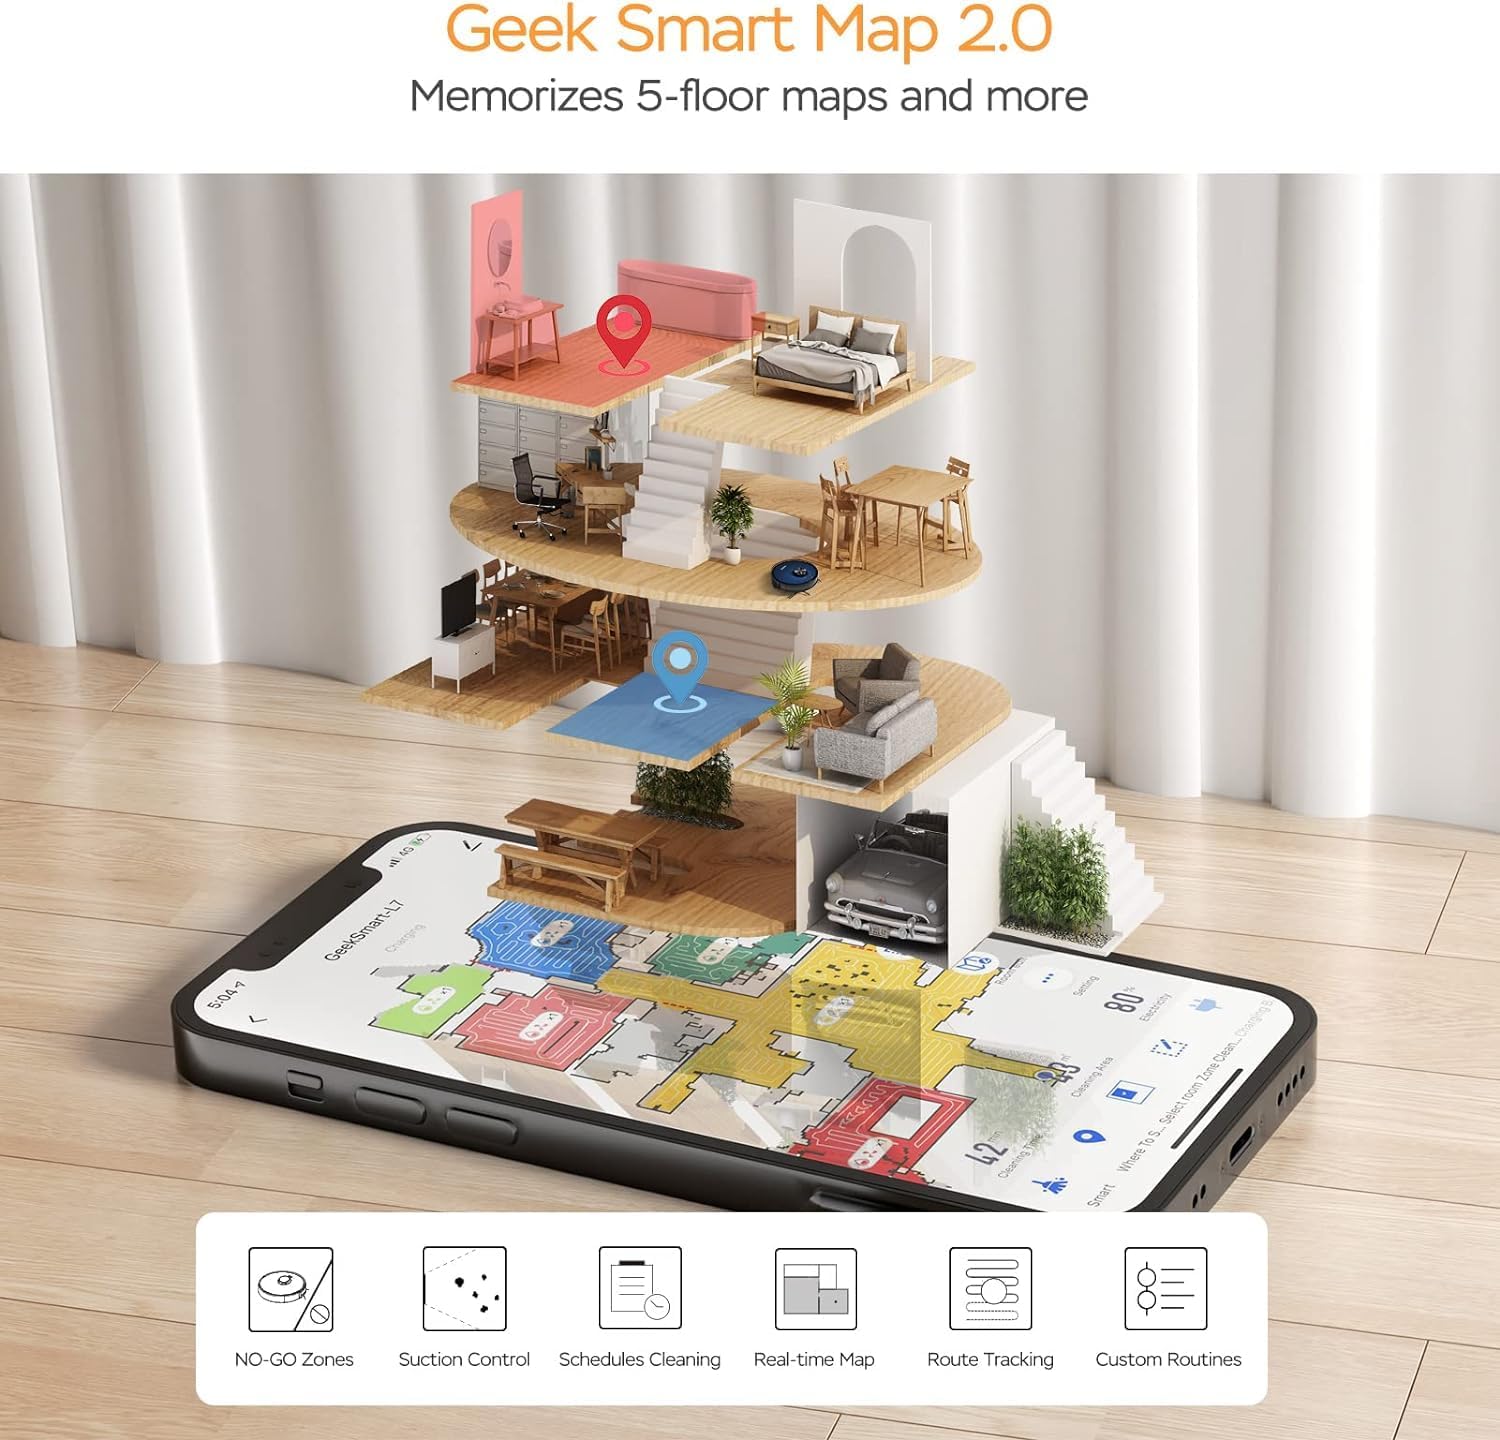
Image: A smartphone screen displaying the Geek Smart app interface, showing a color-coded floor plan map with various cleaning zones and controls.
6. Instruções de operação
6.1 Iniciar e parar a limpeza
- Comece a limpeza: Press the Power/Clean button on the robot or tap "Start Cleaning" in the app. The robot will begin a full cleaning cycle.
- Pausar a limpeza: Press the Power/Clean button during operation or tap "Pause" in the app.
- Limpeza de currículos: Press the Power/Clean button again or tap "Resume" in the app.
- Retornar ao cais: Press the Home/Recharge button on the robot or tap "Recharge" in the app. The robot will return to its charging dock.
6.2 Modos de limpeza
The L7 offers various cleaning modes to suit different needs.

Image: The Geek Smart L7 Robot Vacuum demonstrating its 2-in-1 sweeping and mopping capabilities on a hard floor, with debris being swept and a damp mop trail visible.
- Limpeza automática: The robot intelligently plans its cleaning path using LDS navigation.
- Aspiração: Utilizes up to 2700Pa suction power to clean dirt and debris from various surfaces.
- Esfregar: Attach the mop cloth and fill the 2-in-1 water tank. The electronic water tank allows for adjustable water output.
- Aspirar e passar pano (simultaneamente): The robot can vacuum and mop simultaneously when the 2-in-1 tank is installed.
- Modo de Impulso de Tapete: The robot automatically increases suction power when it detects carpeted areas for deeper cleaning.

Image: The Geek Smart L7 Robot Vacuum actively cleaning a hard floor, with a visual representation of its powerful 2700Pa suction lifting debris.

Image: The Geek Smart L7 Robot Vacuum transitioning from a hard floor to a carpet, illustrating its Carpet Boost Mode with enhanced suction indicated by glowing lines.

Image: The Geek Smart L7 Robot Vacuum positioned on a floor split between marble and wood, illustrating its integrated mopping system and adjustable water output for different surfaces.
6.3 Recursos de controle do aplicativo
The Geek Smart app unlocks advanced cleaning customization.
- Limpeza seletiva de quartos: Choose specific rooms or areas on the map for cleaning.
- No-Go Zones / No-Mop Zones: Draw virtual boundaries on the map to prevent the robot from entering certain areas or mopping carpets.
- Invisible Walls: Create virtual walls to restrict the robot's movement.
- Agendamento: Set cleaning schedules for automatic operation at desired times.
- Ajuste de potência de sucção: Manually adjust the suction level.
- Water Output Adjustment: Control the water flow for mopping.

Image: The Geek Smart L7 Robot Vacuum operating quietly (65dB) in a living room, demonstrating its low noise level suitable for homes with sleeping individuals or pets.
7. Manutenção
A manutenção regular garante o desempenho ideal e prolonga a vida útil do seu robô aspirador. Sempre desligue o robô e desconecte a base de carregamento antes de realizar qualquer manutenção.
7.1 Esvaziando o recipiente de pó
- Pressione o botão de liberação do compartimento de pó e puxe-o para fora.
- Abra a tampa do compartimento de pó e despeje o conteúdo em uma lata de lixo.
- Clean the filter and dust bin with the provided cleaning tool or a soft brush.
- Reinstale a lixeira.
7.2 Cleaning the 2-in-1 Water Tank & Dust Bin
- Remova o tanque 2 em 1 do robô.
- Empty any remaining water from the water tank compartment.
- Esvazie o compartimento para o pó e limpe o filtro.
- Rinse the water tank compartment with clean water. Do not immerse the entire tank in water, especially the electronic components.
- Allow all parts to air dry completely before reassembling and reinstalling.
7.3 Limpeza da escova principal
- Flip the robot over and press the release tabs to remove the main brush cover.
- Retire a escova principal.
- Use the cleaning tool to remove hair and debris tangled around the brush and its bearings.
- Reinstale a escova principal e a tampa.
7.4 Escovas laterais de limpeza
- Puxe delicadamente as escovas laterais para cima para removê-las.
- Remove any hair or debris. If brushes are bent, soak them in warm water for a few minutes to reshape.
- Press the brushes back into place until they click.
7.5 Limpeza dos sensores e contatos de carregamento
- Use a clean, dry cloth to wipe the cliff sensors (located on the bottom of the robot), wall sensors (on the side), and the charging contacts on both the robot and the charging dock.
- Ensure the LDS sensor on top is also clean and free of obstructions.
8. Solução De Problemas
If you encounter issues with your robot vacuum, refer to the following table for common problems and solutions.
| Problema | Possível causa | Solução |
|---|---|---|
| Robô não liga | Bateria fraca; Interruptor de alimentação desligado | Coloque o robô na base de carregamento; certifique-se de que o interruptor de energia esteja ligado. |
| O robô não pode carregar | Contatos de carregamento sujos; base de carregamento sem energia | Limpe os contatos de carregamento do robô e da base; certifique-se de que a base esteja conectada à tomada. |
| O robô fica preso com frequência. | Obstáculos no chão; sensores de precipício sujos | Clear cables and small objects; Clean cliff sensors. |
| Baixo desempenho de limpeza | Compartimento de pó cheio; escovas emaranhadas; filtro entupido. | Empty dust bin; Clean main and side brushes; Clean or replace filter. |
| A função de esfregar não está funcionando. | Water tank empty; Mop cloth dry; Water outlet clogged | Fill water tank; Moisten mop cloth; Clean water outlet. |
| Problemas de conexão do aplicativo | Senha de Wi-Fi incorreta; Roteador muito distante; Robô offline | Verify Wi-Fi credentials; Move robot closer to router; Restart robot and router. |
9. Especificações
| Recurso | Especificação |
|---|---|
| Marca | Geek inteligente |
| Nome do modelo | L7 |
| Tipo de Navegação | LiDAR 360° |
| Potência máxima de sucção | 2700 anos |
| Capacidade da bateria | 2600 mAh |
| Tempo de execução máximo | 130 minutos |
| Capacidade do depósito de pó | 680 ml |
| Water Tank Capacity (2-in-1) | 350 ml |
| Nível de ruído | Sub-65 dB |
| Dimensões do produto | 12.59"C x 12.59"L x 3.74"A |
| Peso do item | 13.39 libras |
| Dispositivos compatíveis | Amazon Eco |
| UPC | 764773837187 |
10. Garantia e Suporte
Geek Smart products are manufactured to the highest quality standards. For warranty information, technical support, or customer service inquiries, please refer to the contact information provided on the product packaging or visit the official Geek Smart website.
Guarde o comprovante de compra para reclamações de garantia.


