Introdução
Thank you for choosing the hygger HG121-8W 5-in-1 Aquarium Internal Filter. This versatile filter is designed to provide comprehensive water purification and circulation for your aquarium, offering multiple functional modes to suit various aquatic environments. Please read this manual thoroughly before installation and operation to ensure proper use and optimal performance.
Características do produto
- 5 funções em 1: Offers ventilation, rain shower, wave making, fountain, and water exchange capabilities.
- 3-S eficientetage Filtração: Utilizes biochemical sponges, activated carbon, and bio-balls for physical, chemical, and biological filtration, effectively removing odors and impurities.
- Operação ultrassilenciosa: Engineered with a super quiet motor, ensuring minimal noise during operation, even at maximum flow.
- Adjustable Flow Design: Allows adjustment of water flow rate, airflow rate, and wave direction to meet specific aquarium needs.
- Aplicação versátil: Suitable for both freshwater and saltwater aquariums ranging from 2 to 13 gallons (8-50 liters).
- Instalação e manutenção fáceis: Equipped with strong suction cups for secure attachment and a removable design for simple cleaning.
Conteúdo da embalagem
Verifique se todos os componentes estão presentes antes de prosseguir com a instalação:
- hygger HG121-8W Internal Filter Unit
- Bioceramic Balls (pre-installed or separate)
- Biochemical Sponge (pre-installed or separate)
- Activated Carbon (pre-installed or separate)
- Rain Shower Bar and Connectors
- Aeration Tube
- Bico de fonte
- Adjustable Flow Knob
- Ventosas (4x)
- DC 5V Adapter with USB Port
Instruções de configuração
- Desembale e inspecione: Retire cuidadosamente todos os componentes da embalagem. Inspecione-os para verificar se há danos.
- Montagem do meio filtrante: The filter unit typically comes with pre-installed media. If not, insert the biochemical sponge into the bottom compartment, followed by activated carbon, and then the bioceramic balls into the top compartment. Ensure they are seated correctly.
- Attach Output Accessories:

This image illustrates the various output accessories and how they connect to the filter head for different functional modes.
- Chuva: Connect the rain shower bar to the filter's output nozzle.
- Aeração: Attach the aeration tube to the designated air intake port on the filter head.
- Fountain/Water Exchange: Attach the fountain nozzle or appropriate connector for water exchange.
- Secure Filter in Tank: Attach the four strong suction cups to the back of the filter unit. Submerge the filter completely in your aquarium water and press the suction cups firmly against the inner glass wall to secure it. Ensure the filter is positioned vertically and the water level is above the minimum water level mark indicated on the filter unit.

This image shows the filter unit securely attached to the aquarium wall, with the rain shower output positioned above the water surface.
- Conecte a energia: Plug the DC 5V adapter into a standard electrical outlet and connect the USB port to the filter's power cable.
Instruções de operação
- Ligar: Once the filter is properly installed and submerged, plug in the power adapter. The filter will begin operating immediately.
- Ajustar a taxa de fluxo: Use the adjustable flow knob located on the filter head to increase or decrease the water flow rate as desired.
- Adjust Airflow (if using aeration): If the aeration tube is connected, you can adjust the amount of air introduced into the water by manipulating the air intake valve on the tube.
- Change Functional Modes: To switch between functions (e.g., from rain shower to fountain), you may need to detach one accessory and attach another. Ensure the filter is unplugged before making any changes to accessories.
Manutenção
Regular cleaning is crucial for maintaining the efficiency and longevity of your filter. It is recommended to clean the filter every 1-2 weeks.
- Desconecte a energia: Always unplug the filter from the power source before performing any maintenance.
- Remove from Tank: Gently detach the filter from the aquarium wall.
- Disassemble Filter: Carefully separate the filter compartments. Note the order of the filter media for correct reassembly.

This image displays the filter's internal structure and the three types of filter media: bioceramic balls, biochemical sponge, and activated carbon.
- Limpeza do meio filtrante: Rinse the biochemical sponge and bioceramic balls with old aquarium water (from a water change) to preserve beneficial bacteria. Do not use tap water directly, as chlorine can harm these bacteria. Activated carbon should be replaced every 2-4 weeks, or as needed, as its adsorptive capacity diminishes over time.
- Limpeza do impulsor e da carcaça: Use a small brush to clean the impeller and the impeller housing to remove any debris or algae buildup.
- Remontar e reinstalar: Reassemble the filter in the reverse order of disassembly, ensuring all parts are securely fitted. Reinstall the filter in the aquarium and reconnect power.
Solução de problemas
| Problema | Possível causa | Solução |
|---|---|---|
| O filtro não está ligando ou o fluxo está fraco. | Power disconnected; Impeller jammed or dirty; Filter media clogged; Air in pump. | Check power connection; Clean impeller and housing; Clean or replace filter media; Gently shake filter to release air. |
| Ruído excessivo | Impeller dirty or damaged; Air in pump; Filter not securely mounted. | Clean or replace impeller; Gently shake filter to release air; Re-secure filter to tank wall. |
| Água não está limpa | Filter media saturated or dirty; Filter too small for tank size; Insufficient water changes. | Clean or replace filter media; Ensure filter is appropriate for tank volume; Perform regular water changes. |
Especificações
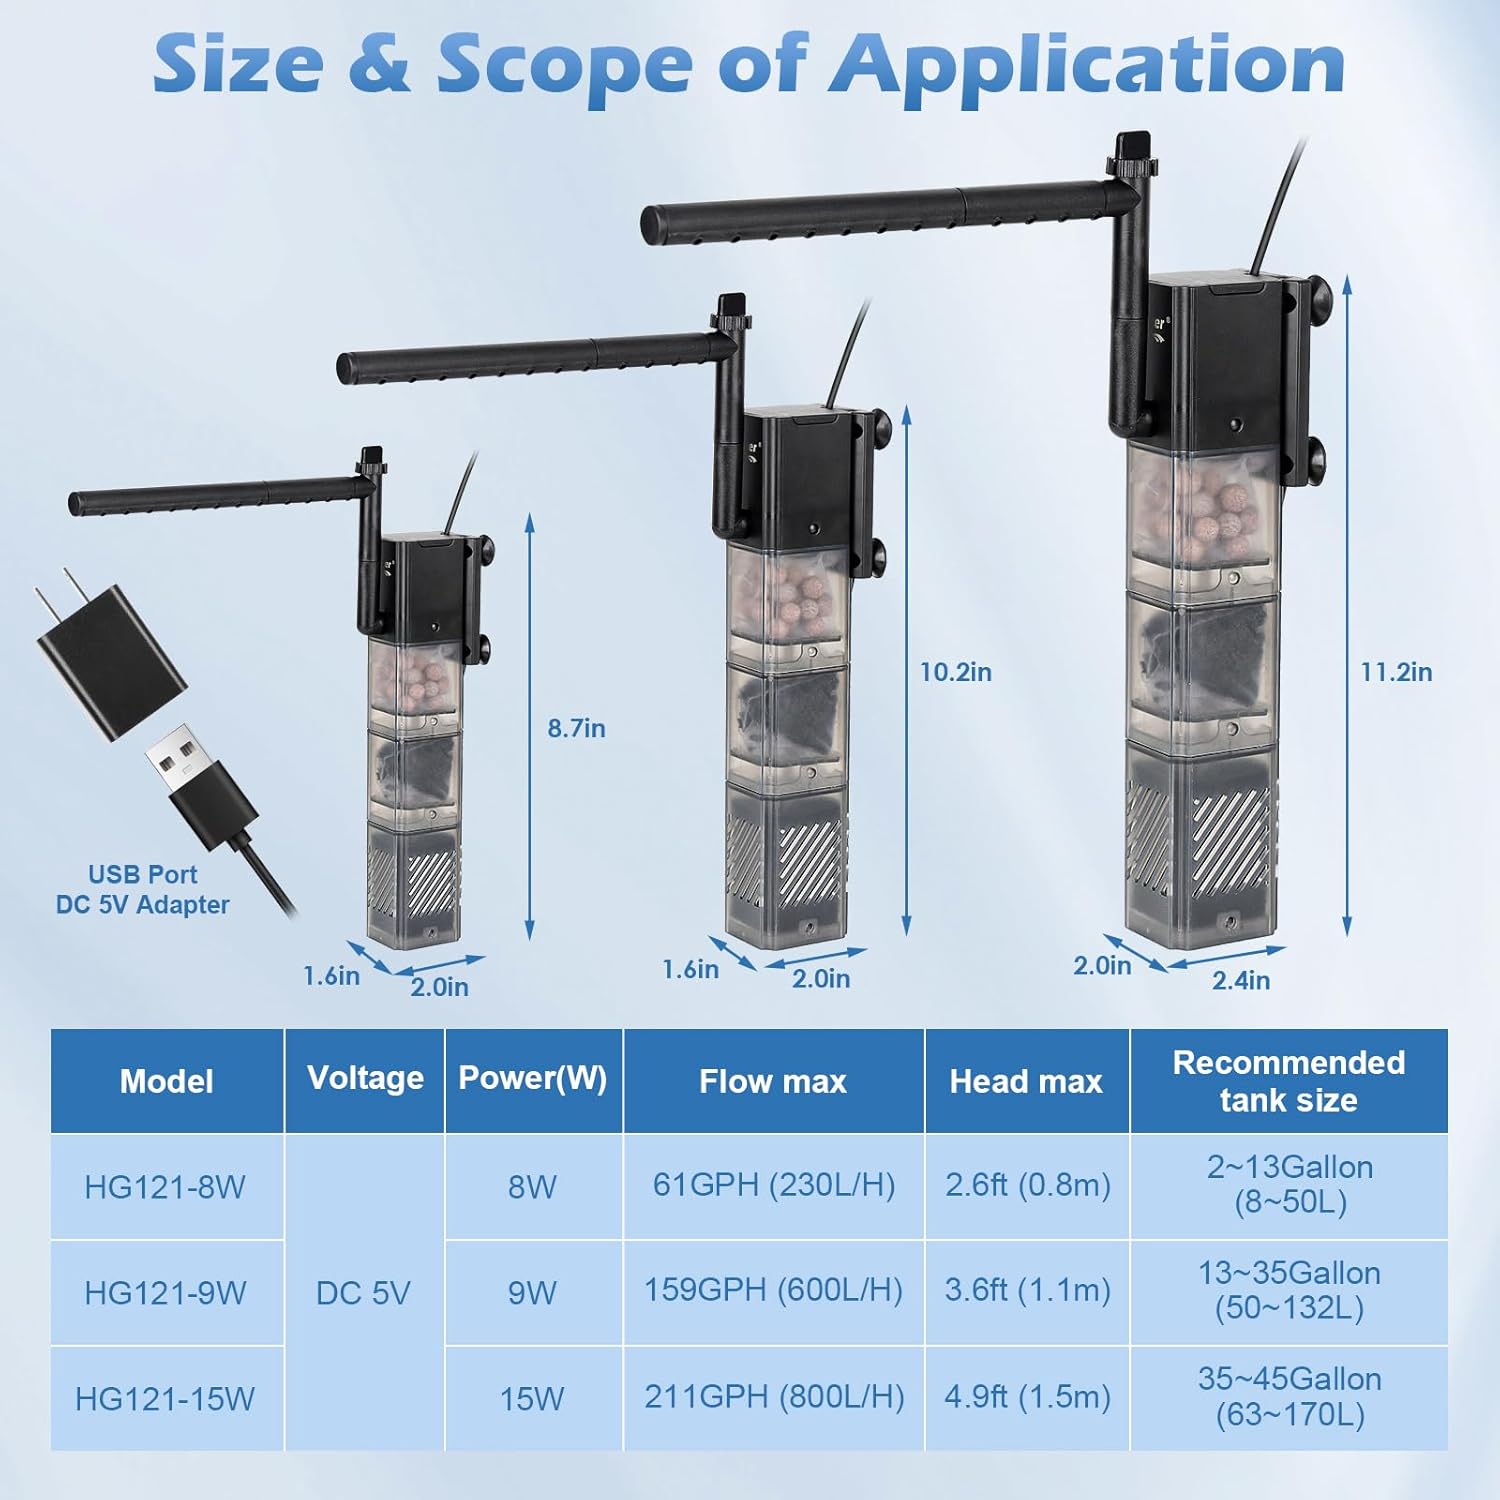
This image provides a detailed specification table for the HG121-8W model, alongside other variants, outlining dimensions, power, flow, and tank suitability.
| Atributo | Valor |
|---|---|
| Número do modelo | HG121-8W |
| Poder | 8W |
| Volumetage entrada | CA 110-240 V |
| Volumetage Saída | Corrente contínua 5 V |
| Taxa de fluxo máxima | 61 GPH (230 L/H) |
| Cabeça Máxima | 2.6 pés (0.8 m) |
| Dimensões (C x L x A) | 2.0 polegadas x 1.6 polegadas x 8.7 polegadas |
| Comprimento do cabo de alimentação | 4.92 pés |
| Tamanho de tanque recomendado | 2-13 Gallons (8-50 Liters) |
Garantia e Suporte
For warranty information or technical support, please contact hygger customer service through the retailer where the product was purchased or visit the official hygger website. Guarde o comprovante de compra para solicitações de garantia.


