1. Introdução
This manual provides detailed instructions for the safe and effective operation, setup, and maintenance of your Ortur Laser Master 2 S2 LU2-10A Laser Engraver and Cutter, along with the Ortur Laser Rotary Roller. Please read this manual thoroughly before using the device to ensure proper functionality and safety.
2. Informações de segurança
WARNING: This product uses a high-power laser. Improper use can cause serious injury, including eye damage and burns. Always wear appropriate laser safety goggles when operating the device. Never look directly at the laser beam.
Observe as seguintes precauções de segurança:
- Proteção para os olhos: Always wear certified laser safety goggles.
- Ventilação: Operate in a well-ventilated area to dissipate fumes and smoke generated during engraving/cutting.
- Risco de incêndio: Mantenha um extintor de incêndio por perto. Não deixe a máquina sem supervisão durante o funcionamento.
- Compatibilidade de materiais: Only engrave or cut materials suitable for laser processing. Avoid reflective, flammable, or PVC materials.
- Crianças e animais de estimação: Mantenha crianças e animais de estimação longe da área de operação.
- Parada de emergência: Familiarize-se com a localização do botão de parada de emergência.
The Ortur Laser Master 2 S2 LU2-10A includes the following safety protections:
- Exposure Duration Detection
- Laser Beam Safety Guard
- Sistema de controle de energia
- Position Movement Protection
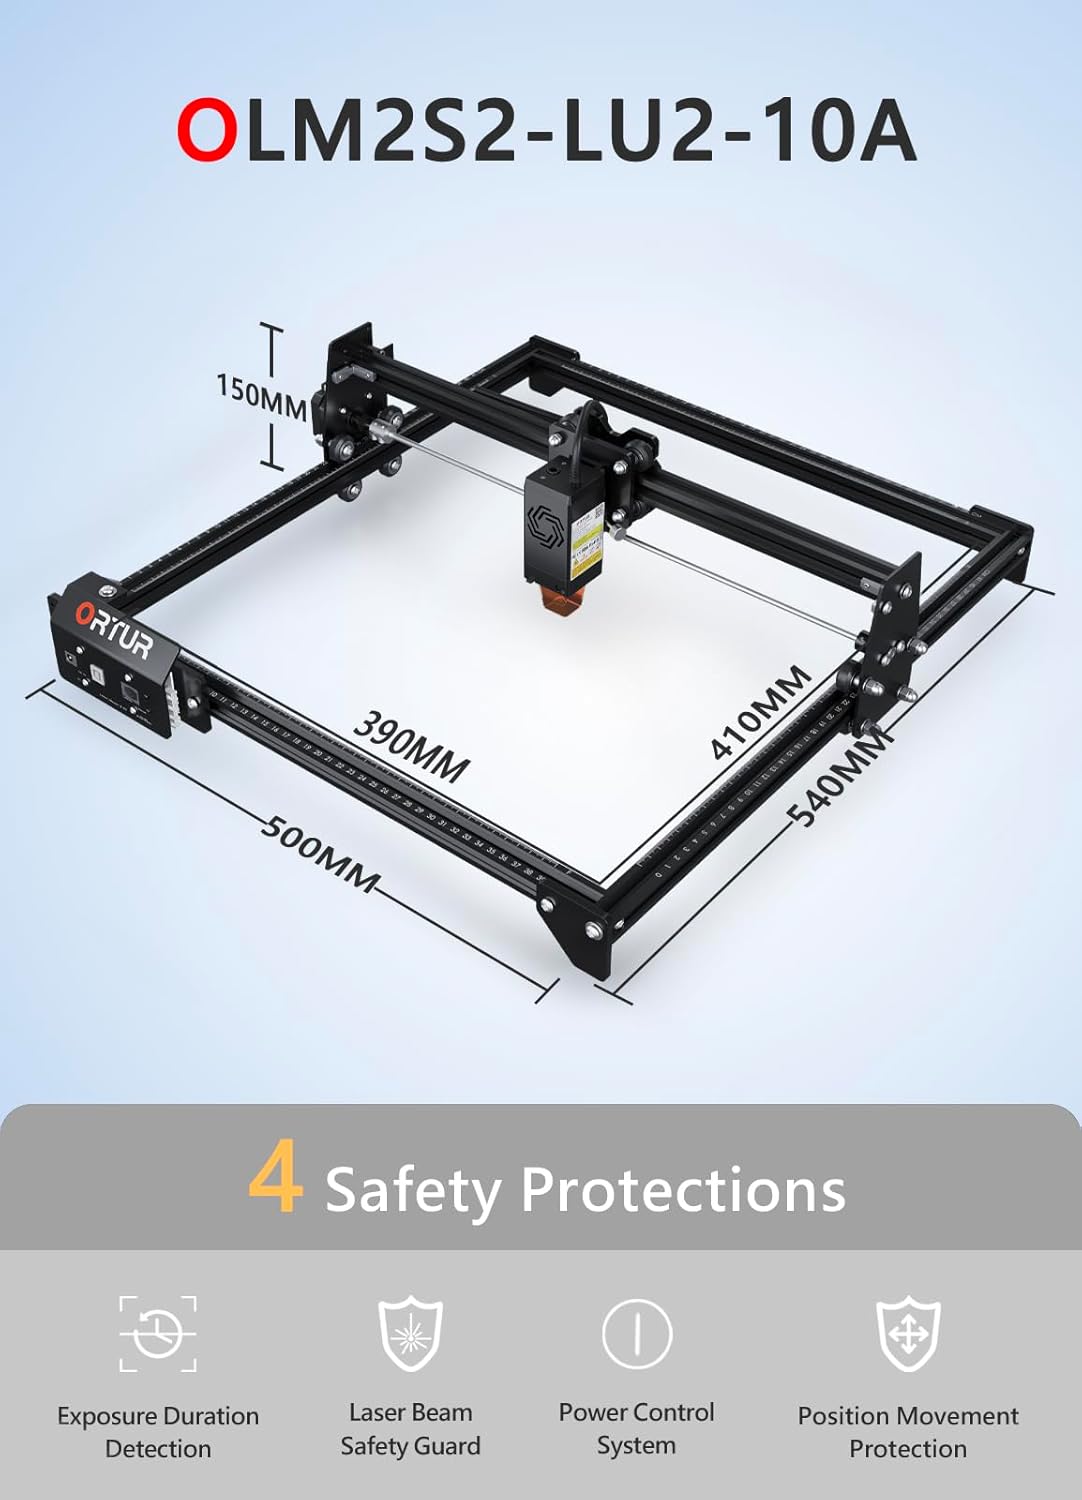
Imagem: Acimaview of the Ortur Laser Master 2 S2 LU2-10A, showing its dimensions and highlighting its four safety protection features: Exposure Duration Detection, Laser Beam Safety Guard, Power Control System, and Position Movement Protection.
3. Conteúdo da embalagem
Ao desembalar, verifique se todos os componentes estão presentes. A embalagem normalmente inclui:
- Ortur Laser Master 2 S2 Engraver Frame
- LU2-10A Laser Module (10W Output Power)
- Ortur Laser Rotary Roller (YRR2.0)
- Adaptador de energia e cabos
- Cabo USB
- Óculos de segurança
- Ferramentas e parafusos de montagem
- Sample Materials for Testing
- Manual do usuário (este documento)

Image: The complete Ortur Laser Master 2 S2 LU2-10A laser engraver with the 10W laser module, shown alongside the Ortur Laser Rotary Roller and various engraved sample items.
4. Produto acabadoview
4.1 Ortur Laser Master 2 S2 LU2-10A Engraver
The Ortur Laser Master 2 S2 LU2-10A is a high-performance laser engraver and cutter featuring a powerful 10W optical output laser module. It is designed for precision engraving and efficient cutting of various materials.
- Módulo Laser: LU2-10A, 10W optical power.
- Compressed Spot: 0.05mm x 0.1mm for fine detail.
- Capacidade de corte: Can cut up to 30mm acrylic and 20mm wood.
- Área de gravação: 390 mm x 410 mm.
- Interface de assistência pneumática: Concebido para um desempenho de corte otimizado.
- Estrutura: Industrial-grade full metal design for reliability and accuracy.

Image: Close-up of the Ortur LU2-10A laser module, illustrating its higher precision with a smaller compressed spot size (0.05x0.1mm) compared to other modules.

Image: Demonstrates the cutting capability of the Ortur LU2-10A laser module, showing clean cuts through 12mm thick black acrylic and 15mm thick plywood in a single pass.

Imagem: Explodida view of the Ortur 10W laser module, detailing its internal components including air intake, dual fans, laser diodes, focus gauge, and protective cover.
4.2 Ortur Laser Rotary Roller (YRR2.0)
The Ortur Laser Rotary Roller is an accessory designed for engraving cylindrical or irregularly shaped objects that cannot be processed on a flat bed. It expands the versatility of your laser engraver.
- Função: Enables 360° rotating engraving on cylindrical objects.
- Adjustable Diameters: Features 7 adjustable diameter settings, accommodating objects from 8mm to 110mm.
- Compatibilidade: Suitable for items such as cups, bottles, pipes, and small diameter cylinders.

Image: Close-up of the Ortur Rotary Roller, illustrating its gear mechanism and the 7 adjustable diameter settings for engraving objects of various sizes, from 8mm to 100mm.

Image: The Ortur Rotary Roller in operation, demonstrating 360° rotating engraving on a cylindrical object (a beverage can).

Imagem: Uma colagem mostrandoasing various items that can be engraved using the rotary roller, including wine glasses, bottles, tumblers, rolling pins, rings, and pens.
5. Configuração
5.1 Main Unit Assembly
The Ortur Laser Master 2 S2 LU2-10A features a modular design for easy assembly. Typically, assembly can be completed within 10-15 minutes by following the included quick start guide or video instructions.
- Desembale todos os componentes e verifique se correspondem à lista de conteúdo da embalagem.
- Assemble the frame according to the provided diagrams, securing all screws.
- Install the LU2-10A laser module onto the gantry.
- Conecte todos os cabos necessários (alimentação, USB, cabos do motor).
- Certifique-se de que a máquina esteja colocada em uma superfície estável e nivelada, em uma área bem ventilada.
5.2 Rotary Roller Connection
To use the Ortur Laser Rotary Roller, connect it to the engraver's dedicated rotary axis port. Specific connection details can be found in the rotary roller's supplementary guide.
- Ensure the main engraver is powered off.
- Connect the rotary roller's motor cable to the designated port on the engraver's control board.
- Place the rotary roller on a stable surface within the engraver's working area.
- Adjust the height of the engraver's gantry or the rotary roller's support to ensure proper focus on the cylindrical object.
6. Instruções de operação
6.1 Compatibilidade de software
The Ortur Laser Master 2 S2 LU2-10A is compatible with popular laser engraving software:
- LaserGRBL: Free software, compatible with Windows 7 / 8 / XP / 10 / 11.
- LightBurn: Paid software, compatible with Windows 7 / 8 / XP / 10 / 11 and macOS.
Suportado file formats include SVG, DXF, JPG, JPEG, PNG, BMP, TIF, CR2, etc.
6.2 Basic Engraving/Cutting Process
- Preparação do projeto: Create or import your design in your chosen software.
- Colocação de Materiais: Place the material securely on the engraving bed.
- Ajuste de foco: Adjust the laser module's focus using the integrated focus gauge.
- Configurações do software: Configure laser power, speed, and passes based on the material type and desired outcome.
- Frame Test: Use the software's framing function to ensure the design fits within the material.
- Iniciar operação: Initiate the engraving or cutting process. Monitor the machine closely.
6.3 Using the Rotary Roller
When engraving cylindrical objects, the rotary roller replaces the standard flat bed operation.
- Install Rotary Roller: Connect the rotary roller as described in Section 5.2.
- Colocar objeto: Secure the cylindrical object (e.g., cup, bottle) onto the rotary roller.
- Adjust Diameter: Set the rotary roller to the appropriate diameter using its adjustable gears (7 steps, 8mm to 110mm).
- Laser de foco: Adjust the laser module height to focus on the surface of the cylindrical object.
- Configuração de software: In your engraving software (e.g., LightBurn), enable the rotary axis and input the correct diameter and steps per rotation settings.
- Iniciar gravação: Proceed with the engraving process, ensuring the object rotates smoothly.
7. Manutenção
A manutenção regular garante o desempenho ideal e prolonga a vida útil da sua gravadora a laser.
- Limpeza da lente a laser: Periodically clean the laser module's lens with a lint-free cloth and lens cleaning solution.
- Trilhos e rodas limpos: Keep the guide rails and wheels free from dust and debris to ensure smooth movement.
- Lubrifique as peças móveis: Apply a small amount of lubricant to the guide rails and lead screws as needed.
- Atualizações de firmware: Check the Ortur official website for any available firmware updates for your machine.
- Inspecione os cabos: Verifique regularmente todos os cabos quanto a desgaste ou danos.
8. Solução De Problemas
Caso encontre algum problema, consulte os problemas e soluções comuns a seguir:
- Sem saída de laser:
- Check power connection and laser module cable.
- Ensure safety features (e.g., tilt sensor) are not triggered.
- Verify software settings for laser power.
- O computador não está conectando:
- Verifique a conexão do cabo USB.
- Instale os drivers necessários para a gravadora.
- Tente uma porta USB ou cabo diferente.
- Qualidade de gravação/corte ruim:
- Verify laser focus is correctly set.
- Adjust laser power and speed settings for the material.
- Limpe a lente do laser.
- Certifique-se de que o material esteja plano e bem preso.
- Rotary Roller Not Rotating:
- Check the rotary roller's motor cable connection.
- Ensure rotary axis is enabled and configured correctly in software.
- Verify the object is not too heavy or causing friction.
For further assistance, consult the Ortur support website ou entre em contato com o atendimento ao cliente.
9. Especificações
9.1 Ortur Laser Master 2 S2 LU2-10A Engraver
- Modelo: Laser Master 2 S2 LU2-10A
- Módulo Laser: LU2-10A (10W Optical Output Power)
- Compressed Spot Size: 0.05 mm x 0.1 mm
- Área de gravação: 390 mm x 410 mm
- Machine Dimensions (Approx.): 500 mm (C) x 540 mm (L) x 150 mm (A)
- Capacidade de corte: Up to 30mm acrylic, 20mm wood
- Compatibilidade: Windows 7/8/XP/10/11, macOS (with LightBurn)
- Suportado File Formatos: SVG, DXF, JPG, JPEG, PNG, BMP, TIF, CR2, etc.
9.2 Ortur Laser Rotary Roller (YRR2.0)
- Modelo: YRR2.0
- Diâmetro de gravação ajustável: 8mm to 110mm (7 steps)
- Dimensões (Aprox.): 129 mm (C) x 184 mm (L) x 81 mm (A)

Image: Technical specifications and dimensions of the Ortur Laser Rotary Roller, showing approximate measurements of 129mm in length, 184mm in width, and 81mm in height.
10. Garantia e Suporte
Ortur products come with a standard manufacturer's warranty. Please refer to the warranty card included with your product or visit the official Ortur website para obter termos e condições detalhados da garantia.
For technical support, troubleshooting assistance, or spare parts, please contact Ortur customer service through their official website or the retailer where you purchased the product. Provide your product model and serial number for faster service.


