Hantek TO1000 Series Full Touch Screen Oscilloscope Instruction Manual
Modelo: TO1112
1. Produto acabadoview
The Hantek TO1000 Series is a versatile full touch screen smart oscilloscope designed for various measurement tasks. It integrates multiple functions including a digital storage oscilloscope, a high-precision multimeter, and a signal generator. The device features a multi-touch large screen with a resolution of up to 800x480, offering a user-friendly interface and an intuitive interaction experience.
Os principais recursos incluem:
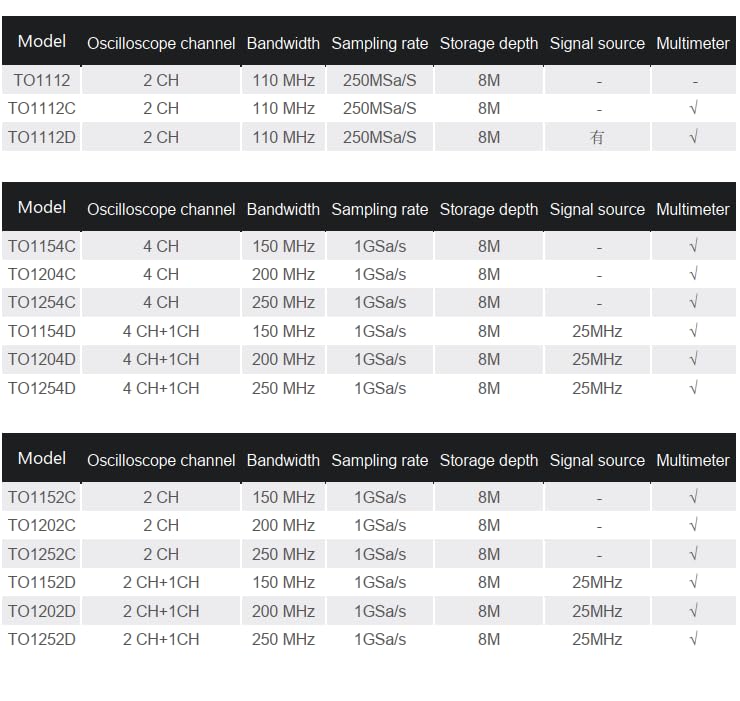
Standard configuration of 2-channel oscilloscope with a maximum bandwidth of 110MHz and a maximum sampling rate of 1GSa/s, featuring 8M large storage.
High-precision multimeter with data recording, storage, trend chart, and statistical analysis functions.
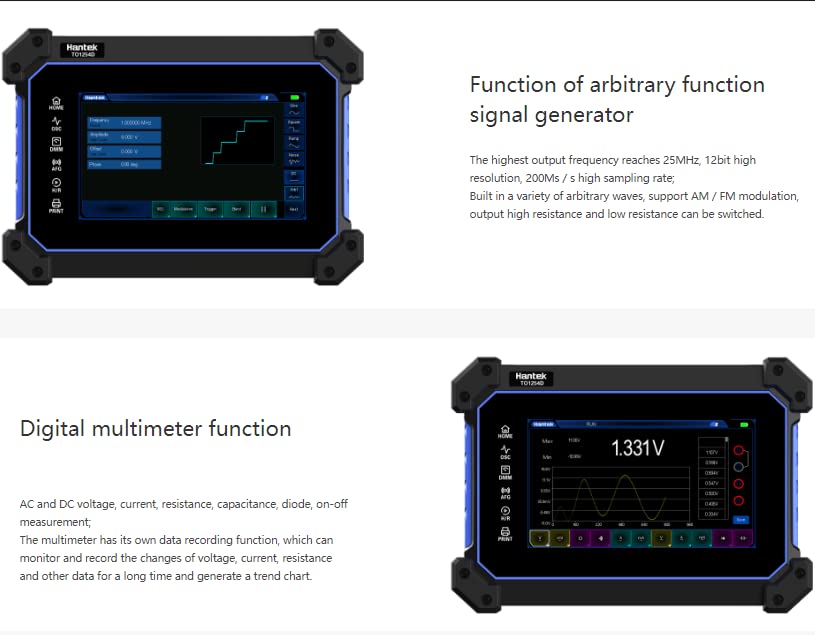
Built-in arbitrary waveform signal generator with a highest output frequency of 25MHz.
One-key waveform storage for convenient and fast data saving.
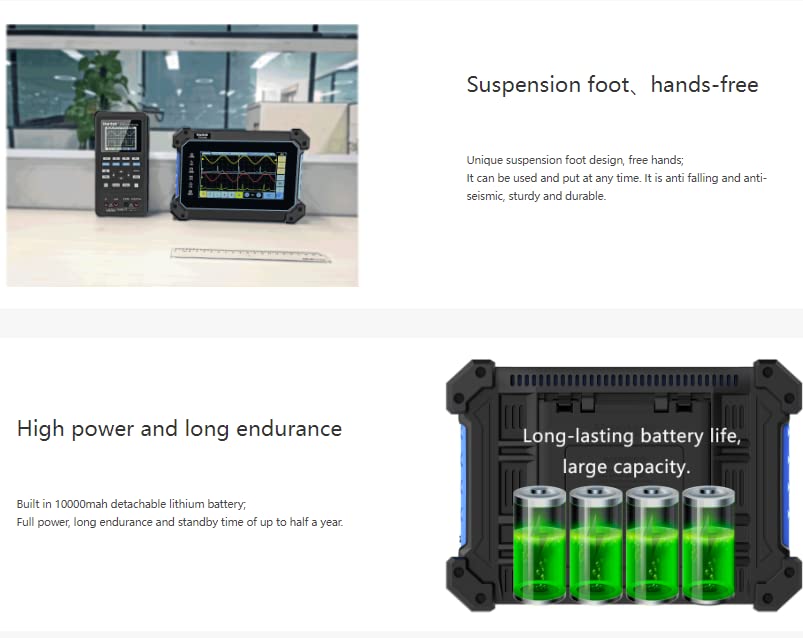
Suspension foot design for multi-angle adjustment, anti-falling, and anti-seismic protection.
Built-in super large capacity lithium battery for long endurance, with standby time up to half a year.
Standard 18W charger supporting Type-C fast charging.
Figura 1.1: Principal view of the Hantek TO1000 Series Oscilloscope.
Figure 1.2: The Hantek TO1000 Series integrates multiple functions, including oscilloscope, multimeter, signal generator, and more, accessible via its touch screen interface.
Vídeo 1.1: Acabouview of Hantek TO1000 Series features and design, demonstrating its multi-functionality and portability.
2. Configuração
2.1 Carregamento Inicial
Before first use, fully charge the device using the provided 18W Type-C charger. Connect the charger to the Type-C port on the side of the oscilloscope and plug it into a power outlet. The charging indicator will show the charging status. A full charge ensures optimal battery life and performance.
2.2 Ligar/Desligar
Para ligar: Press and hold the power button located on the side of the device until the Hantek logo appears on the screen.
Para desligar: Press and hold the power button until a power-off prompt appears on the screen. Follow the on-screen instructions to shut down the device.
2.3 Conectando Sondas
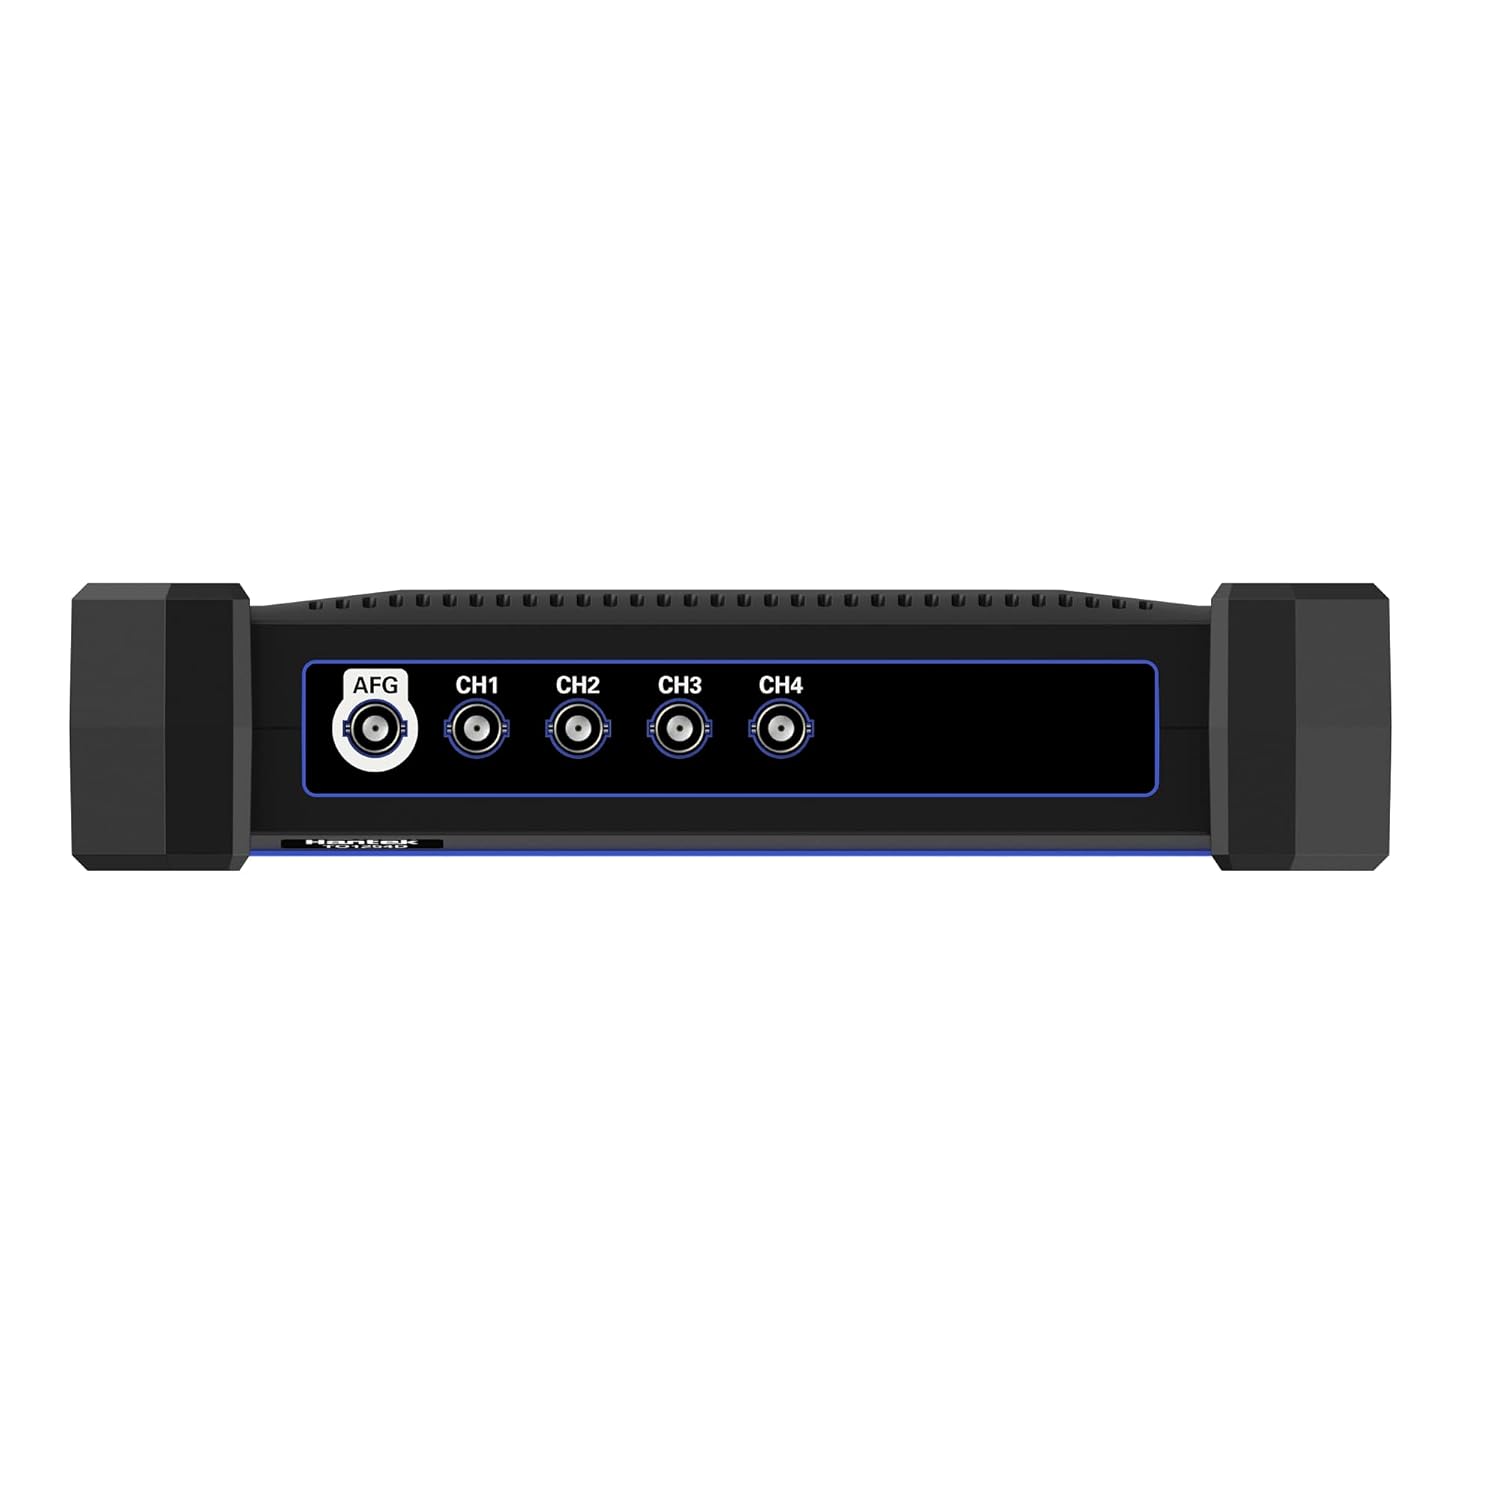
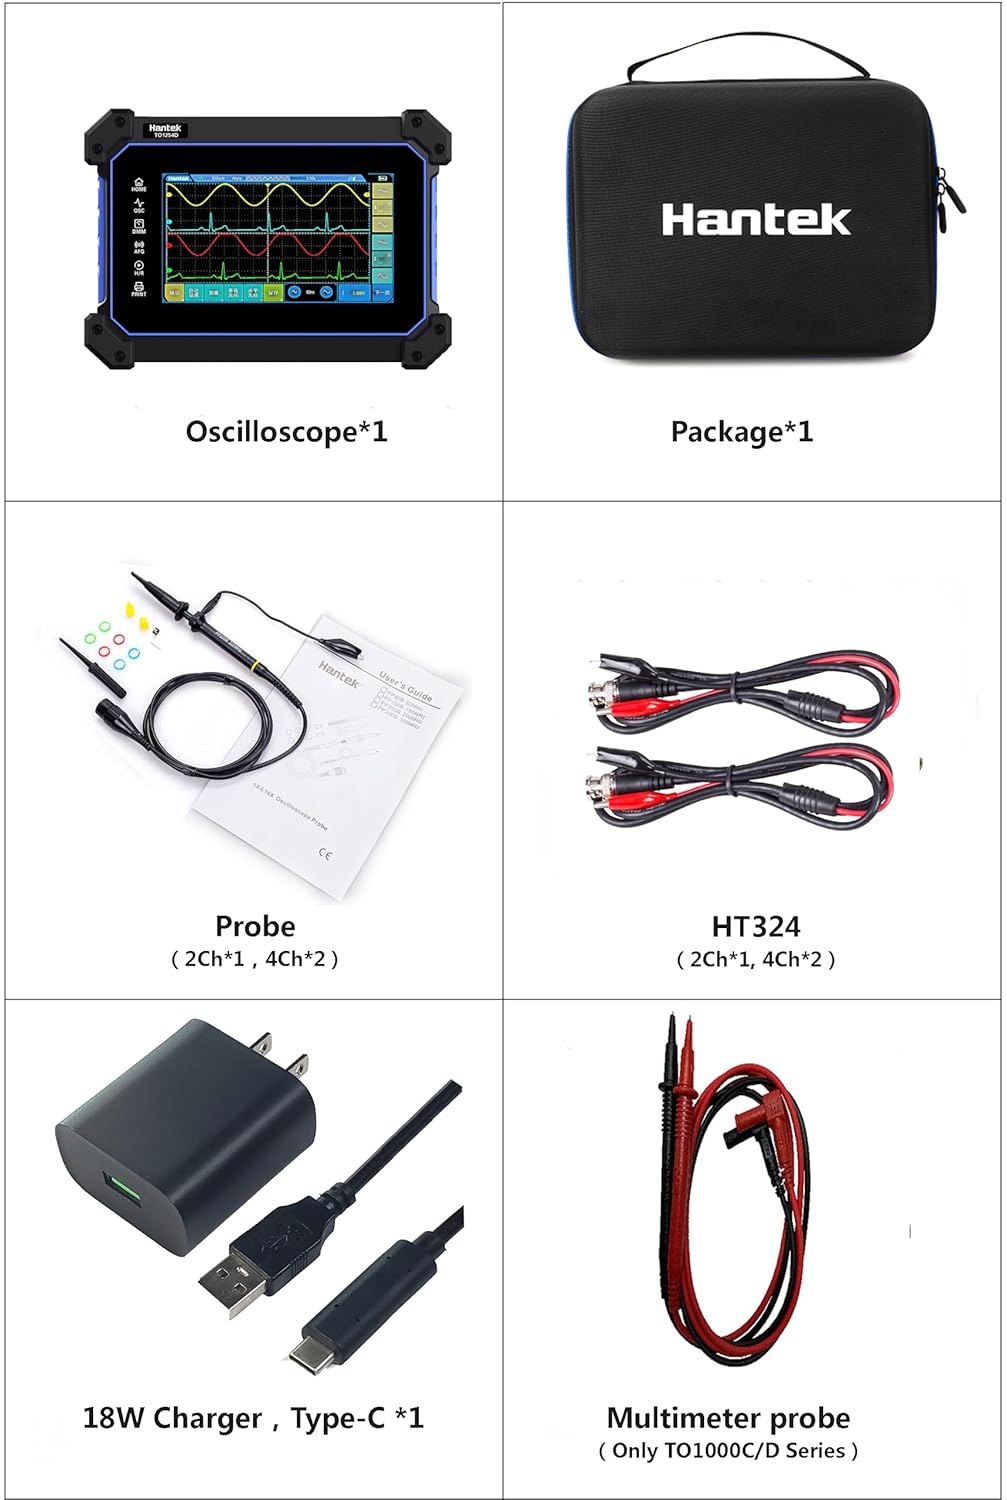
Connect the oscilloscope probes to the BNC connectors (CH1, CH2) on the top of the device. Ensure a secure connection. For multimeter functions, use the dedicated multimeter probes and connect them to the appropriate ports (V/Ω/C, COM, mA, A) on the side of the device.
Figure 2.1: Included accessories, showing oscilloscope, probes, HT324 cables, 18W Type-C charger, and multimeter probes.
3. Instruções de operação
3.1 Navegando na interface da tela sensível ao toque
The TO1000 Series features a multi-touch screen. Use gestures such as tap, swipe, and pinch-to-zoom for navigation and control. The main screen displays icons for different functions: Oscilloscope (OSC), Digital Multimeter (DMM), Arbitrary Function Generator (AFG), File Browser, Settings, and Pictures.
3.2 Função do Osciloscópio (OSC)
Tap the 'OSC' icon to enter the oscilloscope interface. Here you can view and analyze waveforms. The TO1112 model offers 2 channels with 110MHz bandwidth and 1GSa/s samptaxa de crescimento.
Seleção de canais: Select active channels (CH1, CH2) from the on-screen menu.
Escala vertical (Volts/Div): Adjust the vertical scale using touch controls to change the voltage per division.
Escala horizontal (tempo/divisão): Adjust the horizontal scale to change the time per division.
Configurações do gatilho: Configure trigger type (Edge, Slope, Pulse Width, Video, Timeout), source, and level to stabilize waveforms.
Medidas: Access automatic measurement functions for parameters like frequency, period, Vpp, Vmax, Vmin, etc.
Armazenamento de forma de onda: Use the one-key waveform storage feature to save current waveforms.
Figure 3.1: The oscilloscope interface showing multiple waveforms and measurement parameters on the touch screen.
3.3 Função Multímetro Digital (DMM)
Tap the 'DMM' icon to access the digital multimeter. This function provides high-precision measurements for various electrical parameters.
Modos de medição: Select between AC/DC voltage, current, resistance, capacitance, diode test, and on-off measurement.
Gravação de dados: The multimeter has a data recording function to monitor and record changes in voltage, current, and resistance over time, generating trend charts.
Figure 3.2: The digital multimeter interface displaying voltage readings and a trend graph.
3.4 Arbitrary Function Generator (AFG)
Tap the 'AFG' icon to enter the arbitrary function generator interface. This allows you to generate various waveforms for testing purposes.
Seleção da forma de onda: Choose from a variety of built-in arbitrary waveforms.
Frequência e Ampsolidão: Adjust the output frequency (up to 25MHz) and ampIntensidade do sinal gerado.
Modulação: Support for AM/FM modulation.
Impedância de saída: Switch between high resistance and low resistance output.
Figure 3.3: The arbitrary function generator interface, showing waveform selection and parameter adjustments.
4. Manutenção
4.1 Limpando o Dispositivo
Use a soft, dry cloth to clean the exterior of the oscilloscope. For the touch screen, use a screen-specific cleaning solution and a microfiber cloth. Avoid using abrasive cleaners or solvents that could damage the screen or casing.
4.2 Cuidados com a bateria
The device is equipped with a high-capacity lithium battery. To prolong battery life:
Evite descarregar completamente a bateria com frequência.
Store the device in a cool, dry place when not in use for extended periods, with the battery charged to approximately 50-70%.
Use only the provided 18W Type-C charger or a compatible charger to prevent damage.
4.3 Armazenamento
When storing the device, especially for long periods, ensure it is powered off and placed in a protective case to prevent physical damage. The suspension foot design allows for stable placement on various surfaces.
Figure 4.1: The suspension foot design allows for hands-free operation and stable positioning.
5. Solução De Problemas
5.1 O dispositivo não liga
Verifique a bateria: Certifique-se de que a bateria esteja suficientemente carregada. Conecte o dispositivo ao carregador e aguarde alguns minutos antes de tentar ligá-lo novamente.
Conexão do carregador: Verify that the Type-C charger is properly connected to both the device and a working power outlet.
Botão de energia: Ensure the power button is pressed and held for the required duration (typically a few seconds) to initiate power-on.
5.2 Leituras incorretas ou instáveis
Conexão da sonda: Ensure all probes (oscilloscope or multimeter) are securely connected to the device and the circuit under test. Loose connections can cause erratic readings.
Compensação da sonda: For oscilloscope probes, perform probe compensation if waveforms appear distorted (e.g., overshoots or undershoots). Refer to the detailed user manual for compensation procedures.
Faixa de medição: Garanta o vol corretotage/current/resistance range is selected for the multimeter function.
Fatores ambientais: Strong electromagnetic interference can affect measurements. Operate the device in a stable environment.
Tela sensível ao toque de 5.3 polegadas não responde.
Reiniciar dispositivo: If the touch screen becomes unresponsive, try restarting the device by holding down the power button.
Tela limpa: Certifique-se de que a tela esteja limpa e livre de detritos ou umidade que possam interferir na entrada por toque.
6. Especificações
Recurso
Especificação
Fabricante
Hantek Qingdao
Número do modelo
YQH-TO1112
Peso do item
1.5 kg
Dimensões do produto
21 x 11 x 16 cm
Baterias
1 bateria de metal de lítio necessária (incluída)
Canais do Osciloscópio
2 canais
Largura de banda
110 MHz
SampTaxa de ling
250MSa/s (for TO1112)
Profundidade de Armazenamento
8M
Fonte de sinal
Not included in TO1112 (available in 'D' models)
Função multímetro
Sim
O quetage
10 watts
Precisão de medição
0.5%
Certificações
CE, ISO 9001, RoHS
Material
Estireno de acrilonitrila-butadieno
Cor
Multicolorido
7. Garantia e Suporte
7.1 Informações de garantia
Please refer to the warranty card included with your product for specific warranty terms and conditions. Generally, Hantek products come with a limited warranty covering manufacturing defects from the date of purchase. Keep your proof of purchase for warranty claims.
7.2 Suporte Técnico
For technical assistance, troubleshooting, or service inquiries, please contact Hantek customer support. You can typically find contact information on the official Hantek website or through the retailer where you purchased the product. When contacting support, please have your product model number (TO1112) and serial number ready.
Documentos relacionados - TO1112
Manual do Usuário do Osciloscópio Portátil Série Hantek2000 Manual do usuário completo para os osciloscópios portáteis da série Hantek2000, detalhando recursos, operação, funções do multímetro digital, geração de sinal, solução de problemas e especificações técnicas para modelos como Hantek2C72, Hantek2C42, Hantek2D72 e Hantek2D42.
Manual do Usuário do Osciloscópio Portátil Série Hantek2000 V1.1 Este manual do usuário fornece instruções e especificações completas para o osciloscópio portátil da série Hantek2000, abrangendo seus recursos, operação, diretrizes de segurança, solução de problemas e detalhes técnicos.
Manual do Usuário do Osciloscópio de Diagnóstico Automotivo Hantek2D82 | Guia Completo Explore o Osciloscópio de Diagnóstico Automotivo Hantek2D82. Este manual do usuário fornece informações detalhadas sobre seus recursos, operação, segurança, especificações técnicas e solução de problemas para diagnóstico automotivo, DMM e geração de formas de onda.