1. Informações de segurança
Leia e compreenda sempre todo o manual de instruções antes de operar o gerador. O não cumprimento das instruções pode resultar em ferimentos graves ou morte.
- Perigo de monóxido de carbono: Generators produce carbon monoxide, an odorless, colorless gas that can kill you. Operate generators outdoors only, far away from windows, doors, and vents.
- Risco de choque elétrico: Never operate the generator in wet conditions. Ensure all connections are dry and properly insulated.
- Risco de incêndio: Gasoline is highly flammable. Fill the fuel tank in a well-ventilated area with the engine off and cool. Do not smoke while refueling.
- Superfícies Quentes: The generator's engine and muffler become very hot during operation. Avoid touching hot surfaces to prevent burns.
- Proteção auditiva: Prolonged exposure to generator noise can cause hearing damage. Use appropriate hearing protection.
- Crianças e animais de estimação: Mantenha sempre crianças e animais de estimação longe do gerador.
2. Componentes do produto
Familiarize yourself with the key components of your PowerSmart 2580-Watt Portable Inverter Generator.

Figura 2.1: Painel de Controleview. This image displays the generator's control panel, highlighting key features such as the Overload Indicator, Energy-Saving Switch, On/Off Switch, 120V AC Outlets, 12V DC Outlet, and 5V USB Port. Understanding these controls is essential for safe and efficient operation.
- Painel de controle: Features the main engine switch, various power outlets, and indicator lights.
- Tampa do tanque de combustível: Para adicionar gasolina.
- Recuo de partida: Mecanismo de arranque manual por tração.
- Tampa do filtro de ar: Provides access to the air filter for maintenance.
- Abastecimento de óleo/Vareta de medição: For adding and checking engine oil.
- Saída de exaustão: Releases engine exhaust.
- Alça de transporte: Para facilitar o transporte.
3. Configuração
3.1 Desembalagem
Carefully remove the generator from its packaging. Inspect for any shipping damage. Ensure all included accessories are present: wrench, oil funnel, and propane hose connector (if applicable for dual-fuel models).
3.2 Adicionando Óleo do Motor
The generator is shipped without engine oil. You must add the correct amount of oil before first use. Failure to do so will cause severe engine damage and void the warranty.
- Coloque o gerador em uma superfície nivelada.
- Remova a tampa de abastecimento de óleo / vareta medidora de nível.
- Using the provided funnel, slowly add 10W-30 4-cycle engine oil until the oil level reaches the upper mark on the dipstick. This model requires approximately 16.2 fluid ounces (0.48 liters).
- Reinstall the oil fill cap/dipstick securely.
3.3 Abastecendo com combustível (gasolina)
Use only fresh, unleaded gasoline with an octane rating of 87 or higher. Do not use E85 or any gasoline containing more than 10% ethanol.
- Certifique-se de que o motor esteja desligado e frio.
- Remova a tampa do tanque de combustível.
- Slowly pour gasoline into the fuel tank, being careful not to overfill. The tank capacity is 1.05 gallons (4 liters).
- Recoloque a tampa do tanque de combustível firmemente.
3.4 Connecting Propane (for Dual Fuel models)
If your model supports dual fuel, you can connect a propane tank.
- Ensure the generator is off and the propane tank valve is closed.
- Connect one end of the provided propane hose to the generator's propane inlet.
- Connect the other end of the hose to a standard 20lb propane tank.
- Aperte todas as conexões com segurança.
- Abra lentamente a válvula do tanque de propano.
4. Instruções de operação
4.1 Iniciando o gerador
Always operate the generator in a well-ventilated outdoor area, away from any structures.
- Ensure the generator has sufficient oil and fuel (gasoline or propane).
- Turn the main engine switch to the "ON" position. If starting cold, turn to "CHOKE" first, then move to "ON" once the engine starts.
- Puxe a alavanca de arranque retrátil com firmeza e constância até o motor ligar.
- Deixe o motor aquecer por alguns minutos antes de conectar qualquer carga elétrica.
4.2 Conexão de Dispositivos Elétricos
Connect devices one at a time, starting with the highest wattage dispositivo.
- Plug your electrical devices into the appropriate AC 120V outlets, DC 12V outlet, or USB ports.
- Do not overload the generator. The Overload Indicator light will illuminate if the generator is overloaded. If this happens, disconnect devices and restart the generator.
- For sensitive electronics, ensure the Eco Mode is engaged for stable power delivery.
4.3 Parando o gerador
- Desconecte todas as cargas elétricas do gerador.
- Turn the main engine switch to the "OFF" position.
- Se estiver usando propano, feche a válvula do cilindro de propano.
- Allow the generator to cool down completely before storing.
5. Manutenção
Regular maintenance ensures optimal performance and extends the life of your generator. Always perform maintenance with the engine off and cool.
5.1 Verificação e troca do óleo do motor
- Verifique o óleo: Before each use, check the oil level using the dipstick. Add oil if necessary.
- Trocar óleo: Change the engine oil after the first 20 hours of operation, and every 100 hours or 6 months thereafter.
5.2 Manutenção do filtro de ar
- Inspecionar: Inspect the air filter every 50 hours or 3 months.
- Limpar/Substituir: Clean or replace the air filter element if it is dirty or damaged.
5.3 Inspeção da vela de ignição
- Inspecionar: Inspect the spark plug every 100 hours or 6 months.
- Limpar/Substituir: Clean or replace the spark plug if it is fouled or worn.
5.4 Armazenamento
For long-term storage (more than 30 days), prepare the generator as follows:
- Esvazie o tanque de combustível e o carburador. Ligue o motor até que ele pare por falta de combustível.
- Add a fuel stabilizer to fresh gasoline if you plan to keep fuel in the tank.
- Troque o óleo do motor.
- Limpe o filtro de ar.
- Guarde o gerador em local limpo, seco e bem ventilado.
6. Solução De Problemas
Esta seção fornece soluções para problemas operacionais comuns. Para problemas não listados aqui, entre em contato com o suporte ao cliente.
| Problema | Possível causa | Solução |
|---|---|---|
| O motor não pega | No fuel; Low oil level; Choke not set correctly; Spark plug issue | Add fuel; Add oil; Adjust choke; Inspect/replace spark plug |
| Sem saída de energia | Sobrecarga; Disjuntor desarmado; Dispositivo com defeito | Reduzir a carga; Reiniciar o disjuntor; Verificar o dispositivo |
| O motor funciona mal | Stale fuel; Dirty air filter; Incorrect spark plug gap | Use fresh fuel; Clean/replace air filter; Adjust/replace spark plug |
| Ruído excessivo | Loose components; Muffler damage | Check for loose parts; Inspect muffler for damage |
7. Especificações
| Recurso | Detalhe |
|---|---|
| Marca | PowerSmart |
| Nome do modelo | Gerador inversor |
| Wat começandotage | 2580 Watts |
| Corrida de Águatage | 1900 Watts |
| Tipo de combustível | Gasolina |
| Tipo de motor | 4 tempos, 79 centímetros cúbicos |
| Capacidade do tanque de combustível | 1.05 galões |
| Tempo de execução (50% de carga) | Até 5.7 horas |
| Nível de ruído (50% de carga) | 56 dB a 23 pés |
| Peso do item | 40 libras |
| Dimensões do produto | 19.1"C x 13.4"L x 20.1"A |
| Volumetage | 120 Volts |
| Total de tomadas | 2 (120V 20A), 1 (12V DC), 2 (USB) |
| Características especiais | Portable, Super Quiet, Pure Sine Wave, Parallel Capable, Low Oil Shutdown, Overload Protection, Carbon Monoxide Auto-Shutdown |
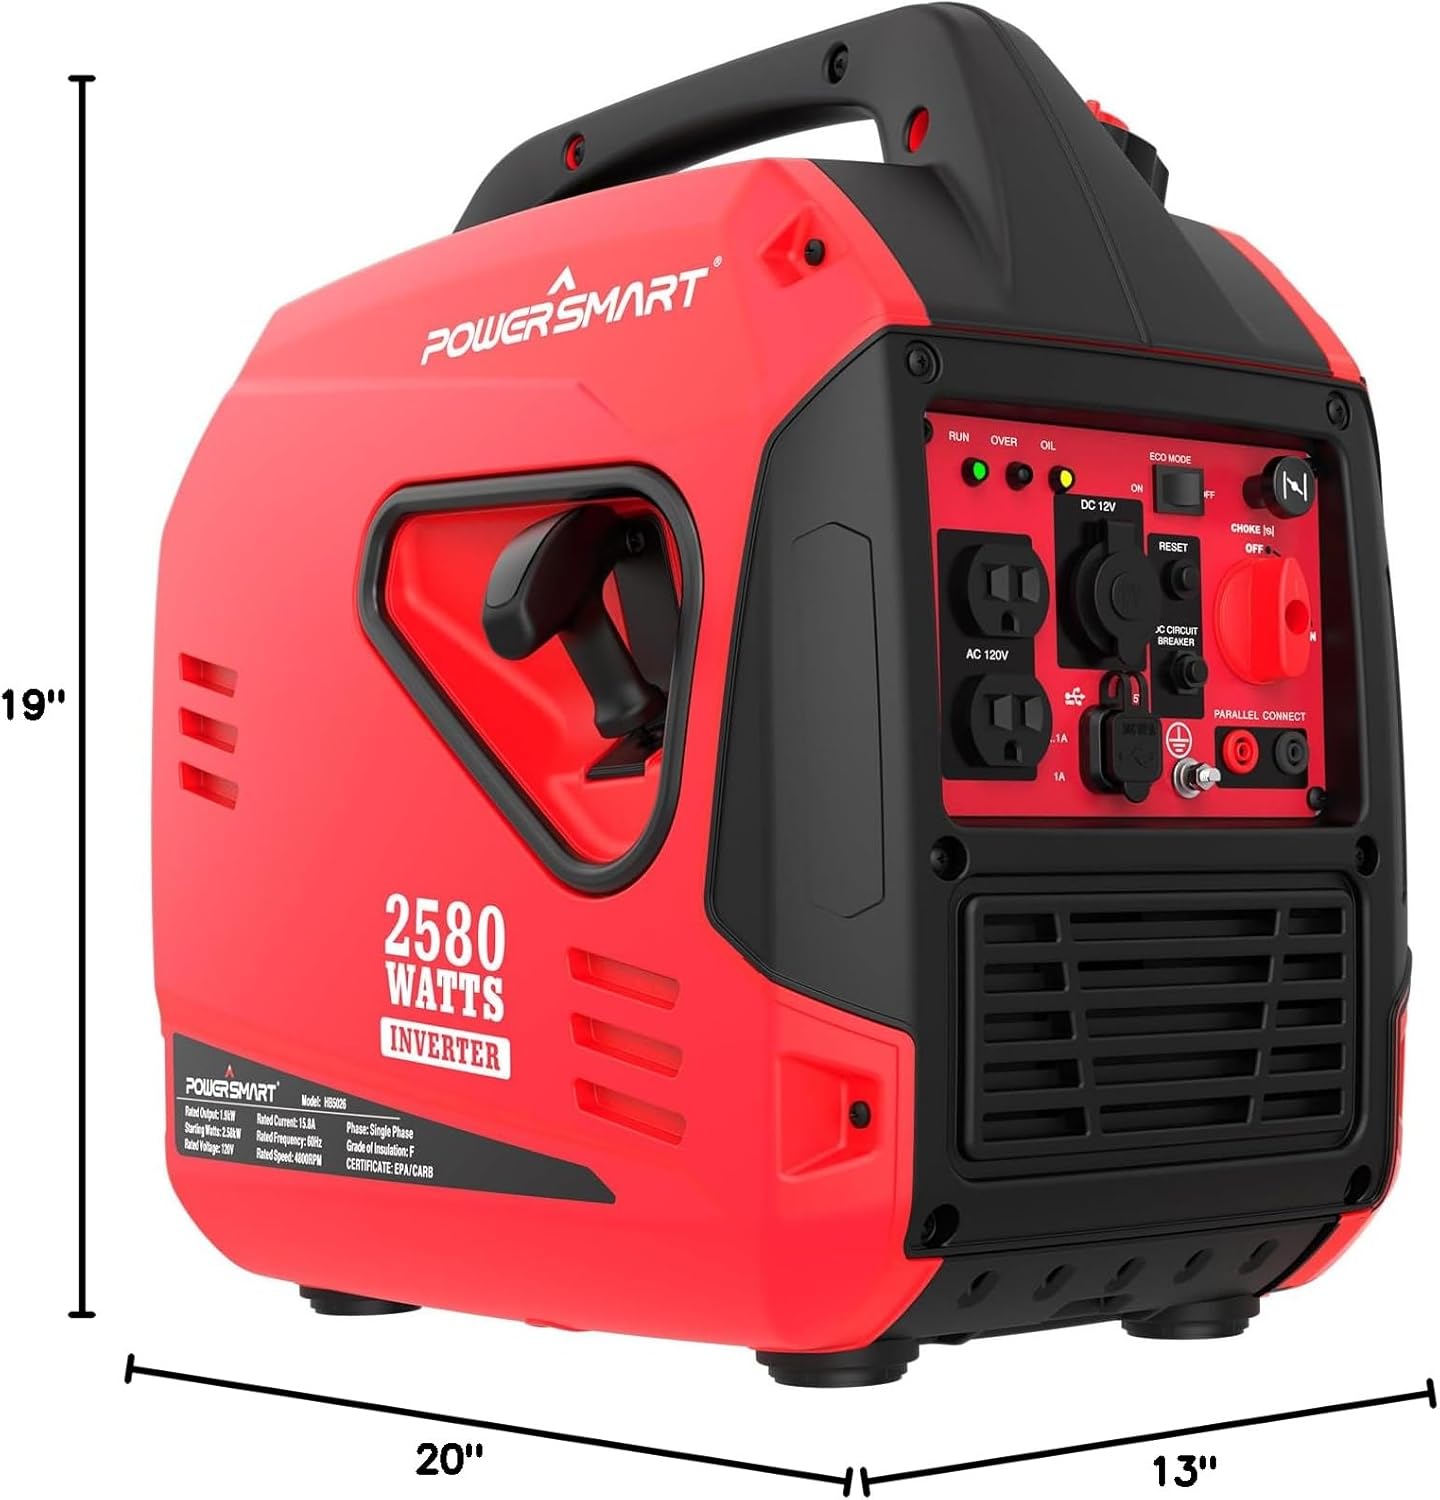
Figure 7.1: Generator Dimensions. This image illustrates the compact dimensions of the PowerSmart 2580-Watt Portable Inverter Generator, showing its length, width, and height for easy storage and transport.
8. Garantia e suporte
For warranty information, technical support, or to order replacement parts, please contact PowerSmart customer service.
- Atendimento ao Cliente: Refer to your product registration card or visit the official PowerSmart website para detalhes de contato.
- Recursos on-line: Additional support and FAQs may be available on the PowerSmart Store.