1. Introdução
Thank you for choosing the IMAGE HL420 Rechargeable Ultra-Bright Barbecue Grill Light. This versatile and durable light is designed to provide optimal illumination for your grilling, outdoor cooking, and various other tasks. Featuring a flexible gooseneck, magnetic base, and dual power options, it ensures convenience and reliability.
2. Conteúdo da embalagem
Verifique se todos os itens listados abaixo estão incluídos no seu pacote:
- 2 x IMAGE HL420 Barbecue Grill Lights
- 2 x Rechargeable 18650 Batteries (pre-installed or separate)
- 2 x USB Charging Cables (pin connector)
- 2 x Metal Plates with Adhesive Backing

Image: Contents of the HL420 Grill Light package.
3. Recursos do Produto
- Ultra-Bright LED Illumination: Provides powerful and clear lighting for various tasks.
- Pescoço de ganso flexível: Allows for 360° adjustment of the light angle and precise positioning.
- Distância focal ajustável: Easily customize the light beam from wide flood to focused spot.
- Base magnética: Securely attaches to most ferrous metal surfaces for hands-free operation.
- Opções de energia dupla: Operates with the included rechargeable 18650 battery or 3 AAA batteries (not included).
- Recarregável USB: Convenient charging via USB cable with an indicator light.
- Construção durável em liga de alumínio: Built to withstand high temperatures and outdoor conditions.
- Metal Plates Included: For attaching the light to non-magnetic surfaces.
4. Configuração
4.1 Instalação da bateria
The grill light can be powered by either one 18650 rechargeable battery (included) or three AAA batteries (not included).
- Unscrew the bottom cap of the light to access the battery compartment.
- Insert one 18650 rechargeable battery with the positive (+) end facing towards the gooseneck, or insert three AAA batteries into the provided adapter, then place the adapter into the compartment.
- Securely screw the bottom cap back on.
4.2 Charging the 18650 Battery
To charge the included 18650 rechargeable battery:
- Locate the charging port on the side of the light's body, usually protected by a rubber cover.
- Gently lift the rubber cover and insert the small pin connector of the USB charging cable into the port.
- Connect the USB-A end of the cable to a standard USB power source (e.g., wall adapter, power bank, computer USB port).
- The LED indicator on the light will show vermelho durante o carregamento e gire verde quando totalmente carregada.
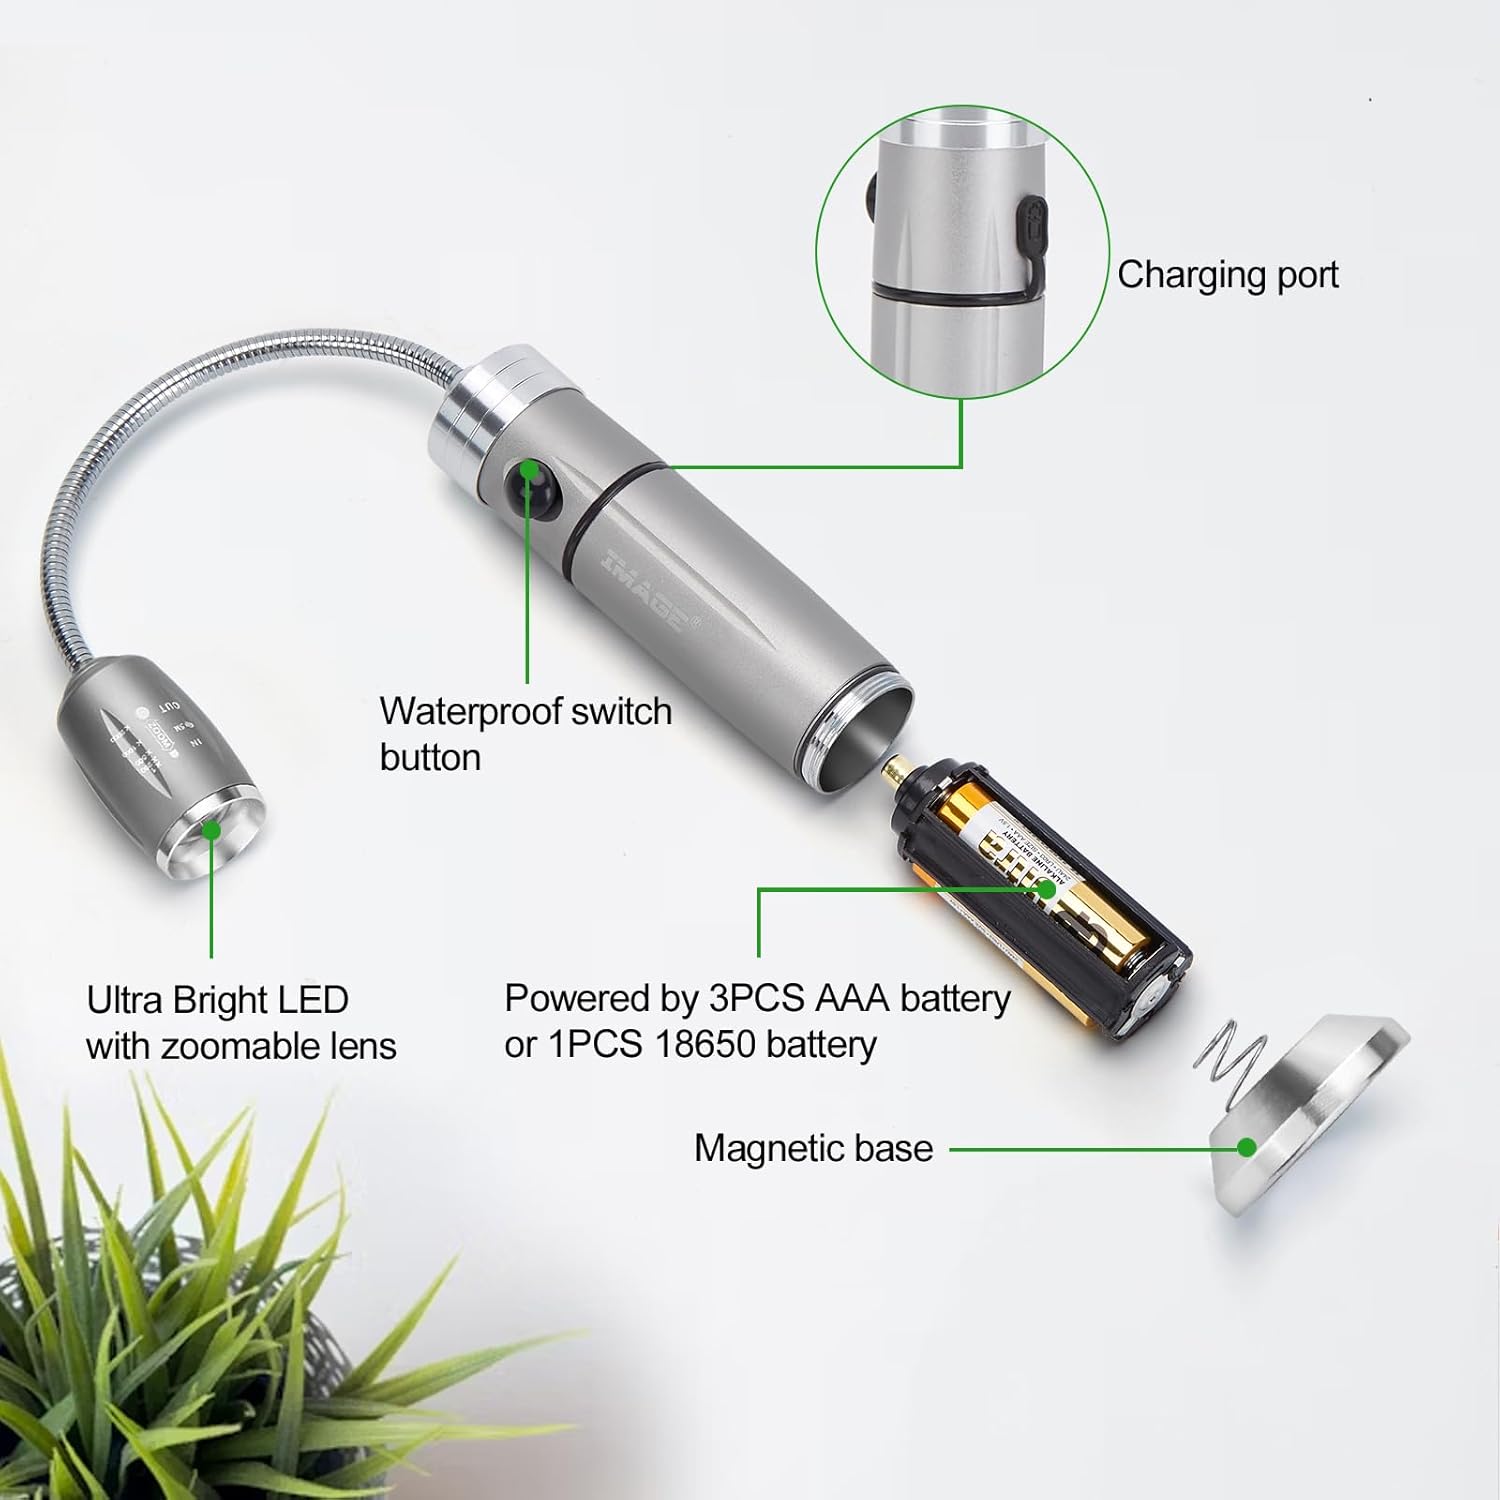
Image: Internal components and power options.

Image: USB charging with LED indicator.
4.3 Fixação da luz
The light features a strong magnetic base for easy attachment to metal surfaces.
- Para superfícies metálicas: Simply place the magnetic base directly onto any ferrous metal surface, such as a grill lid, car hood, or metal shelf.
- For Non-Metal Surfaces: Use the included metal plates. Peel off the adhesive backing from a metal plate and firmly press it onto the desired non-magnetic surface. Once the plate is secured, you can attach the light's magnetic base to the metal plate.

Image: Magnetic base attachment to steel surfaces.

Image: Using metal plates for non-magnetic surfaces.
5. Instruções de operação
5.1 Ligar/Desligar
Press the power button located on the body of the light once to turn it on. Press the button again to turn it off.
5.2 Adjusting the Gooseneck
The flexible gooseneck allows you to direct the light exactly where it's needed. Simply bend and twist the gooseneck to achieve your desired angle and position.

Image: Flexible gooseneck adjustment.
5.3 Adjusting Focal Distance and Lighting Range
The head of the light features an adjustable lens. Gently slide the head of the light forward or backward to change the focal distance and adjust the lighting range from a wide floodlight to a concentrated spotlight.

Image: Adjustable focal distance and lighting range.
5.4 Aplicações Versáteis
Beyond grilling, the HL420 light is ideal for various tasks requiring focused illumination:
- Automotive repairs (under the hood)
- Workshop tasks
- Campatividades ao ar livre e
- Luz de leitura
- Iluminação de emergência

Image: Grill lights in use during a barbecue.

Image: Versatile applications in various settings.
5.5 Vídeo de Demonstração do Produto
Video: A comprehensive demonstration of the Rechargeable Ultra-Bright Barbecue Grill Light's features and functionality, including its flexible gooseneck, adjustable focus, magnetic base, and charging process.
6. Manutenção
- Limpeza: Limpe a luz com um pano macio e damp cloth. Do not use abrasive cleaners or immerse the light in water.
- Cuidados com a bateria: If storing the light for an extended period, remove the 18650 battery to prevent potential leakage. Recharge the battery periodically to maintain its lifespan.
- Armazenar: Guarde a lâmpada em local fresco e seco, longe da luz solar direta e de temperaturas extremas.
7. Solução De Problemas
| Problema | Possível causa | Solução |
|---|---|---|
| A luz não acende. | A bateria está descarregada ou instalada incorretamente. | Recharge the 18650 battery or replace AAA batteries. Ensure batteries are inserted with correct polarity. |
| A luz está fraca. | Bateria fraca. | Recharge the 18650 battery or replace AAA batteries. |
| Magnetic base not sticking. | Surface is non-ferrous metal or non-magnetic. | Use the included adhesive metal plates on non-magnetic surfaces. |
| O indicador de carregamento não está funcionando. | Cable not properly connected or battery already full. | Ensure the charging cable is securely connected to both the light and the power source. Check if the battery is already fully charged (green light). |
8. Especificações
| Número do modelo | HL420 |
| Marca | IMAGEM |
| Fonte de luz | LIDERADO |
| Material | Liga de alumínio |
| Fonte de energia | 1 x 18650 Rechargeable Battery (included) or 3 x AAA Batteries (not included) |
| Volumetage | 3 Volts |
| Tipo de montagem | base magnética |
| Comprimento do pescoço de ganso | Aproximadamente 5 polegadas (13 cm) |
| Altura da Base | Aproximadamente 3.9 polegadas (10 cm) |
| Item Weight (per light) | Aprox. 0.5 lbs (0.23 kg) |
| Quantidade da embalagem | 2 Luzes |
| Fabricante | Brainytrade |
| País de origem | China |
9. Garantia e suporte
Para informações sobre garantia ou suporte técnico, consulte a embalagem do produto ou entre em contato diretamente com o vendedor através da plataforma onde realizou a compra. Guarde o comprovante de compra como prova de aquisição.


