1. Introdução
Thank you for choosing the EazeID D210S Label Maker. This portable device is designed for efficient and versatile labeling, suitable for various environments including home, office, and school. Featuring a user-friendly QWERTY keyboard and dual power options, it produces durable, laminated labels resistant to water, abrasion, fading, and temperature changes.
This manual provides detailed instructions on how to set up, operate, and maintain your label maker to ensure optimal performance and longevity.
2. Configuração
2.1. Conteúdo da embalagem
Antes de começar, verifique se todos os itens estão presentes na sua embalagem:
- EazeID D210S Gray label maker (1 unit)
- Sample label tape waterproof (12mm 0.47 laminated White, 4M) (1 unit)
- Cabo tipo C (1 unidade)
- Manual do usuário (1 unidade)

Image: Contents of the EazeID D210S Label Maker package, including the device, sample tape, Type-C cable, and manual.
2.2. Ligando o dispositivo
The EazeID D210S label maker offers two power options:
- Cabo USB Tipo-C: Connect the included Type-C cable to the label maker and a compatible power adapter (not included). The device does not support charging via Type-C; it operates directly from the power source.
- Pilhas AAA: For portable use, insert 6 AAA batteries (not included) into the battery compartment located on the underside of the device. Ensure correct polarity.
Observação:
- It is recommended to use a charger block with an output voltage of ±5V when using the Type-C cable.
- Do not leave batteries in the printer when it is powered by the USB Type-C cable.

Image: Illustration of the label maker's dual power options: USB Type-C for continuous power and AAA batteries for portability.
2.3. Instalação da fita de etiqueta
Para instalar a fita de etiquetas:
- Open the tape compartment cover on the back of the label maker.
- Insert the label tape cassette with the tape facing the print head. Ensure the tape is properly aligned and clicks into place.
- Feche bem a tampa do compartimento da fita.
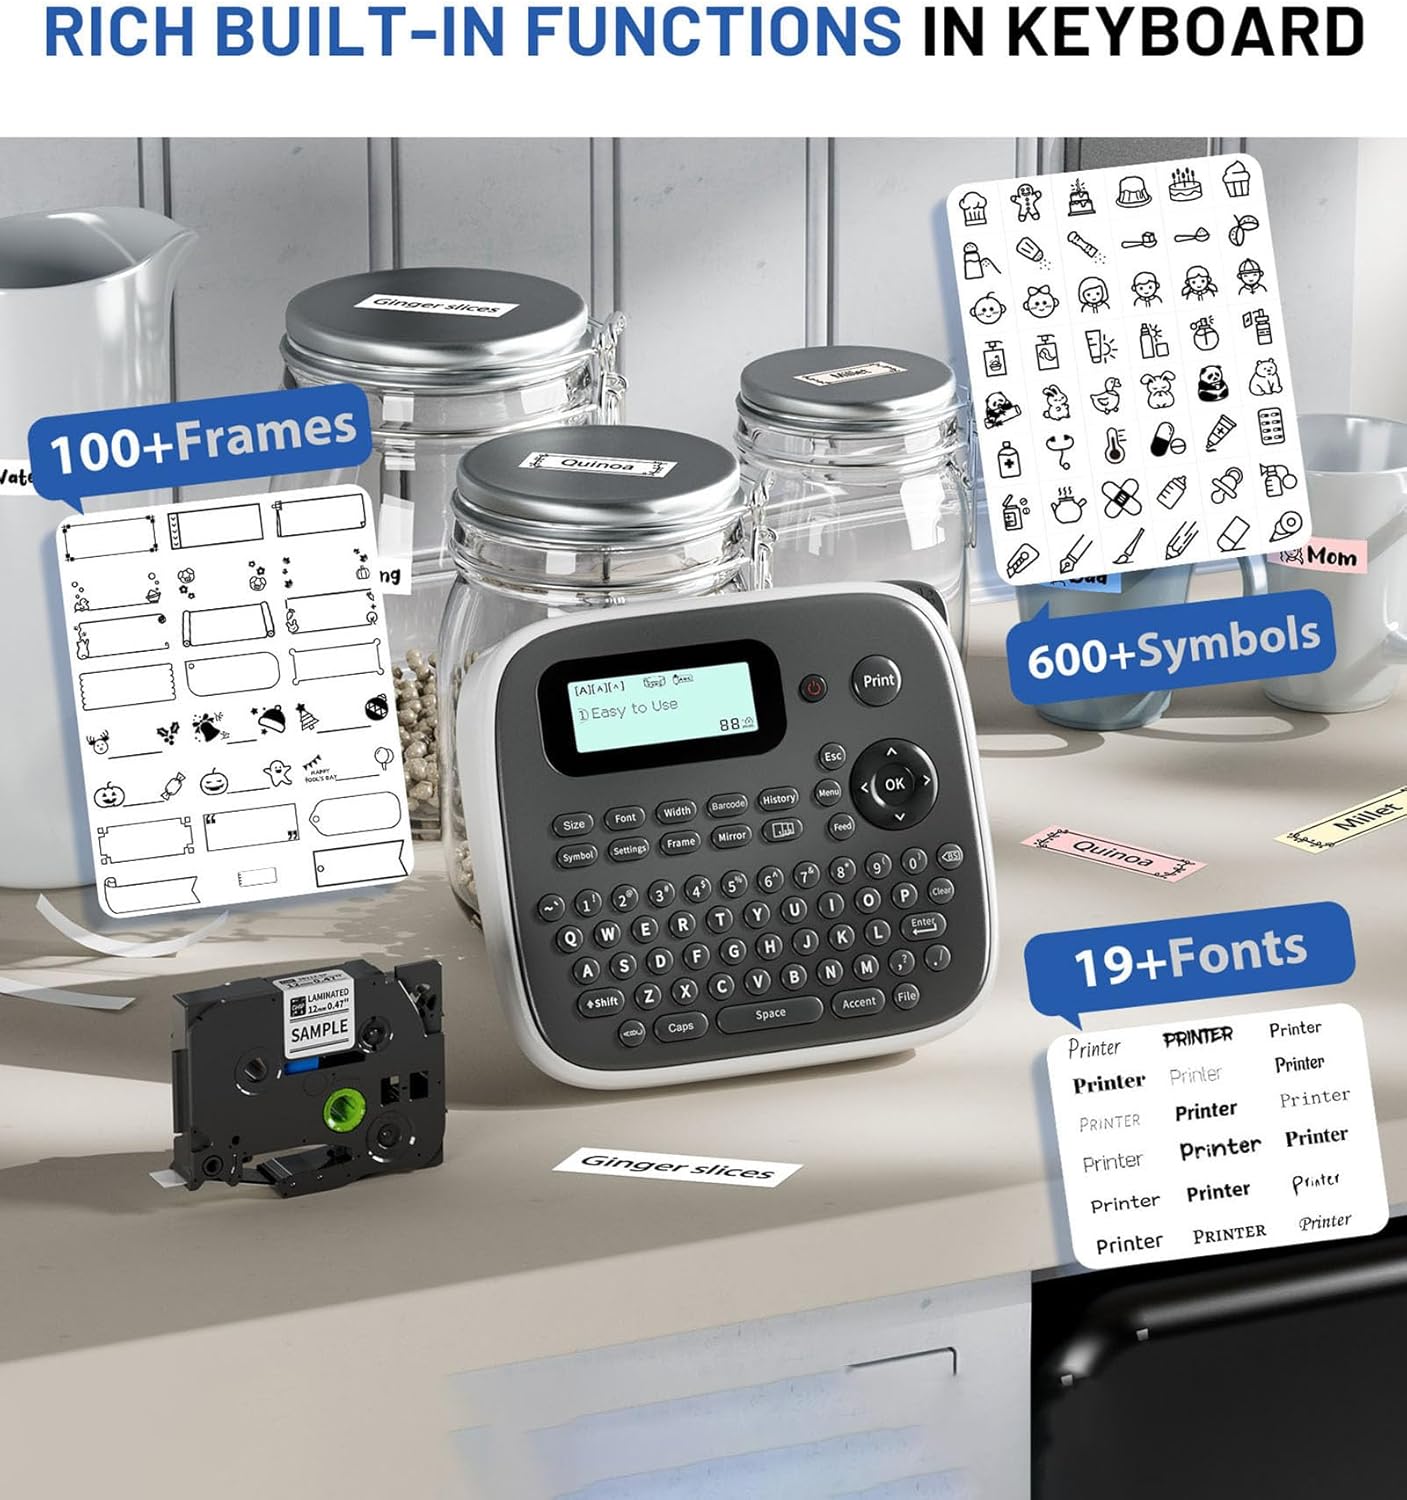
Image: The label maker with its tape compartment open, illustrating the tape installation area and the integrated cutter.
3. Instruções de operação
3.1. Basic Label Creation
Follow these steps to create a basic label:
- Ligar: Pressione o botão liga/desliga para ligar a etiquetadora.
- Entrada de teclado: Use o teclado QWERTY para digitar o texto desejado. O texto aparecerá na tela LCD.
- Imprimir: Pressione o Imprimir botão para imprimir a etiqueta.

Image: A visual guide demonstrating the simple three-step process to operate the label maker.
3.2. Text Formatting and Special Functions
The D210S label maker includes a variety of built-in functions to customize your labels:
- Estilos de fonte: Access 16 font styles using the dedicated Fonte chave.
- Símbolos: Choose from over 640 symbols using the Símbolo chave.
- Molduras: Apply over 100 frames to your labels using the Quadro chave.
- Outras funções: Utilize keys for Size, Width, Barcode, History, Mirror, and more for advanced customization.

Image: The label maker showcasing its extensive library of frames, symbols, and font options for creative labeling.
3.3. Printing Multiple Labels
The D210S offers efficient options for printing multiple labels:
- Multi-Copy Editing: Use the multi-copy editing one-touch key to continuously edit and print up to 55 different labels. This is ideal for creating a series of unique labels without re-entering the menu.
- Printing Identical Labels: To print multiple copies of the same label, it is advisable to print them all at once and then cut them individually. You can specify the number of copies (1-9) by pressing Mudança + Imprimir, then using the navigation keys or a number key, and finally pressing OK or Imprimir.

Image: A flowchart demonstrating how to use the multi-copy function for sequential label printing.

Image: A guide on how to efficiently print multiple identical labels using the Shift + Print key combination.
3.4. Clearing Text
To clear text or formatting:
- Delete Letters One by One: Pressione o BS (Retrocesso) chave.
- Delete All Text and Format: Imprensa Claro → OK → [Texto e Formato] → OK.
- Delete Text Only: Imprensa Claro → [Somente texto] → OK.

Image: A step-by-step guide on using the Clear function to remove text or formatting from the label maker's display.
3.5. Utilizando o cortador integrado
After printing, use the integrated cutter to cleanly separate your label from the tape roll. The cutter is located on the side of the device. Press the cutter lever firmly to cut the label.
3.6. Optimizing Label Tape Usage
To reduce label tape costs, it is recommended to set the label margin to "Narrow" in the device settings. Navigate to Configurações → Margem → Estreito.
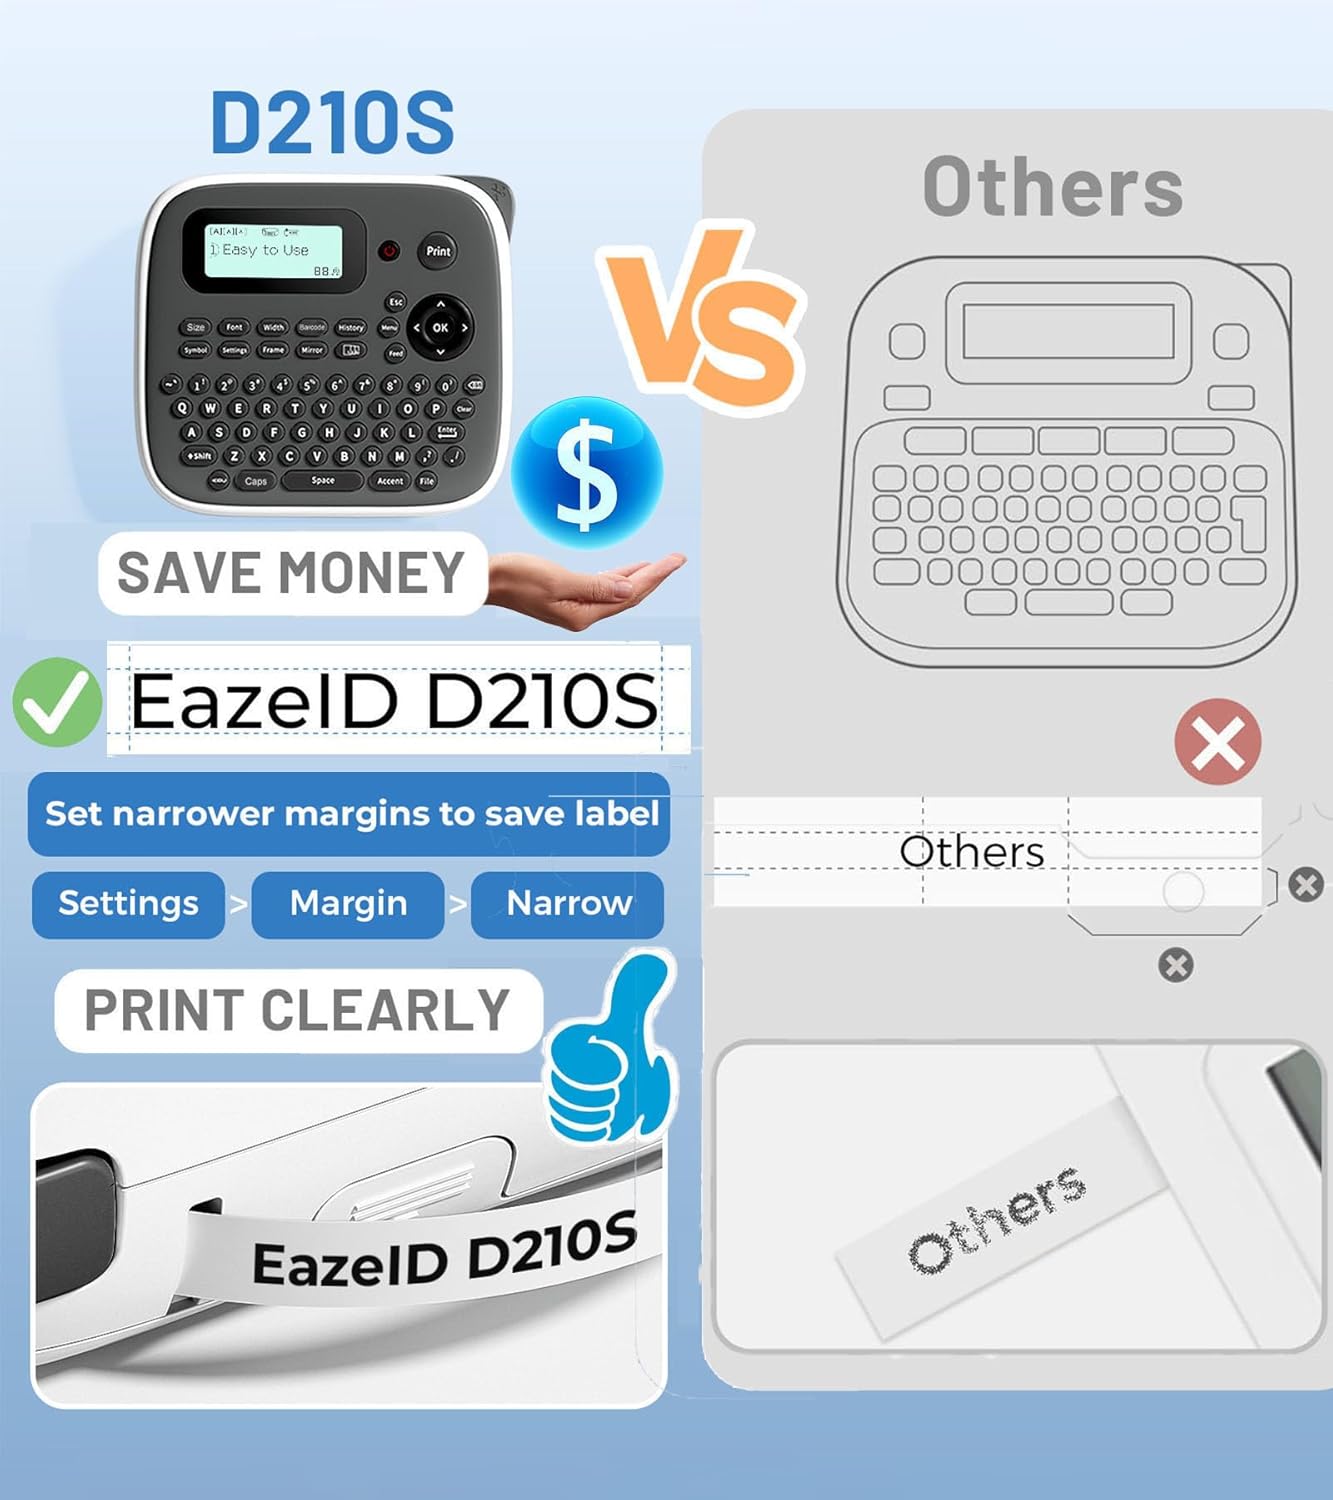
Image: A visual comparison highlighting the tape-saving benefit of using the 'Narrow' margin setting on the D210S.
4. Manutenção
4.1. Limpeza
To ensure optimal performance and print quality, regularly clean your label maker:
- Limpe a parte externa do dispositivo com um pano macio e seco.
- If the print head becomes dirty, gently wipe it with a cotton swab dampened with isopropyl alcohol. Ensure the device is turned off and disconnected from power before cleaning.
- Remove any dust or debris from the tape compartment.
4.2. Tape Replacement
When the label tape runs out or you wish to change tape types, follow the tape installation instructions in Section 2.3. Ensure you use compatible EazeID D210S label tapes for best results.
4.3. Armazenamento
Store the label maker in a cool, dry place away from direct sunlight and extreme temperatures. If storing for an extended period, remove the AAA batteries to prevent leakage.
5. Solução De Problemas
If you encounter issues with your EazeID D210S Label Maker, refer to the following common problems and solutions:
| Problema | Possível causa | Solução |
|---|---|---|
| O dispositivo não liga | Low or dead batteries; USB cable not connected properly; incorrect power adapter. | Replace AAA batteries; ensure USB Type-C cable is securely connected; use a compatible 5V power adapter. |
| Poor print quality (faint, blurry, or missing lines) | Dirty print head; incorrect tape installation; low tape quality. | Clean the print head (see Section 4.1); re-install label tape correctly; ensure you are using genuine EazeID D210S compatible tape. |
| Tape jams frequently | Improper tape installation; foreign objects in tape path; tape not feeding smoothly. | Re-install tape, ensuring it is seated correctly; check for and remove any obstructions; ensure tape is not creased or damaged. |
| Label not cutting properly | Lâmina de corte cega ou obstruída. | Ensure no tape residue is blocking the cutter; if issues persist, contact customer support. |
| Mensagem de erro na tela | Condição de erro específica. | Refer to the on-screen message for guidance. Common errors relate to tape issues (e.g., "Tape End"). Follow instructions or re-install tape. |
6. Especificações
| Nome do modelo | D210S Gray Label Maker Machine |
| Marca | EazeID |
| Tecnologia de impressão | Térmico |
| Tecnologia de Conectividade | Teclado |
| Tamanho máximo da mídia | 12 mm |
| Resolução máxima de impressão a cores | 180 DPI |
| Resolução máxima de impressão em preto e branco | 203 DPI |
| Fonte de energia | Type-C Cable or 6 AAA Batteries |
| Dimensões do produto | 5 x 5 x 2 polegadas |
| Peso do item | 1.26 libras |
| Componentes incluídos | Label maker, Sample label tape, Type-C Cable, User Manual |
| Número máximo de cópias por execução | 55 (different labels) |
7. Garantia e Suporte
7.1. Informações de garantia
The EazeID D210S Label Maker comes with a limited warranty. Please refer to the warranty card included in your package or visit the official EazeID webConsulte o site para obter os termos e condições detalhados referentes à cobertura e duração da garantia.
7.2. Suporte ao cliente
For technical assistance, troubleshooting not covered in this manual, or inquiries about replacement parts and accessories, please contact EazeID customer support. Contact information can typically be found on the EazeID official website ou na embalagem do produto.
8. Vídeos de Produtos
Não foram encontrados vídeos oficiais do produto fornecidos pelo vendedor nos dados disponíveis para inclusão neste manual.


