1. Introdução
This manual provides detailed instructions for the installation, operation, and maintenance of your Unitek HDMI KVM Switch (Model SJW-KM202B). This device allows you to control two computers using a single set of dual HDMI monitors, a keyboard, a mouse, and other USB 3.0 peripherals. It supports resolutions up to 4K@60Hz, enhancing productivity in both home and office environments.
Nota importante: This product is designed for use with desktop hosts only and is not compatible with laptops. Ensure all necessary cables, including the USB A-to-B cables and HDMI cables, are connected for full functionality.
2. Conteúdo da embalagem
Verifique se todos os itens listados abaixo estão incluídos no seu pacote:
- 1 x Unitek HDMI KVM Switch (Model SJW-KM202B)
- 2 x USB A to B Cables
- 1 x Desktop Controller
- 1 x adaptador de alimentação DC 5V/2A
- 1 x Manual do Usuário

The image above displays the Unitek HDMI KVM Switch along with its complete set of accessories, including the main switch unit, two USB A to B cables for connecting to computers, a desktop controller for remote switching, a DC 5V/2A power adapter for stable operation, and the user manual.
3. Produto acabadoview
The Unitek HDMI KVM Switch is designed for efficient management of multiple computers. It features a robust metal casing and clearly labeled ports for easy setup.
Painel frontal
- Chave ON / OFF: Botão liga/desliga do dispositivo.
- Botão de mudança: Manually switch between PC1 and PC2.
- Porta de fone de ouvido: Saída de áudio de 3.5 mm para fones de ouvido.
- Porta do microfone: 3.5mm audio input for a microphone.
- USB 3.0 OUT Ports (x3): Connect USB peripherals such as keyboard, mouse, USB flash drives, printers, and mobile hard drives.
Painel traseiro
- Entrada de energia DC 5V: Connect the included 5V/2A power adapter.
- HDMI OUT A & B: Connect to your dual HDMI monitors.
- PC1 IN (HDMI A, HDMI B, USB IN): Connect to the first computer's dual HDMI outputs and USB 3.0 port.
- PC2 IN (HDMI A, HDMI B, USB IN): Connect to the second computer's dual HDMI outputs and USB 3.0 port.
- Desktop Control Port: Connect the wired desktop controller for remote switching.
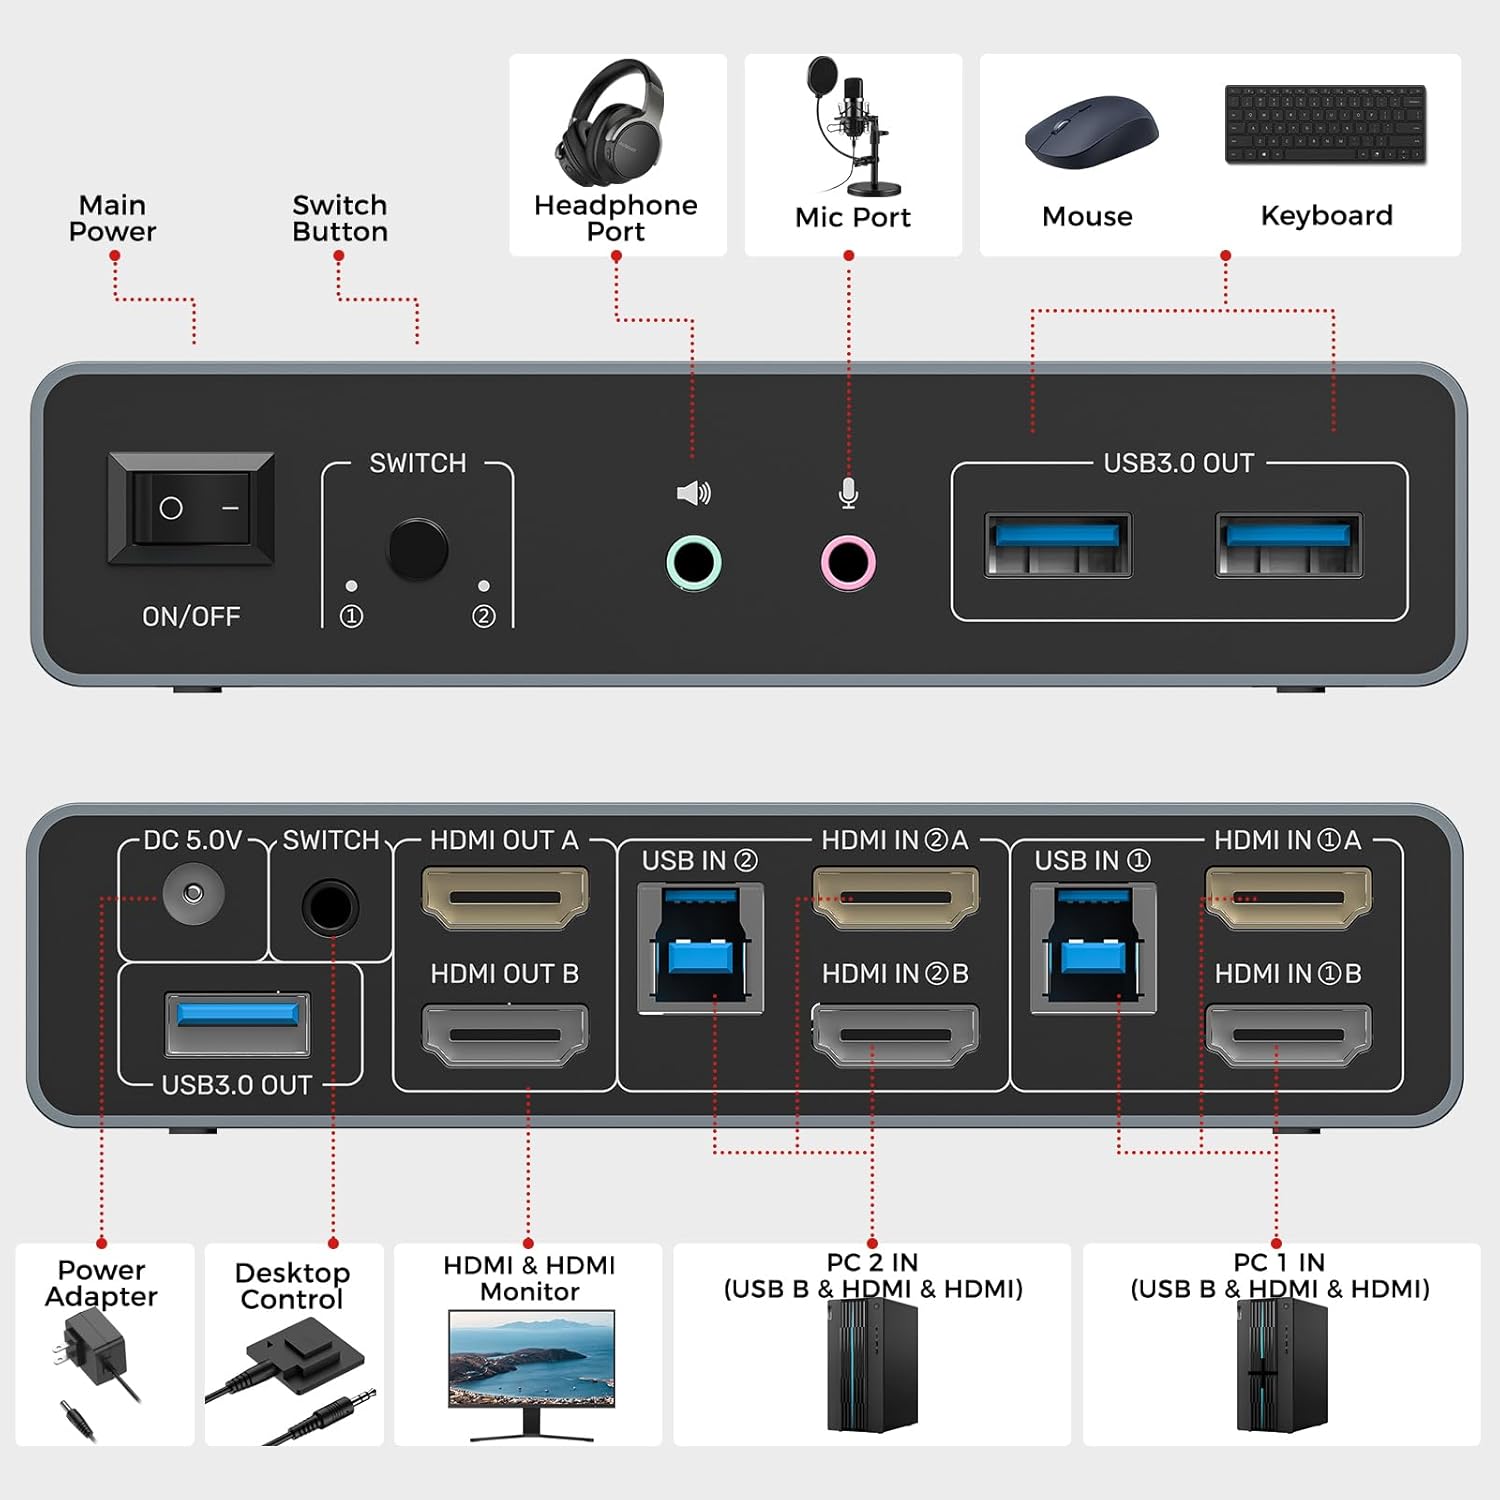
The illustration above highlights the various ports on the front and rear panels of the KVM switch. The front provides convenient access for USB peripherals and audio connections, while the rear panel is dedicated to connecting the two computers, dual monitors, and the power supply.
4. Instruções de configuração
Follow these steps to correctly set up your Unitek HDMI KVM Switch:
- Conexão de energia: Connect the DC 5V/2A power adapter to the KVM switch's DC 5V input port and plug it into a power outlet. This is crucial for stable operation, especially when using high-power USB devices.
- Computer 1 Connection:
- Connect two HDMI cables from the HDMI outputs of PC1 to the "HDMI IN A" and "HDMI IN B" ports under "PC1 IN" on the KVM switch.
- Connect one USB A-to-B cable from a USB 3.0 port on PC1 to the "USB IN" port under "PC1 IN" on the KVM switch.
- Computer 2 Connection:
- Connect two HDMI cables from the HDMI outputs of PC2 to the "HDMI IN A" and "HDMI IN B" ports under "PC2 IN" on the KVM switch.
- Connect one USB A-to-B cable from a USB 3.0 port on PC2 to the "USB IN" port under "PC2 IN" on the KVM switch.
- Conexão do monitor: Connect two HDMI cables from your dual monitors to the "HDMI OUT A" and "HDMI OUT B" ports on the KVM switch.
- Conexão periférica: Connect your keyboard, mouse, and other USB 3.0 peripherals (e.g., USB flash drive, printer, external hard drive) to the "USB 3.0 OUT" ports on the front panel of the KVM switch. If using a microphone or headphones, connect them to the respective 3.5mm audio jacks.
- Desktop Controller (Optional): Connect the wired desktop controller to the "Desktop Control" port on the rear panel for convenient remote switching.
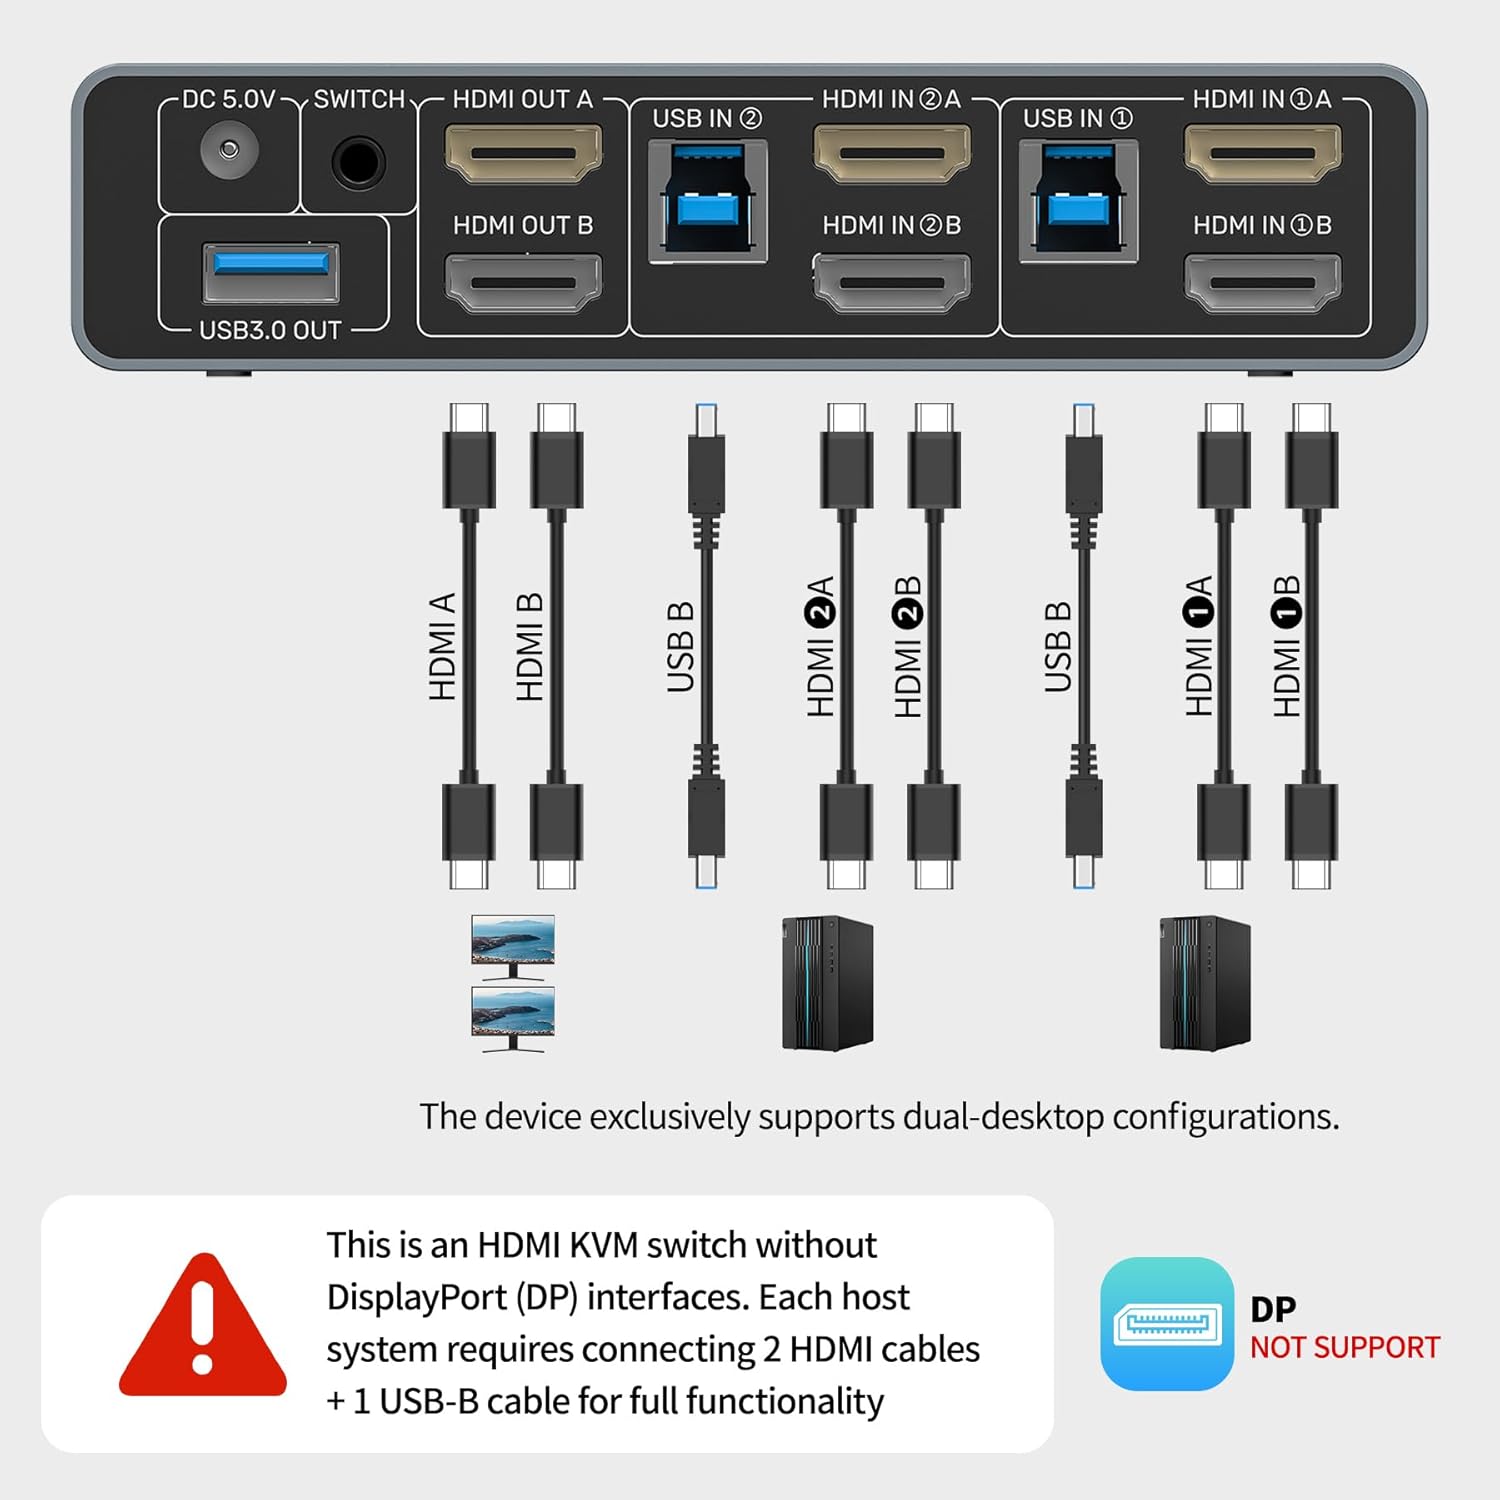
The diagram above provides a clear visual guide for connecting all components to the KVM switch, ensuring proper setup for dual monitor and peripheral sharing between two computers.

This image demonstrates the critical difference between correct and incorrect wiring. For optimal performance, each PC must have two HDMI cables for video and one USB-B cable for data transfer connected to the KVM switch.
This video from Unitek Official provides a concise overview of the KVM switch, highlighting its physical features and demonstrating its intended use in a dual-computer setup.
This video from SuidekDirect offers a practical demonstration of setting up an HDMI KVM switch to manage two computers with dual monitors, showing how to connect all necessary cables and peripherals.
5. Instruções de operação
Once the KVM switch is set up, you can easily switch between your connected computers and manage your display modes.
Alternando entre computadores
There are two convenient methods to switch between PC1 and PC2:
- Botão do painel frontal: Press the "SWITCH" button on the front panel of the KVM switch to toggle between PC1 and PC2.
- Controlador de mesa: Use the wired desktop controller (if connected) to switch between computers with a simple press of its button. This allows you to place the KVM switch out of sight for a cleaner desk.

The image above demonstrates both the manual switch button on the KVM unit and the wired desktop controller, providing flexible options for switching between your connected computers.
Display Modes (Mirror or Extend)
The KVM switch supports both Mirror Mode (Duplicate) and Extend Mode for your dual monitors.
- Sistema Windows: Imprensa Win + P. From the menu, select:
- Duplicate (Mirror Mode): Both screens will display the same content.
- Extend (Extended Mode): Combines both screens into a larger workspace.
- macOS System: After connecting an external display, press Option + F1 (or use the Touch Bar display icon). In the pop-up menu, select "Mirror" or "Extend".

This image clearly illustrates the difference between Extended Mode, which expands your desktop across two screens, and Mirror Mode, which duplicates the display on both monitors.
This video from The Stuff We Use demonstrates the practical application of the KVM switch, showing how a single keyboard, mouse, and HDMI monitor can be used to control two separate computers, illustrating the efficiency of the device.
6. Manutenção
To ensure the longevity and optimal performance of your Unitek HDMI KVM Switch, please follow these maintenance guidelines:
- Limpeza: Use a soft, dry cloth to clean the exterior of the device. Avoid using liquid cleaners or aerosols, which may damage the unit.
- Ventilação: Certifique-se de que o switch KVM esteja posicionado em uma área bem ventilada para evitar superaquecimento. Não bloqueie nenhuma abertura de ventilação.
- Gerenciamento de cabos: Keep cables organized and free from kinks or excessive tension to prevent damage to the cables and ports.
- Fonte de energia: Always use the original DC 5V/2A power adapter provided with the device. Using an incorrect power adapter may cause damage or malfunction.
- Armazenar: If storing the device for an extended period, disconnect all cables and store it in a cool, dry place away from direct sunlight and extreme temperatures.
7. Solução De Problemas
If you encounter issues with your KVM switch, please refer to the following common troubleshooting steps:
- Sem imagem nos monitores:
- Ensure the KVM switch is powered on and the power adapter is securely connected.
- Verify that all HDMI cables are correctly and securely connected from the computers to the KVM switch, and from the KVM switch to the monitors.
- Check the display settings on your computers to ensure the correct output resolution and refresh rate are selected (up to 4K@60Hz).
- Tente reiniciar os computadores e o switch KVM.
- Teclado/Mouse não responde:
- Ensure the USB A-to-B cables are securely connected from both computers to the KVM switch.
- Try connecting the keyboard and mouse to different USB 3.0 OUT ports on the KVM switch.
- Some specialized gaming keyboards/mice may require direct connection to the computer or specific drivers. Try a standard keyboard/mouse to isolate the issue.
- Restart the KVM switch and computers.
- Problemas de comutação:
- Ensure the desktop controller (if used) is properly connected to its dedicated port.
- Verify that the KVM switch is receiving adequate power.
- Problemas de áudio:
- Check that headphones/microphone are correctly plugged into the KVM switch's audio jacks.
- Verify audio output settings on your computers are configured to use the KVM switch's audio device.
- "NOTE: DO NOT COMPATIBLE WITH LAPTOPS!" This KVM switch is specifically designed for desktop computers. Laptops may have different power delivery or video output configurations that are not supported.
8. Especificações
| Dimensões do produto | 3.94 x 1.97 x 0.79 polegadas; 1.15 libras |
| Número do modelo do item | SJW-KM202B |
| Marca | Unitek |
| interface de hardware | USB 3.0, HDMI 2.0 |
| Resolução de vídeo | Up to 4K@60Hz, 2K, 3D, 1080P |
| Suporte HDCP | HDCP 2.2 / 1.4 |
| Velocidade de transferência de dados USB | Até 5 Gbps (USB 3.0) |
| Adaptador de energia | Corrente contínua 5 V/2 A |
| Recurso especial | Plug and Play, Two-way Switching (Button/Desktop Controller) |
| Dispositivos compatíveis | Keyboards, Mice, USB Flash Drives, Printers, Mobile Hard Drives, PCs (Desktop Hosts Only) |
9. Garantia e Suporte
For warranty information, technical support, or any inquiries regarding your Unitek HDMI KVM Switch, please refer to the official Unitek webou entre em contato diretamente com o serviço de atendimento ao cliente. Guarde o comprovante de compra para eventuais solicitações de garantia.


