Introdução
Thank you for choosing the Swiss Pro+ Digital Air Fryer SP-AF6.5L.BG. This appliance is designed to provide a healthier way to cook your favorite foods, using rapid hot air circulation to fry, grill, roast, and bake with little to no added oil. Please read this instruction manual thoroughly before first use to ensure safe and optimal operation of your new air fryer. Keep this manual for future reference.
Instruções importantes de segurança
Ao usar aparelhos elétricos, precauções básicas de segurança devem sempre ser seguidas para reduzir o risco de incêndio, choque elétrico e ferimentos às pessoas, incluindo o seguinte:
- Leia todas as instruções antes de usar o aparelho.
- Não toque em superfícies quentes. Use alças ou botões.
- Para evitar choques elétricos, não mergulhe o cabo, os plugues ou o aparelho em água ou qualquer outro líquido.
- É necessária supervisão rigorosa quando qualquer aparelho for usado por crianças ou perto delas.
- Desligue da tomada quando não estiver em uso e antes de limpar. Deixe esfriar antes de colocar ou retirar peças.
- Não opere nenhum aparelho com o cabo ou plugue danificado ou após o aparelho apresentar mau funcionamento ou ter sido danificado de qualquer forma.
- O uso de acessórios não recomendados pelo fabricante do aparelho pode causar ferimentos.
- Não utilize ao ar livre.
- Não deixe o cabo pendurado na borda da mesa ou do balcão, nem toque em superfícies quentes.
- Não coloque sobre ou perto de um queimador a gás ou elétrico quente, nem em um forno aquecido.
- Deve-se ter extremo cuidado ao mover um aparelho que contenha óleo quente ou outros líquidos quentes.
- Sempre conecte primeiro o plugue ao aparelho e, em seguida, ligue o cabo na tomada. Para desconectar, gire qualquer controle para a posição "desligado" e, em seguida, retire o plugue da tomada.
- Não utilize o aparelho para outro fim que não o pretendido.
- Certifique-se de que o aparelho esteja colocado sobre uma superfície estável, nivelada e resistente ao calor.
- Não bloqueie nenhuma abertura de ventilação.
- Nunca encha o cesto com óleo.
Produto acimaview e Componentes
Familiarize yourself with the main parts of your Swiss Pro+ Digital Air Fryer.
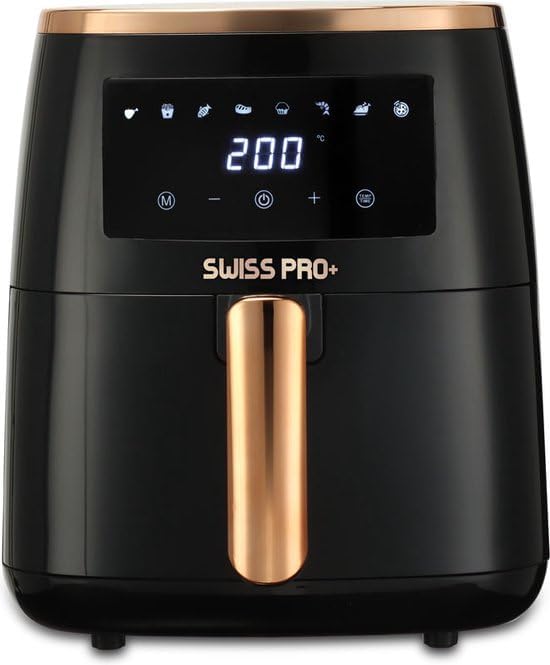
Figura 1: Frente view of the Swiss Pro+ Digital Air Fryer, showcasing the digital display and control panel.
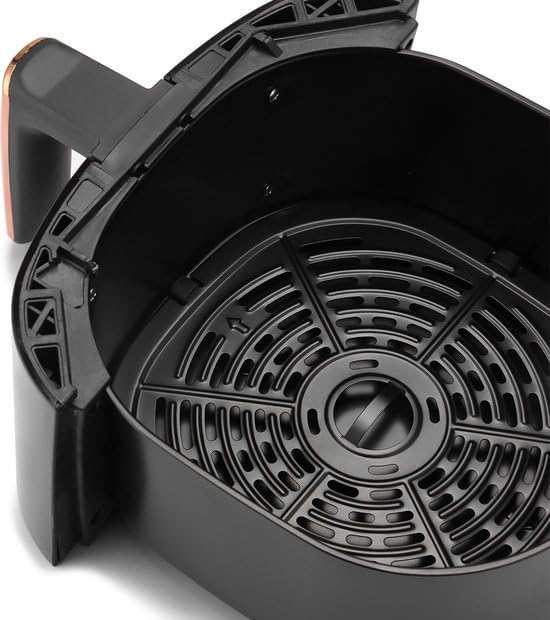
Figura 2: The removable frying basket and the grill plate, designed for easy cleaning and efficient cooking.

Figura 3: Principal view of the air fryer, highlighting the digital control panel with various preset cooking functions.
- Unidade principal: Abriga o elemento de aquecimento e o ventilador para circulação de ar quente.
- Painel de controle digital: Visor sensível ao toque para ajustar a temperatura, a hora e selecionar as configurações predefinidas.
- Cesta de Fritura: Removable, non-stick coated basket for holding food.
- Grill Plate (or Crisper Plate): Sits at the bottom of the frying basket to allow air circulation around food and collect excess fat.
- Lidar: Cabo ergonômico para puxar a cesta de fritura com segurança.
Configurar
- Desembalagem: Remova cuidadosamente todos os materiais de embalagem da fritadeira a ar.
- Limpeza Inicial: Before first use, clean the frying basket and grill plate with hot water, dish soap, and a non-abrasive sponge. Wipe the main unit with a damp pano. Certifique-se de que todas as peças estejam completamente secas antes da montagem.
- Colocação: Place the air fryer on a stable, level, heat-resistant surface, away from walls and other appliances to allow for proper air circulation. Ensure there is at least 10 cm (4 inches) of free space on the back, sides, and above the appliance.
- Conexão de energia: Conecte o cabo de alimentação a uma tomada aterrada.
Instruções de operação
Operação geral
- Preparar comida: Coloque os ingredientes na cesta da fritadeira. Não a encha demais para garantir um cozimento uniforme.
- Inserir Cesta: Deslize a cesta de fritura de volta para a unidade principal até que ela se encaixe no lugar.
- Ligar: Press the power button on the digital control panel to turn on the appliance.
- Definir temperatura e tempo:
- Use the temperature control buttons (usually '+' and '-') to adjust the desired cooking temperature.
- Use the time control buttons (usually '+' and '-') to set the cooking duration.
- Use Preset Programs: The digital interface features quick-select programs for common foods like frozen fries, meat, fish, and chicken legs. Simply touch the corresponding icon to activate a preset. The appliance will automatically set the optimal temperature and time.
- Comece a Cozinhar: Press the start/pause button to begin the cooking process. The air fryer will preheat briefly, then start cooking.
- Cesto para agitar (opcional): For some foods, it is recommended to shake the basket halfway through the cooking time to ensure even browning. The air fryer may beep to remind you. Carefully pull out the basket, shake, and reinsert.
- Fim da receita: The air fryer will beep when the set cooking time has elapsed. Carefully pull out the basket and transfer the cooked food to a serving plate.
Função Manter Aquecido
The Swiss Pro+ Air Fryer includes a convenient "Keep Warm" function. After cooking is complete, you can activate this function to keep your food warm for up to 30 minutes. This allows flexibility in serving times without compromising food quality.
Manutenção e Limpeza
A limpeza regular garante a longevidade e o desempenho ideal da sua fritadeira a ar.
- Desconecte e refresque-se: Desligue sempre a fritadeira da tomada e deixe-a arrefecer completamente antes de a limpar.
- Limpe a cesta e a grelha: The non-stick coated basket and grill plate are dishwasher safe. Alternatively, you can wash them with hot water, dish soap, and a non-abrasive sponge. Avoid using metal utensils or abrasive cleaning materials that could damage the non-stick coating.
- Interior limpo: Limpe o interior do aparelho com um panoamp pano. Para resíduos persistentes, use um detergente suave.
- Exterior limpo: Limpe o exterior da fritadeira com anúncioamp pano. Não mergulhe a unidade principal em água ou qualquer outro líquido.
- Armazenar: Certifique-se de que todas as peças estejam limpas e secas antes de guardar a fritadeira em local fresco e seco.
Solução de problemas
Caso encontre algum problema com sua fritadeira a ar, consulte a tabela abaixo para problemas comuns e suas soluções.
| Problema | Possível causa | Solução |
|---|---|---|
| A fritadeira de ar comprimido não liga. | O aparelho não está ligado na tomada. A tomada não está funcionando. | Certifique-se de que o cabo de alimentação esteja firmemente conectado a uma tomada em funcionamento. Verifique o disjuntor. |
| Os alimentos não são cozinhados uniformemente. | Basket is overfilled. Food pieces are too large. | Do not overfill the basket. Cut food into smaller, more uniform pieces. Shake the basket halfway through cooking. |
| Sai fumaça branca do aparelho. | Resíduos de gordura de uso anterior. Excesso de óleo nos alimentos. | Clean the basket and grill plate thoroughly. Remove excess oil from food before placing it in the air fryer. |
| A comida não é crocante. | Umidade excessiva nos alimentos. Falta de óleo (para certos alimentos). Temperatura muito baixa. | Pat food dry before cooking. Lightly brush with oil if desired. Increase temperature or cooking time. |
If the problem persists after checking these solutions, please contact customer support.
Especificações
| Recurso | Detalhe |
|---|---|
| Marca | Swiss Pro+ |
| Número do modelo | SP-AF6.5L.BG |
| Cor | Preto |
| Capacidade | 6.5 litros |
| Potência / Wattage | 1500 Watts |
| Material | Aço inoxidável |
| Dimensões do produto (P x L x A) | 42 x 39 x 44 cm |
| Peso do item | 6 quilos |
| Características especiais | Programmable, Digital Display, Keep Warm Function, Hero Air Technology |
| Método de controle | Tocar |
Garantia e Suporte
For warranty information and customer support, please refer to the warranty card included with your product or visit the official Swiss Pro+ webGuarde seu comprovante de compra para eventuais solicitações de garantia.
Vídeos oficiais do produto
There are no official product videos provided for this model at this time. Please refer to the written instructions and images for guidance.


