1. Introdução
This manual provides essential information for the safe and efficient operation of your Pretul DESI-36P2 3.6V Cordless Screwdriver. Please read it thoroughly before first use and keep it for future reference. This compact cordless screwdriver is designed for light-duty fastening tasks, featuring a two-position handle and an integrated LED work light.

Figura 1: Pretul DESI-36P2 Cordless Screwdriver. This image shows the screwdriver in its straight configuration, highlighting its compact design and yellow and black color scheme.
2. Informações de segurança
Sempre observe as precauções básicas de segurança ao usar ferramentas elétricas para reduzir o risco de incêndio, choque elétrico e ferimentos pessoais.
- Segurança da Área de Trabalho: Mantenha sua área de trabalho limpa e bem iluminada. Áreas desordenadas ou escuras convidam a acidentes.
- Segurança elétrica: Não exponha ferramentas elétricas à chuva ou condições úmidas. A entrada de água em uma ferramenta elétrica aumentará o risco de choque elétrico.
- Segurança pessoal: Fique alerta, observe o que está fazendo e use o bom senso ao operar uma ferramenta elétrica. Não use uma ferramenta elétrica quando estiver cansado ou sob a influência de drogas, álcool ou medicamentos.
- Uso e cuidados com a ferramenta: Não force a ferramenta elétrica. Use a ferramenta elétrica correta para sua aplicação. Ele executará o trabalho melhor e com mais segurança no ritmo para o qual foi projetado.
- Cuidados com a bateria: Recarregue somente com o carregador especificado pelo fabricante. Um carregador que seja adequado para um tipo de bateria pode criar risco de incêndio quando usado com outra bateria.
3. Componentes e características do produto
Familiarize yourself with the parts of your Pretul DESI-36P2 cordless screwdriver.
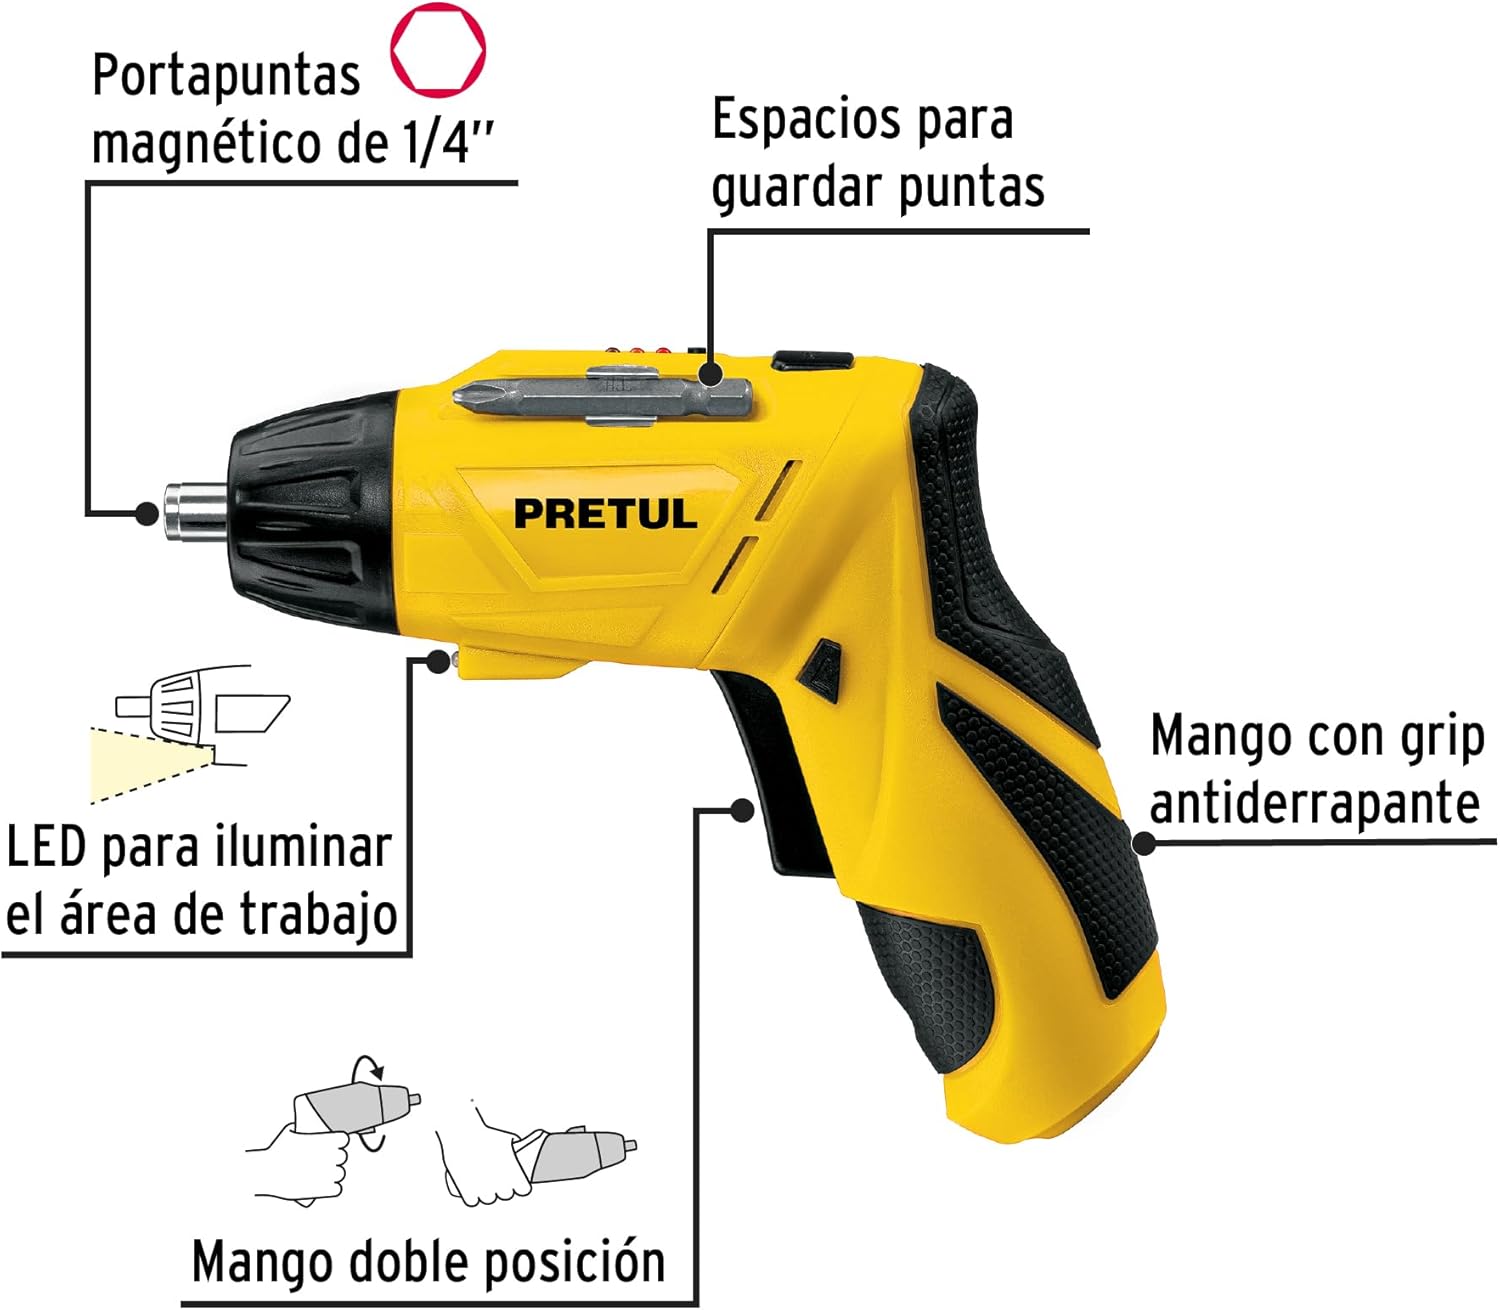
Figura 2: Key features of the Pretul DESI-36P2. This diagram illustrates the magnetic 1/4" bit holder, bit storage slots, anti-slip grip handle, LED work light, and the two-position handle mechanism.
- Magnetic 1/4" Hex Bit Holder: Securely holds screwdriver bits for quick changes.
- Bit Storage Slots: Conveniently located on the tool for storing extra bits.
- Anti-slip Grip Handle: Proporciona um manuseio confortável e seguro durante a operação.
- Luz de trabalho LED: Illuminates the work area for improved visibility in dimly lit spaces.
- Two-Position Handle: Allows the screwdriver to be used in a straight or pistol-grip configuration for versatility and access in tight spaces.
- Interruptor de avanço/reverso: Controls the direction of rotation for tightening and loosening screws.
- Botão de energia: Ativa a chave de fenda.
4. Configuração
4.1 Carregamento Inicial
Before first use, fully charge the screwdriver's internal battery. Connect the charger to a standard electrical outlet and then to the charging port on the screwdriver. The charging indicator (if present) will show the charging status. Disconnect the charger once the battery is fully charged.
4.2 Attaching Screwdriver Bits
- Select the appropriate 1/4" hex screwdriver bit for your task.
- Insert the bit firmly into the magnetic bit holder at the front of the screwdriver until it is securely seated.
- To remove a bit, simply pull it out from the holder.
4.3 Ajuste da posição da alça
The screwdriver features a two-position handle for enhanced versatility:
- Pistol Grip: Standard configuration for most tasks.
- Straight Grip: For reaching into confined spaces. To change the handle position, firmly grasp the handle and the body of the screwdriver, then pivot the handle until it locks into the desired position.
5. Instruções de operação
5.1 Ligar/Desligar
Press and hold the power button to activate the screwdriver. Release the button to stop operation. The LED work light will activate when the power button is pressed.
5.2 Selecionando a direção de rotação
Use the forward/reverse switch, typically located near the trigger, to select the desired rotation direction:
- Push the switch to the left for forward rotation (tightening screws).
- Push the switch to the right for reverse rotation (loosening screws).
- Ensure the switch is in the center position to lock the tool and prevent accidental activation.
5.3 parafusos de fixação
- Ensure the correct bit is installed and the rotation direction is set to forward.
- Place the bit onto the screw head, applying gentle pressure.
- Press the power button to start driving the screw. Release the button once the screw is fully seated or the desired torque is reached.
5.4 Afrouxando Parafusos
- Ensure the correct bit is installed and the rotation direction is set to reverse.
- Place the bit onto the screw head, applying gentle pressure.
- Press the power button to start loosening the screw. Release the button once the screw is free.
6. Manutenção
A manutenção regular garante o desempenho ideal e prolonga a vida útil da sua ferramenta.
- Limpeza: Mantenha as aberturas de ventilação da ferramenta desobstruídas e livres de detritos. Use um pano macio e seco.amp Use um pano para limpar a parte externa. Não utilize produtos químicos agressivos ou abrasivos.
- Suporte para bits: Periodically inspect the bit holder for wear or damage. Clean any accumulated dust or metal shavings.
- Armazenamento da bateria: Store the screwdriver in a cool, dry place away from direct sunlight and extreme temperatures. For long-term storage, ensure the battery is partially charged (around 50%).
- Inspeção: Regularly check for loose screws, damaged cords (if applicable), or any other conditions that may affect safe operation.
7. Solução De Problemas
If you encounter issues with your screwdriver, refer to the following common problems and solutions:
| Problema | Possível causa | Solução |
|---|---|---|
| A parafusadeira não liga. | A bateria está descarregada. | Carregue a bateria totalmente. |
| A chave de fenda não tem potência. | A bateria está fraca. | Recarregue a bateria. |
| A ponta escapa da cabeça do parafuso. | Broca de tamanho incorreto ou broca gasta. | Use a broca do tamanho correto; substitua as brocas desgastadas. |
| Handle does not lock into position. | Not fully pivoted. | Ensure the handle is fully pivoted until it clicks into place. |
Se o problema persistir após tentar essas soluções, entre em contato com o suporte ao cliente.
8. Especificações
Technical specifications for the Pretul DESI-36P2 Cordless Screwdriver.

Figura 3: Dimensions of the Pretul DESI-36P2. This image shows the screwdriver with measurements indicating a length of 17.5 cm and a height of 13 cm.
| Recurso | Especificação |
|---|---|
| Número do modelo | DESI-36P2 (26402) |
| Marca | preço |
| Fonte de energia | Bateria |
| Bateria Voltage | 3.6 Volts |
| Velocidade | 230 RPM |
| Torque | 3E+1 Pound-inches (approximately 30 in-lbs) |
| Porta-bits | 1/4" Hex Magnetic |
| Material | Plástico, Metal |
| Dimensões (L x H) | 17.5 cm x 13 cm (aproximadamente, com base na imagem) |
| Peso | 530 g (0.53 kg) |
| Componentes incluídos | 5 Phillips bits 1" (PH1, PH2, PH3), Charger, 2 Phillips bits 2" (PH1, PH2), 1/4" Magnetic extension |
9. Garantia e Suporte
The Pretul DESI-36P2 Cordless Screwdriver comes with a Garantia de 1 ano a partir da data da compra. Guarde o comprovante de compra para eventuais solicitações de garantia.

Figura 4: Product packaging showing the included components and a "1 year warranty" seal.
For technical support, service, or warranty inquiries, please contact Pretul customer service through their official channels or the retailer where the product was purchased.