1. Introdução
Obrigado pela compra.asing the Karlsson Alarm Clock Duo. This manual provides detailed instructions for setting up, operating, and maintaining your new alarm clock. Please read this manual thoroughly before use and retain it for future reference.
2. Informações de segurança
- Mantenha o dispositivo longe de água e alta umidade.
- Não exponha o dispositivo à luz solar direta ou a temperaturas extremas.
- Não tente desmontar ou reparar o dispositivo por conta própria. Encaminhe todos os serviços de manutenção a pessoal qualificado.
- Utilize apenas o tipo de bateria especificado. Certifique-se da polaridade correta ao inserir as baterias.
- Remova as pilhas se o dispositivo não for usado por um longo período.
3. Conteúdo da embalagem
Por favor, verifique se todos os itens estão presentes:
- Karlsson Alarm Clock Duo (Model KA5954BK)
- Manual do usuário (este documento)
Observação: as pilhas não estão incluídas e devem ser adquiridas separadamente.
4. Produto acabadoview
The Karlsson Alarm Clock Duo features a classic analog clock face combined with a modern digital display for temperature and humidity. Its compact design makes it suitable for various settings.

Figura 1: Frente view of the Karlsson Alarm Clock Duo. The top section features an analog clock with a white face and black numbers, while the bottom section has a digital display showing temperature (e.g., 22.0 °C) and relative humidity (e.g., 58%).

Figura 2: The alarm clock viewed from the side, demonstrating its compact size and matte black finish. It is shown on a surface next to a white desk lamp, indicating its suitability for bedside tables or desks.
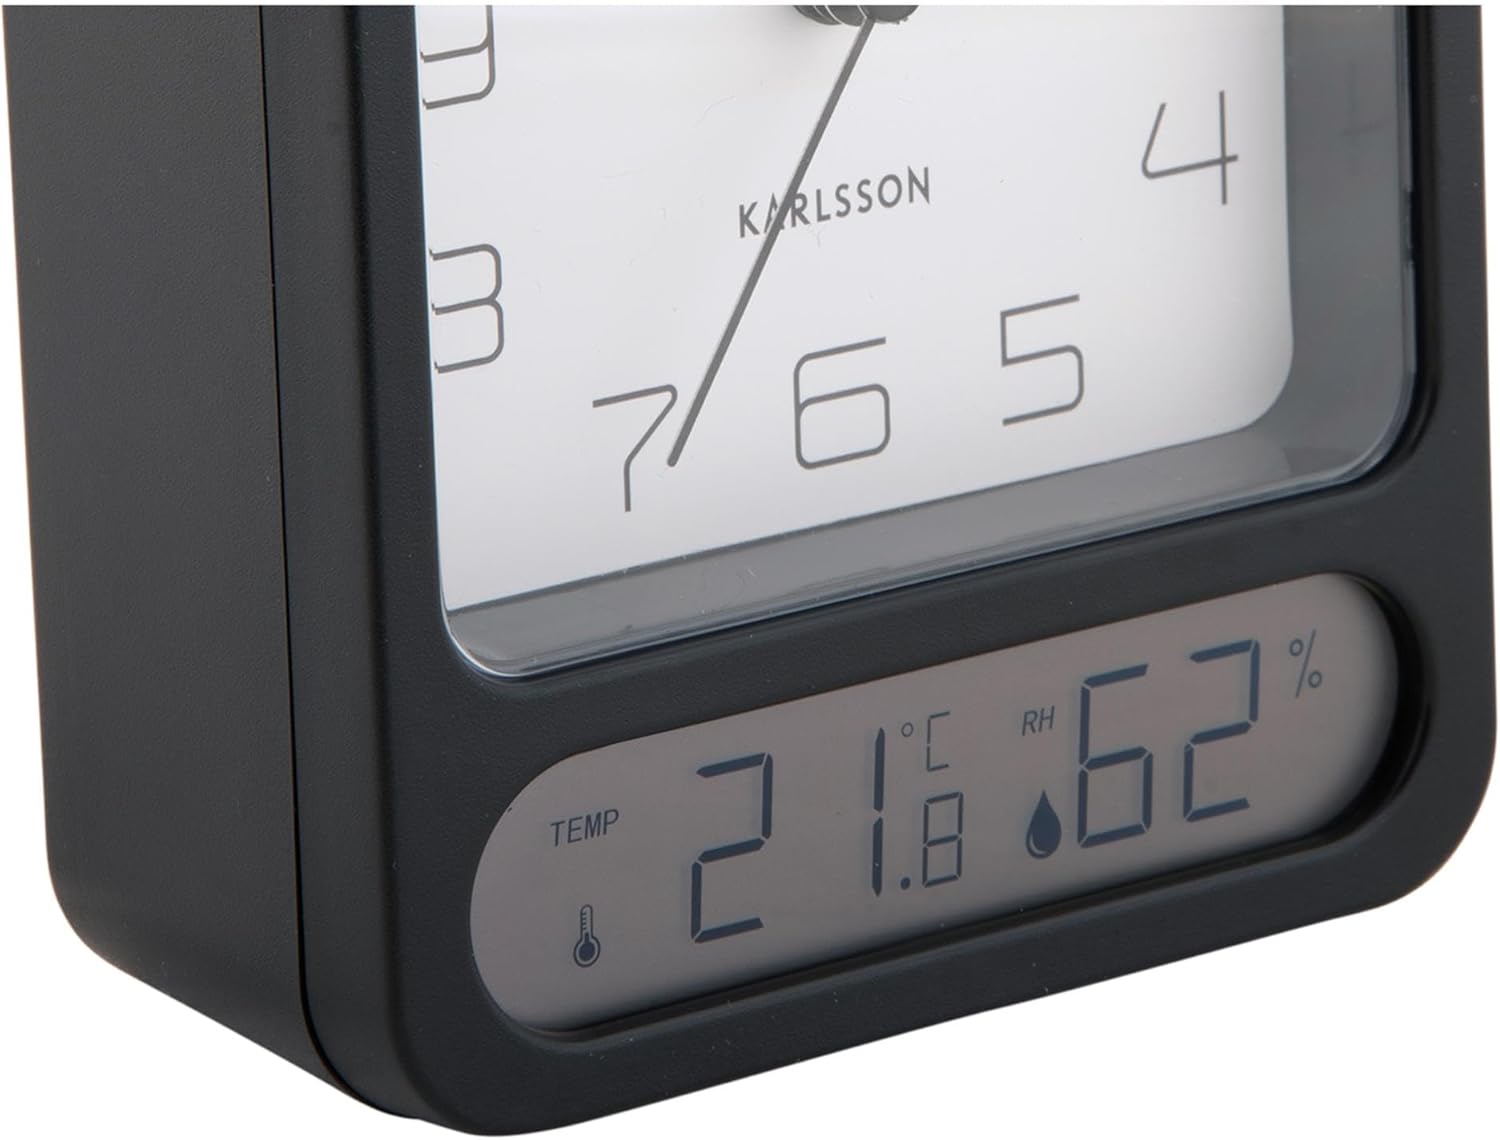
Figura 3: A detailed close-up of the digital display, clearly showing the temperature in Celsius (e.g., 21.8 °C) and the relative humidity percentage (e.g., 62% RH). Small icons for temperature and humidity are also visible.

Figura 4: An angled perspective of the alarm clock, providing a comprehensive view of its design, including the square analog clock face and the rectangular digital display below it, all encased in a matte black frame.
5. Configuração
5.1. Instalação da bateria
- Localize a tampa do compartimento da bateria na parte traseira do despertador.
- Remove the cover by sliding or lifting it according to the markings.
- Insert the required batteries (typically 1x AA for the analog clock and 2x AAA for the digital display, though specific types may vary - refer to the compartment markings) ensuring correct polarity (+ and -).
- Recoloque a tampa do compartimento da bateria com segurança.
5.2. Definição da hora
- On the back of the clock, locate the time setting knob (usually labeled "TIME SET" or similar).
- Rotate the knob in either direction to adjust the hour and minute hands to the current time.
5.3. Configurando o Alarme
- Locate the alarm setting knob (usually labeled "ALARM SET" or similar) on the back of the clock.
- Rotate this knob to set the alarm hand to your desired alarm time.
- Locate the alarm ON/OFF switch (often a small slider or button). Slide it to the "ON" position to activate the alarm.
6. Instruções de operação
6.1. Lendo as horas
The current time is displayed on the analog clock face with hour, minute, and second hands.
6.2. Reading Temperature and Humidity
The digital display at the bottom of the clock shows the current room temperature (in Celsius or Fahrenheit, depending on model) and relative humidity percentage. There may be a button (e.g., "°C/°F") to switch between temperature units if applicable.
6.3. Função de alarme
- When the alarm is set to "ON", it will sound at the designated alarm time.
- To stop the alarm, slide the alarm ON/OFF switch to the "OFF" position.
- Função soneca: If your model includes a snooze button (often a large button on top), pressing it during an active alarm will temporarily silence the alarm for a few minutes before it sounds again.
7. Manutenção
7.1. Limpeza
Wipe the clock with a soft, dry cloth. Do not use abrasive cleaners or solvents, as these may damage the finish or display.
7.2. Substituição da bateria
Replace batteries when the clock hands slow down, the alarm becomes weak, or the digital display fades or stops working. Follow the battery installation steps in Section 5.1.
8. Solução De Problemas
| Problema | Possível causa | Solução |
|---|---|---|
| Clock not working / Digital display off | Pilhas descarregadas ou inseridas incorretamente. | Substitua as pilhas, certificando-se da polaridade correta. |
| Alarme não soa | Alarm is not activated (OFF position) or set incorrectly. | Ensure alarm switch is ON and alarm time is set correctly. |
| Hora incorreta exibida | Time was not set correctly or batteries are low. | Reset the time. Replace batteries if necessary. |
| Temperatura/umidade imprecisa | Obstrução do sensor ou condições ambientais extremas. | Ensure the clock is in a well-ventilated area, away from direct heat sources or drafts. Allow time for readings to stabilize. |
9. Especificações
| Número do modelo | KA5954BK |
| Marca | Karlsson |
| Dimensões (C x L x A) | 9.7 x 4.5 x 12 cm |
| Peso | 600 g |
| Fonte de energia | Bateria (não incluída) |
| ASIN | B0DHL8TMB6 |
10. Garantia e Suporte
This Karlsson product is covered by a manufacturer's warranty. Please refer to the warranty card included with your purchase or visit the official Karlsson website para obter termos e condições detalhados da garantia.
For technical support, troubleshooting assistance, or inquiries regarding your product, please contact Karlsson customer service through their official website ou as informações de contato fornecidas com a documentação da sua compra.