Introdução
Thank you for choosing the TARSHYRY Electric Milk Frother. This manual provides essential information for the safe and efficient operation of your new appliance. Please read it thoroughly before first use and keep it for future reference.
Instruções de segurança
- Leia todas as instruções antes de usar.
- Não mergulhe a unidade base em água ou outros líquidos.
- Certifique-se de que a fonte de alimentação corresponda ao voltage especificado no aparelho.
- Mantenha fora do alcance de crianças.
- Não opere se o cabo de alimentação ou o plugue estiverem danificados.
- Always unplug the frother when not in use and before cleaning.
- Não ultrapasse as linhas de enchimento máximo para evitar transbordamento.
- Use only with the provided accessories.
Produto acimaview
Componentes
- 1 x batedor de leite
- 1 x Mixer (Whisk)
- 1 x Lid
- 1 x Cabo de alimentação
- 1 x Manual
Principais características
- 4-in-1 Working Modes: Offers options for cappuccino foam, latte frothed milk, heating milk/chocolate, and cold milk froth.
- 350ML Large Capacity: 450W power with a 350ml capacity for milk warming and 150ml for milk foaming.
- Fácil de limpar: Features a non-stick interior and a detachable blender for simple cleaning.
- Quiet & Anti-Slip Base: Operates quietly and has an anti-slip base for stability.
- Função de desligamento automático: Automatically turns off when the desired temperature is reached.
Guia visual de recursos

Figure 1: The 4-in-1 Multi-Functional Milk Frother modes.
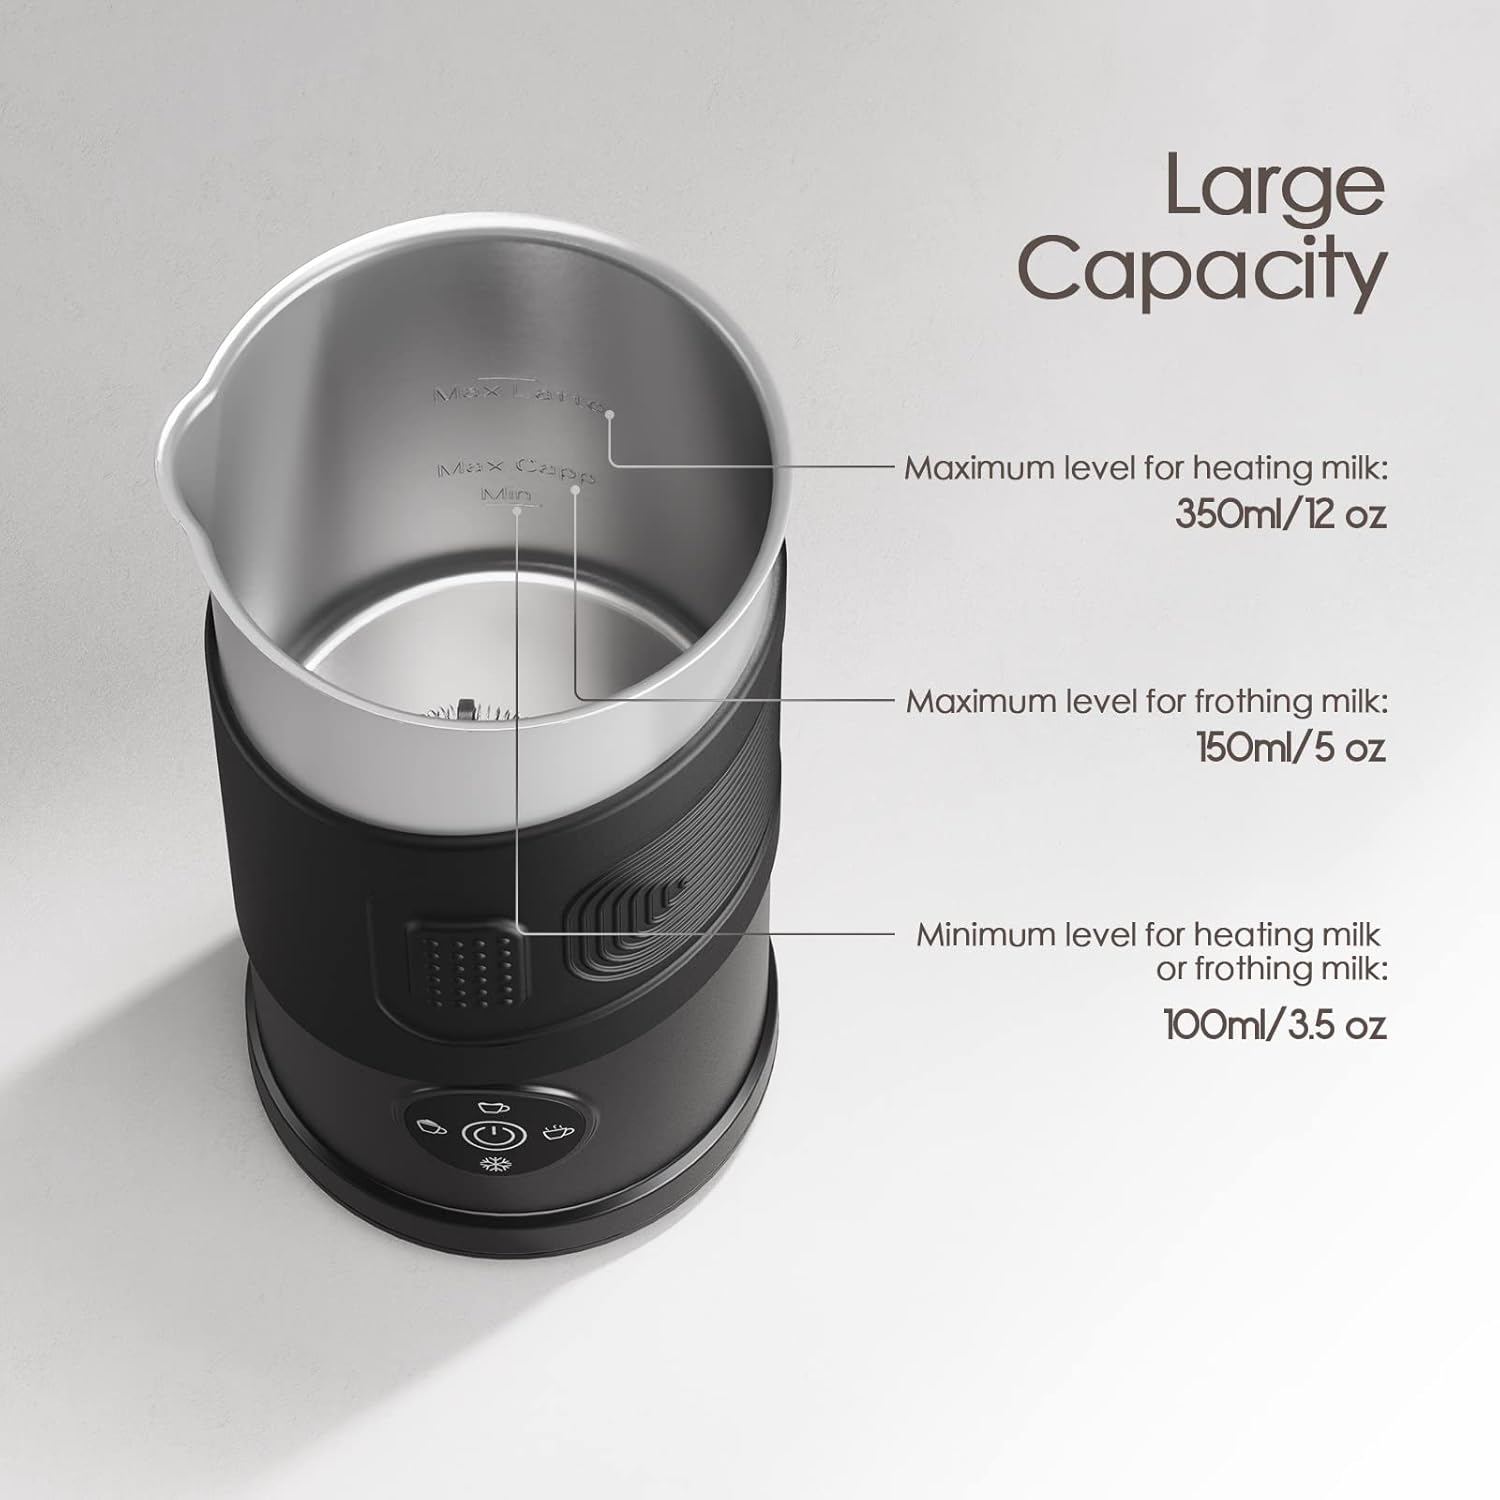
Figure 2: Internal capacity markings for heating and frothing milk.

Figura 3: Detalhado view of the frother's design elements.
Especificações
| Atributo | Valor |
|---|---|
| Marca | TARSÍRIA |
| Poder | 450 W |
| Maximum Milk Warming Capacity | 350ML |
| Maximum Milk Foaming Capacity | 150ML |
| Capacidade Mínima | 100ML |
| Tamanho do produto | 192 x 100 mm / 7.55 x 3.93 pol. |
| Peso do produto | 0.64 kg / 22.57 onças |
| Material | Aço inoxidável |
| Nome do modelo | TARSHYRYrifpm52xku-US |
Configurar
- Descompacte: Remova cuidadosamente todos os componentes da embalagem.
- Limpar: Wash the frother jug interior, lid, and whisk with warm soapy water before first use. Rinse thoroughly and dry.
- Colocação: Place the frother base on a stable, flat, and dry surface away from water sources.
- Conexão de energia: Plug the power cable into a suitable electrical outlet. The frother will emit a beep, indicating it is ready for use.
Instruções de operação
Your TARSHYRY Electric Milk Frother offers four distinct modes for various milk preparations. Ensure the correct whisk attachment is in place for frothing or heating.
Video 1: Demonstration of the 4-in-1 Milk Frother functions, including frothing and heating milk.
Operação geral:
- Ensure the frother is clean and dry before adding milk.
- Pour milk into the frother jug, observing the MIN and MAX fill lines for your desired function.
- Coloque a tampa firmemente no vaporizador.
- Press the power button to cycle through the modes until the desired indicator light is illuminated.
- The frother will automatically stop when the process is complete.
Seleção de modo:
- Cappuccino Foam (Hot Froth): For rich, dense foam. Fill milk between MIN and MAX frothing line (150ml max). Press the button until the cappuccino icon lights up.
- Latte Frothed Milk (Hot Froth): For lighter, creamy foam. Fill milk between MIN and MAX frothing line (150ml max). Press the button until the latte icon lights up.
- Heating Milk / Hot Chocolate: For warming milk without frothing, or preparing hot chocolate. Remove the frothing whisk and use the heating whisk. Fill milk between MIN and MAX heating line (350ml max). Press the button until the heating icon lights up.
- Espuma de Leite Frio: For cold frothed milk. Fill milk between MIN and MAX frothing line (150ml max). Press the button until the cold froth icon lights up.
Note: For best frothing results, use cold milk (around 4-6°C / 39-43°F) and ensure the frothing whisk is properly installed.
Manutenção e Limpeza
Regular cleaning ensures optimal performance and longevity of your frother.
- Desconecte: Always unplug the frother from the power outlet and allow it to cool down completely before cleaning.
- Desmontar: Remove the lid and the whisk from the frother jug.
- Jarro limpo: The non-stick interior of the frother jug can be cleaned with a soft, damp cloth or sponge and mild dish soap. Avoid abrasive materials that could scratch the surface.
- Clean Whisk & Lid: The whisk and lid can be washed with warm soapy water. Rinse thoroughly.
- Base Limpa: Limpe a parte externa da base do espumador com um pano.amp pano. Nunca mergulhe a base em água.
- Seco: Certifique-se de que todas as peças estejam completamente secas antes de remontá-las e guardá-las.
Solução de problemas
| Problema | Possível causa | Solução |
|---|---|---|
| O vaporizador não liga | Não conectado ou conexão solta | Ensure the power cable is securely plugged into the outlet and the frother base. |
| Milk not frothing or heating properly | Incorrect milk level, wrong whisk, or milk type | Check milk levels against MIN/MAX lines. Ensure the correct whisk is installed. Use fresh, cold milk (dairy or suitable plant-based). |
| Overflow during operation | Milk filled above MAX line | Always observe the MAX fill lines for frothing (150ml) and heating (350ml). |
| Ruído incomum | Whisk not properly seated or foreign object | Ensure the whisk is correctly placed on the spindle. Check for any obstructions in the jug. |
Garantia e Suporte
This product is covered by a standard manufacturer's warranty. For specific warranty details, please refer to the documentation included in your product packaging or contact TARSHYRY customer support. If you encounter any issues or have questions not addressed in this manual, please reach out to our customer service team for assistance.
Suporte ao cliente: Please refer to your purchase receipt or the manufacturer's website para informações de contato.